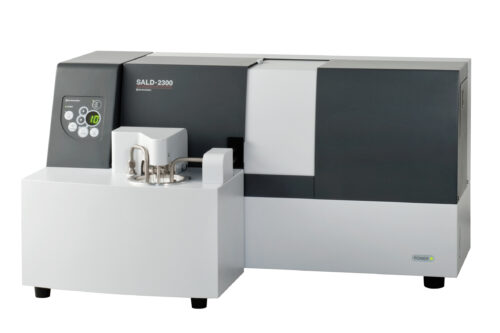
SALD-2300
Laser Diffraction Particle Size Analyzer
| Test Type | Optical ultrasound |
| Type | Desktop unit |
Applicable to a Wide Range of Applications Using Optional Units and Application Sof tware Packages
Provides Accurate Evaluation of the Change in Par ticle Size Distribution, Conforming to ISO13320
Laser Diffraction Particle Size Analysis?
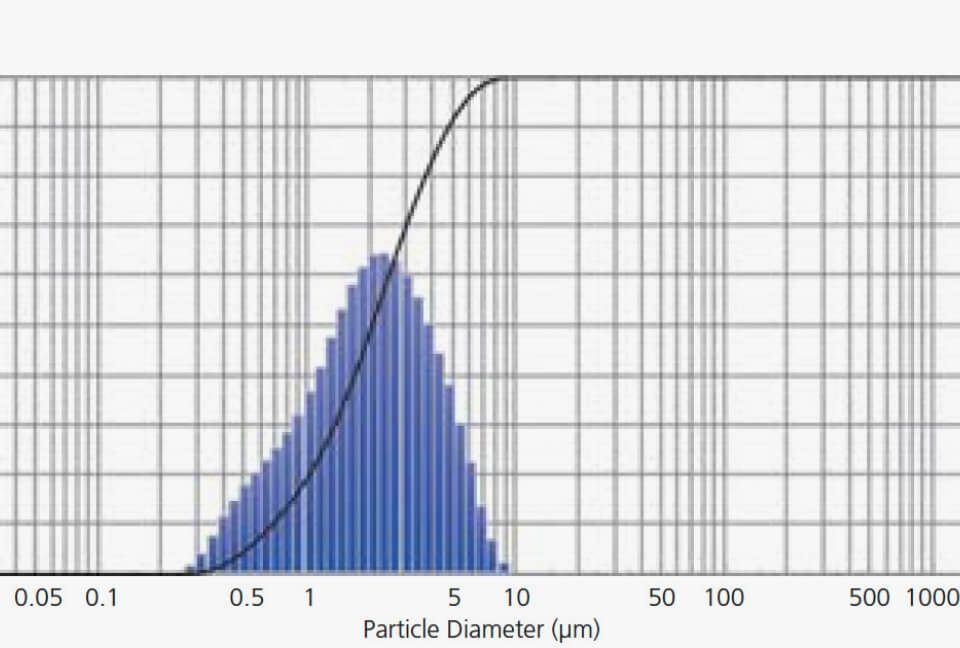
Particle size distribution can be calculated using the light intensity distribution pattern of scattered light which is
generated from sample particles when laser irradiates them. This is the main particle size analysis method because it has excellent properties such as a wide measurement range, a short measurement time, and the ability to measure both wet and dry samples. Please refer to page 19 for the measurement principle.
- Wide applicability
- High resolution
- High concentration
- High repeatability
- High reliability
- High sensitivity
- High throughput
- High efficiency
- High analysis capability
Powerful new functions have been added to accurately evaluate the change in particle size distribution.
Particle size distribution can have a major effect on the characteristics desired for a given application or objective, or on the performance and quality of a final product. A particle size analyzer with the ability to precisely measure particle size distribution is an essential tool in today’s laboratory. The SALD-2300 is that tool. With a variety of optional units and application software packages, the SALD-2300 can easily address the application requirements in a variety of industries, including pharmaceuticals, cosmetics, foods, drinks, pigments, paints, ceramics and electronic materials.
The following three functions have been added to ensure the accurate evaluation of changes in particle size distribution, which is caused by time course or particle concentration.
1. Wide particle concentration range from 0.1ppm to 20%.
2. Continuous measurement function at minimum 1-second intervals
3. Wide measurement range from 17nm to 2500 μm
SALD-2300 maintains data compatibility with previous products such as the SALD-2001, SALD-2101, and SALD-2201.
Wide applicability
Particle size distribution can be calculated using the light intensity distribution pattern of scattered light which is generated from sample particles when laser irradiates them. This is the main particle size analysis method because it has excellent properties such as a wide measurement range, a short measurement time, and the ability to measure both wet and dry samples. Please refer to page 19 for the measurement principle.
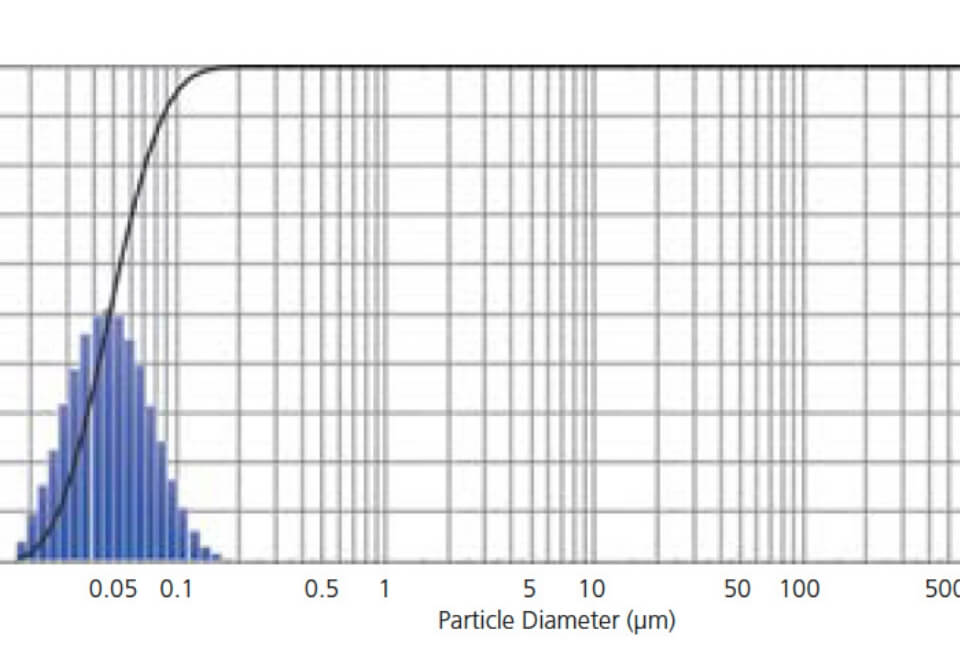
PSL particles 50nm median diameter

Stainless balls of 2mm diameter
The system configuration can be optimized to address various uses, purposes, measurement objects, environments and conditions.
Various sample amounts (Suspension) can be selected according to measurement objects and purposes.
- Sample amount for SALD-MS23 is variable: 100mL, 200mL, or 300mL.
- Sample amount for batch cell SALD-BC23 is 12mL.
- In the case of high-concentration sample measurement system SALD-HC23, optional indentation can be used for sample amounts ranging from 15μL to 150μL.
High resolution
Accurately detects particle size distribution with five peaks
Scattered light from coarse particles is concentrated at low angles near the optical axis and fluctuates vigorously within a tiny angle, but scattered light from microparticles fluctuates slowly up to large angles away from the center. Whereas the intensity of scattered light from coarse particles is extremely high, the intensity of scattered light from microparticles is very low. The SALD-2300 achieves high resolution over a wide range of particle sizes by utilizing the relationship between particle size and scattered light and increasing the detection surface area of each of the 78 concentric detector elements in the Wing Sensor II at a logarithmic rate from the center outward. In addition to the Wing Sensor II, one sensor is used for side scattered light and five sensors are used for backward scattered light.
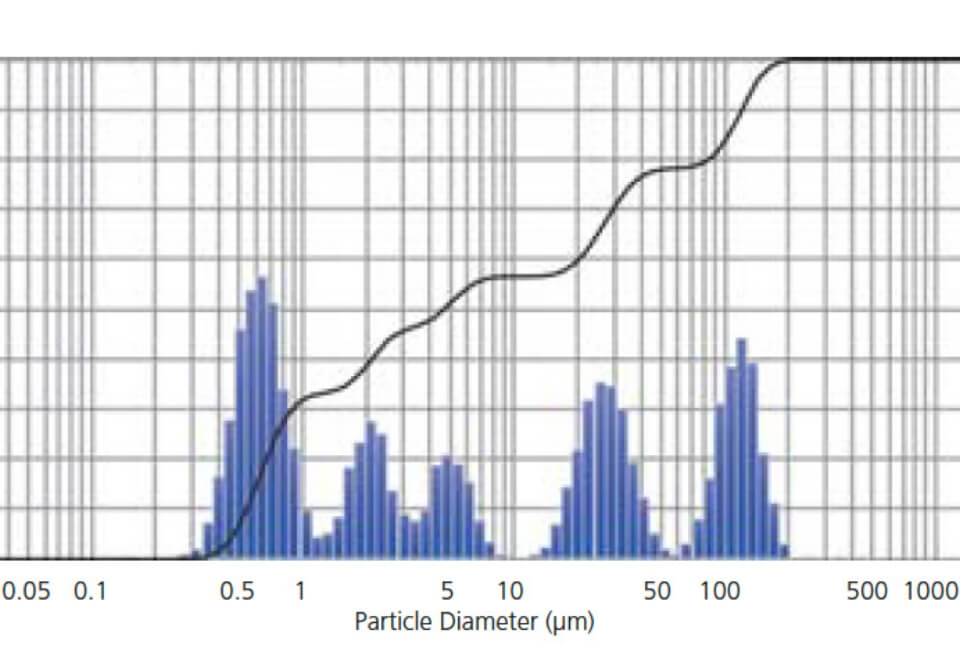
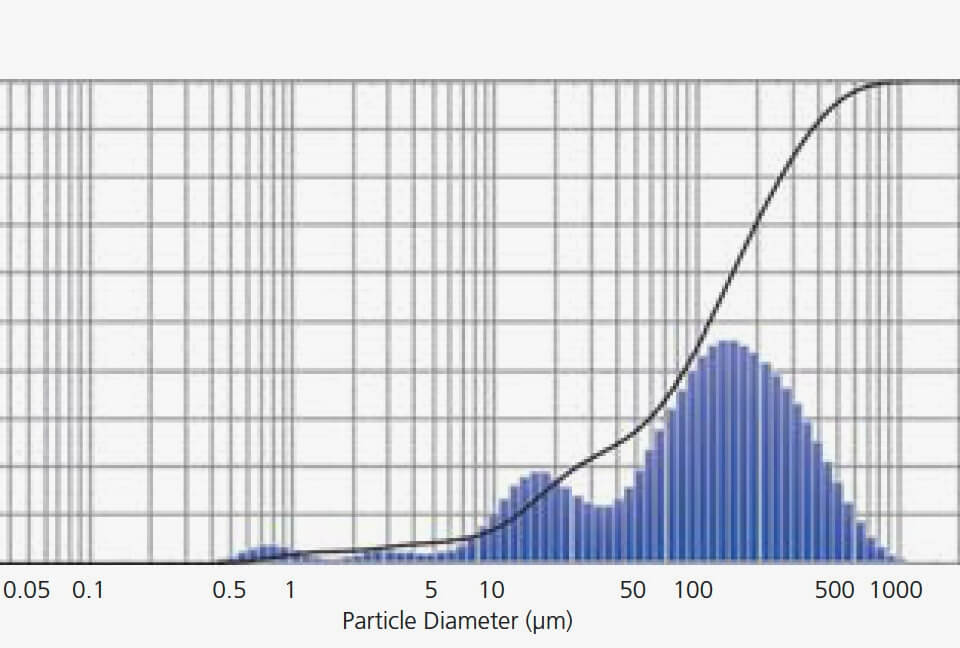
Particle Size Distribution Data with Five Peaks
Reliably reproduces particle size distributions with complicated distribution shapes. This is an example of measuring a mixture of five types of particles, with diameters of 0.7, 2, 5, 25, and 100μm.
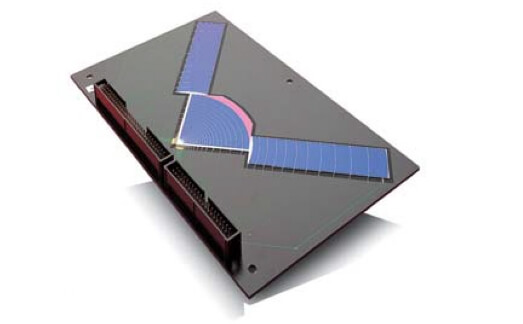
Wing Sensor II
High reliability
- Laser diffraction method ISO 13320 and JIS Z 8825-1 compliant
Complies with ISO 13320 and JIS Z 8825-1 laser diffraction and scattering standards.
- Instrument validation with JIS standard particles
System performance can be confirmed using MBP1-10 standard particles specified in JIS Z 8900-1. These samples have a broad particle size distribution; using these samples enables verification of the instrument’s accuracy.
- Easy maintenance
A powerful self-diagnostic function allows checking the output signals from each sensor and detection element and the system’s functional status. The operation log function stores detailed information with all measurement data, such as the operating status and cell contamination status. This allows retroactively verifying the validity of measurement data and confirming the cell contamination status.
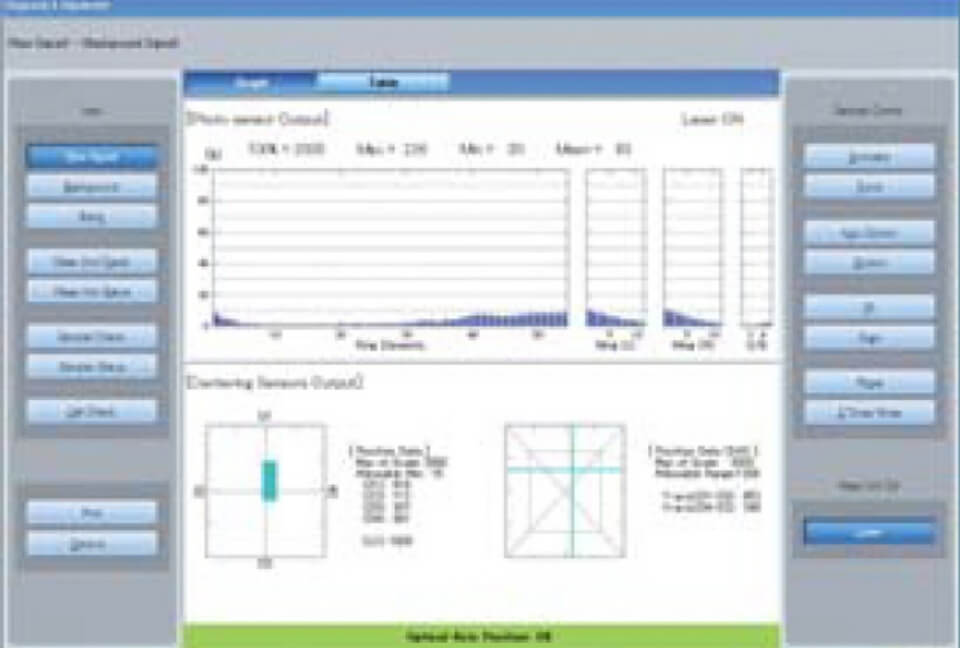
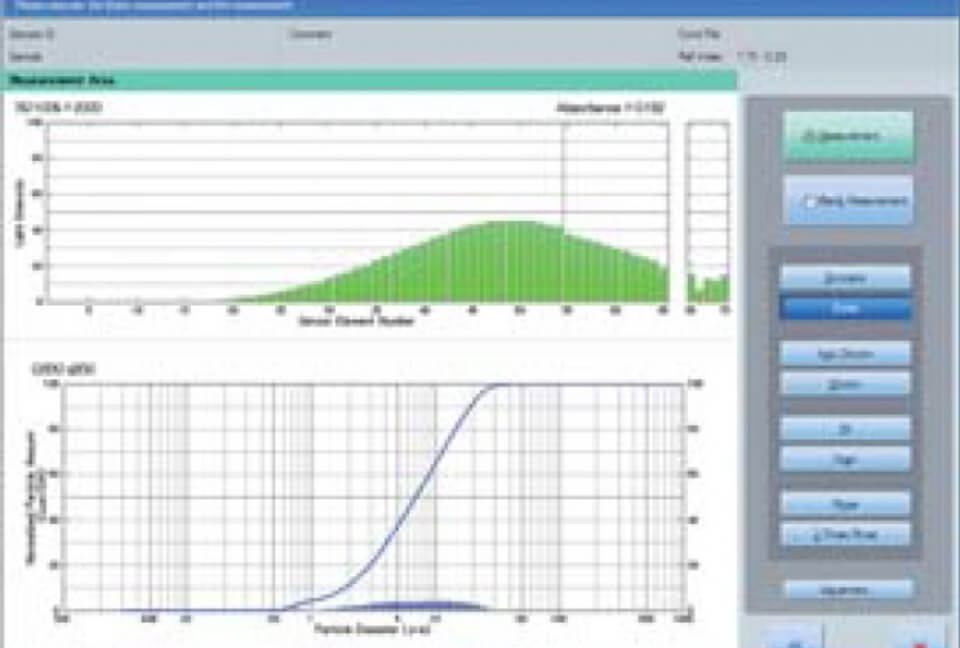
- Allows verifying measurement results (particle size distribution data) by light intensity distribution data (raw data)
Since light intensity distribution data (raw data) and measurement results (particle size distribution data) can be displayed on the same screen, measurement results can be verified while viewing both sets of data. In addition to verifying whether the detection signal level (particle concentration) is appropriate or not, this enables confirming the validity of measurement results from multiple aspects, such as in terms of the distribution width and the presence of aggregates and contaminants.
High reproducibility
Improved stability of the optical system
SALD systems utilize an OSAF (Omnidirectional Shock Absorption Frame), which completely isolates all elements of the optical system from impacts, vibration, and other external disturbances.
Therefore, optical axes rarely need adjustment.
High efficiency / High reliability
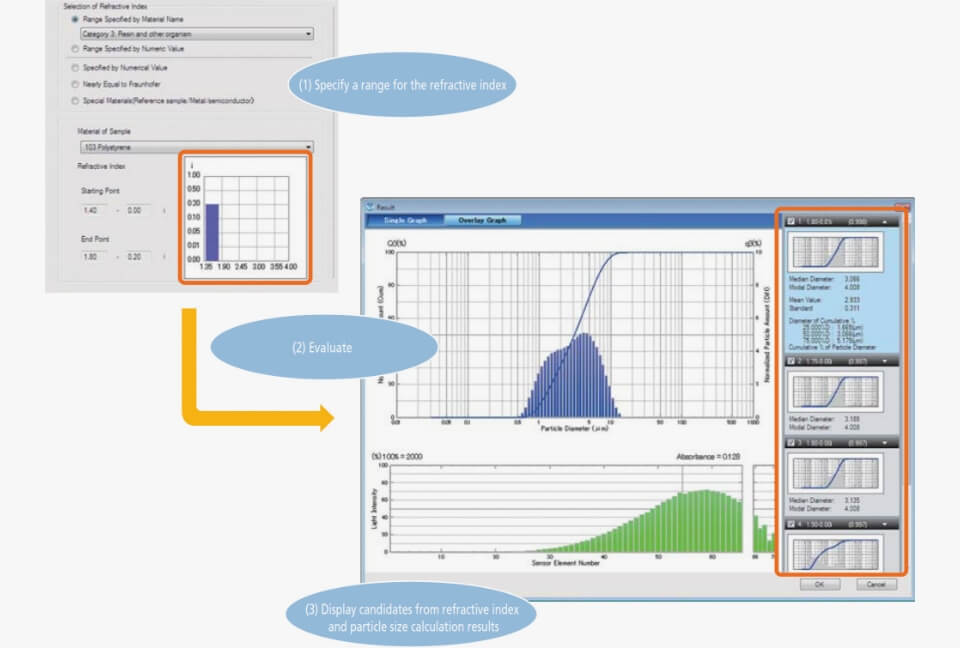
Automatic refractive index calculation function eliminates the mistake or trouble of selecting refractive indices.
Automatic Refractive Index Calculation Function Is Available. Selecting a refractive index was an unavoidable part of using the laser diffraction method, in which a published value was generally entered. However, such values were not necessarily appropriate, considering the effects of particle composition and shape. Therefore, tedious trial and error processes were used to select refractive indices. WingSALD II solves such problems by being the world’s first software to include a function that automatically calculates an appropriate refractive index based on the LDR (light intensity distribution reproduction) method. Note: The LDR method automatically calculates an appropriate refractive index based on consistency between the actual measured light intensity distribution and one reproduced (recalculated) from particle size distribution data. This method was developed by Shimadzu and published in two technical papers. It is sometimes called the „Kinoshita Method“, in academic communities, after the name of Shimadzu’s engineer. The refractive index of main materials can be selected in the list.
High efficiency / High reliability
Assist function decreases operational error to ensure more accurate measurement.
Measurement Assistant Function Allows Preparing SOPs to Ensure Measurements Are Always Performed Using the Same Conditions and Procedures. Anyone can conduct high-quality measurements anywhere at any time. With the SALD-MS23, SALD-BC23, and SALD-DS5, automatic measurement by PC control can be conducted according to a specified SOP. The operator’s work consists of sample preprocessing and inputting only. Creating, saving, and sharing measurement conditions and procedures, including pretreatment methods and conditions, ensures measurements are performed using the same conditions and procedures, even if performed by a different operator or at a different location or plant, and ensures safe comparison of data. Furthermore, when the measurement assistant function is used, measurement instructions for the operator are displayed on the screen. This enables even inexperienced operators to perform measurements correctly. Various functions and operations of SALD-2300 can be controlled by a PC, enabling SOPs to be used more effectively. In addition, administrators and operators can be assigned different operating privileges to ensure security. Note: SOP is an acronym for Standard Operating Procedure.

High sensitivity / High concentration
By enabling measurement under wide particle concentration conditions (0.1ppm to 20%), changes in particle size distribution depending on particle concentration can be evaluated.
Previously, the particle concentration of a sample had to be adjusted to meet the optimum conditions of analyzers by dilution or concentration using a centrifuge. In these cases, changes in particle size distribution, such as agglomerations or dispersions, could not be considered.
Dispersions and agglomeration can be caused by dilutions.
In some cases, dilutions can accelerate dispersions, but in other cases, they can create agglomerates. To ensure optimum, the initial particle concentration must be determined without dilutions or concentrations. After the evaluation of particle size distribution at the initial state, the effects of particle concentration from dispersions and agglomerations must be evaluated.
SALD-2300 can measure particle size distribution under the conditions of particle concentration from 0.1ppm to 20%.
When the sampler SALD-MS23 or batch cell SALD-BC23 is used, measurements are possible under conditions of concentration from 0.1ppm to 100ppm. When the high-concentration sample measurement system SALD-HC23 is used, high-concentration samples up to 20% can be measured because the negative effects of multiple scattering are prevented.
Wide particle concentration range must be covered to evaluate the dissolution process of sample particles.
This is necessary because the progress of dissolution makes the particle concentration low in comparison to the first particle concentration.
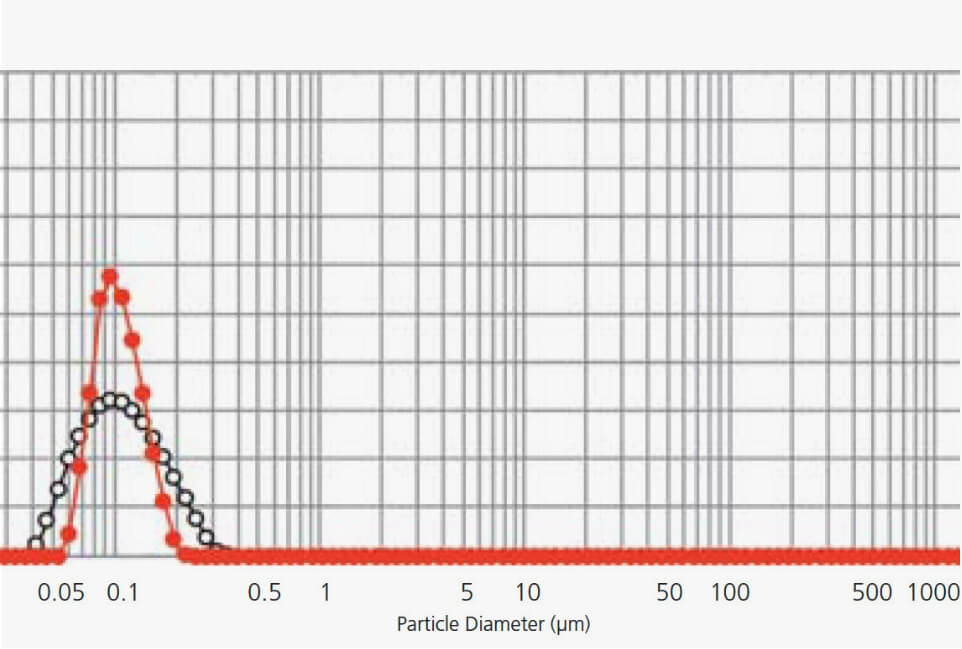
Measurement without dilution of hand cream
In the case of hand cream, dilutions make the particle size distribution narrow. Measurements without dilutions must be done to obtain accurate measurement.
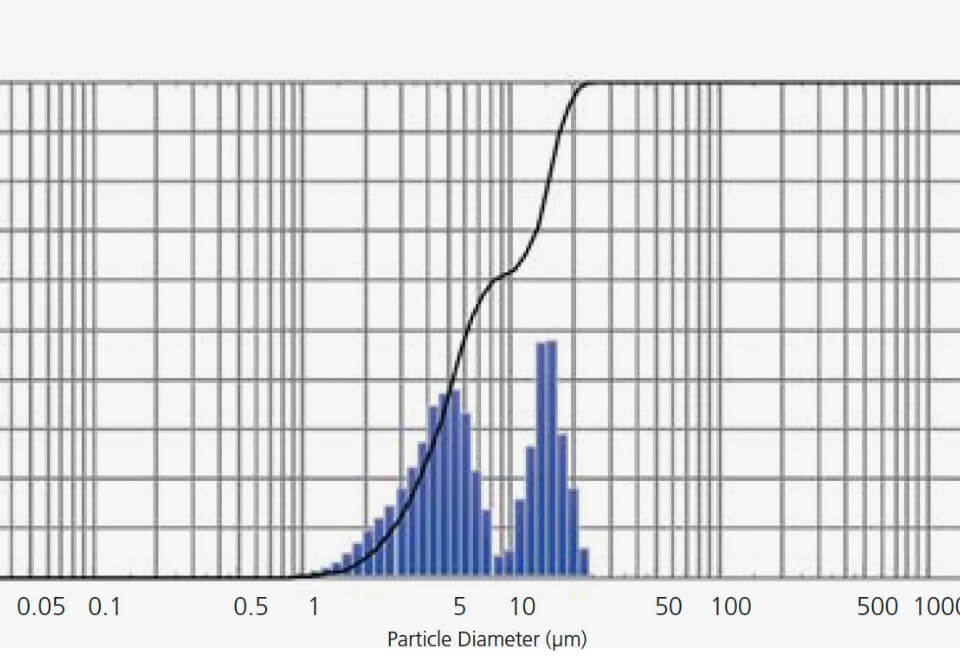
Evaluation of a fine particle included in red wine
The graph to the left shows the result of measuring red wine in the state of the undiluted solution. The low-concentration sample can be measured as an undiluted solution. Measuring it in this state can remove the influence of dispersion or agglomeration by the concentration operation.
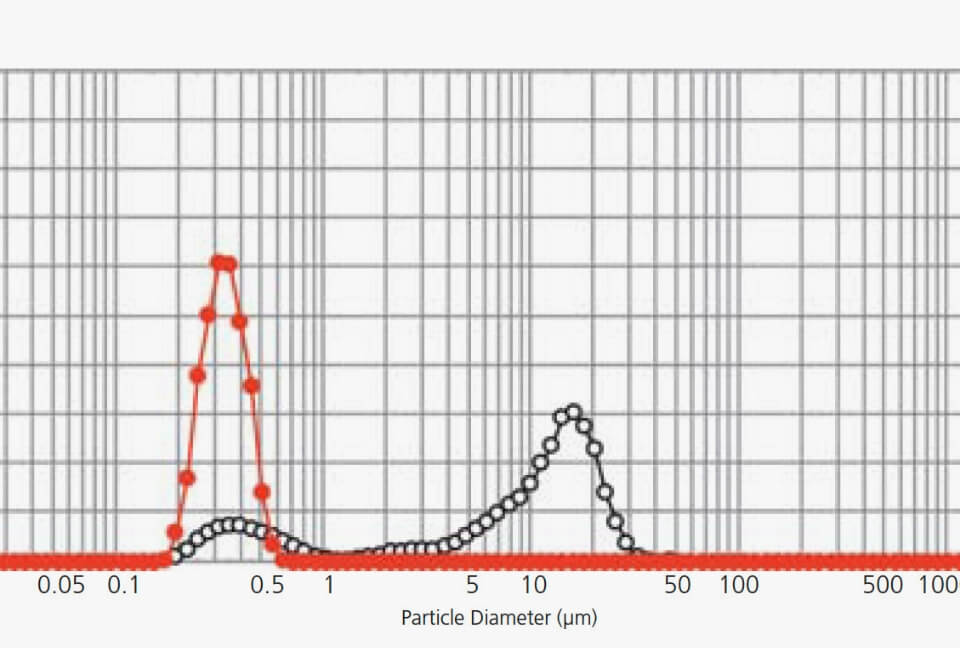
Evaluation of negative electrode material of a secondary battery
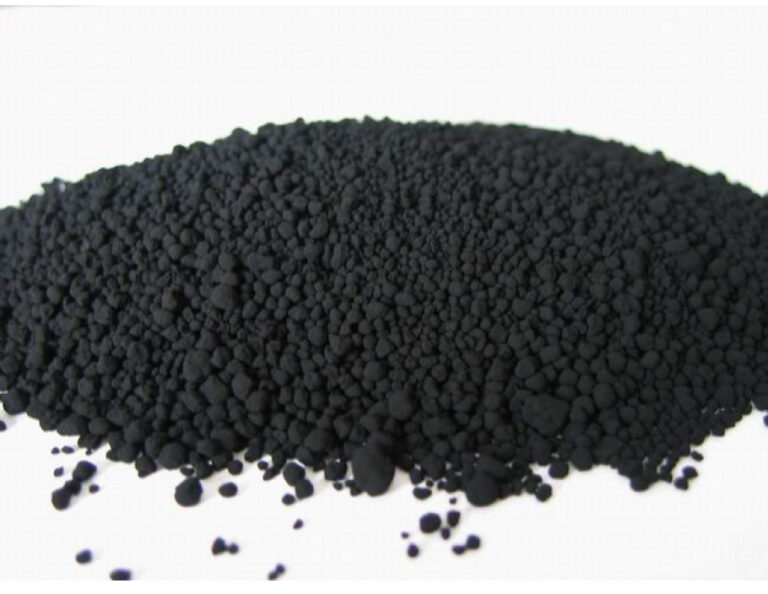
At left is a graph showing the results of measuring a carbon black particle. The agglomeration particle (micrometer range) has been dispersed to the fine particle (sub-micrometer range) by dispersion processing using a homogenizer. The sample (sample that absorbs light like the carbon black) that doesn’t transmit light easily can be measured based on the improvement in sensitivity.
High speed
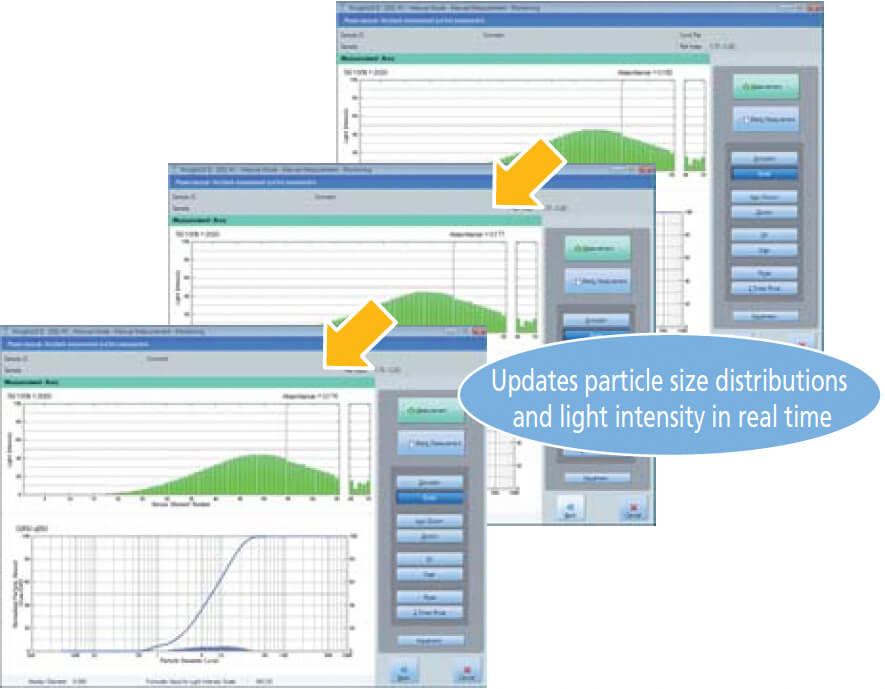
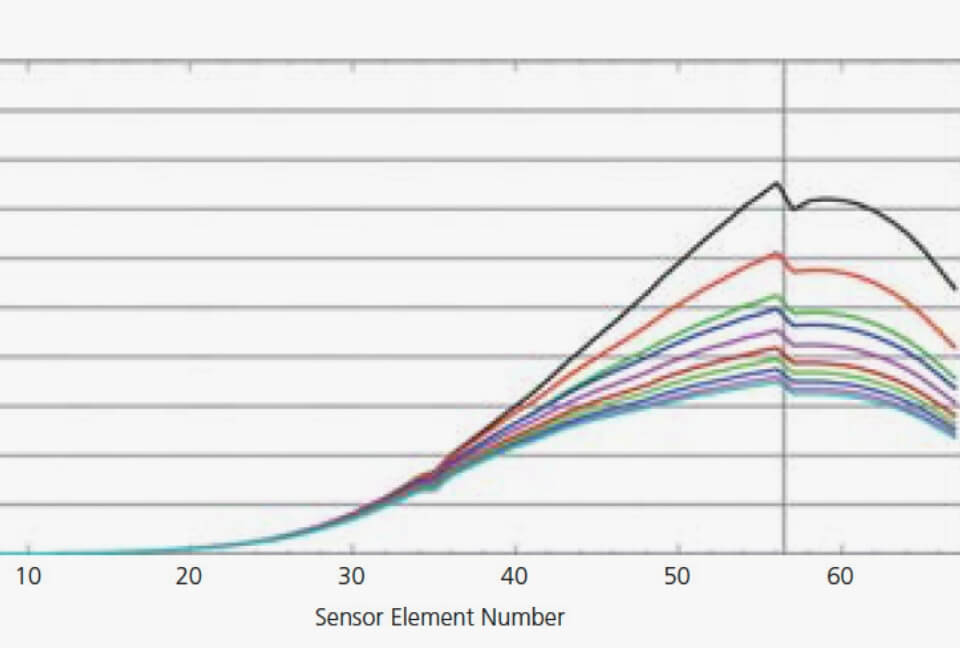
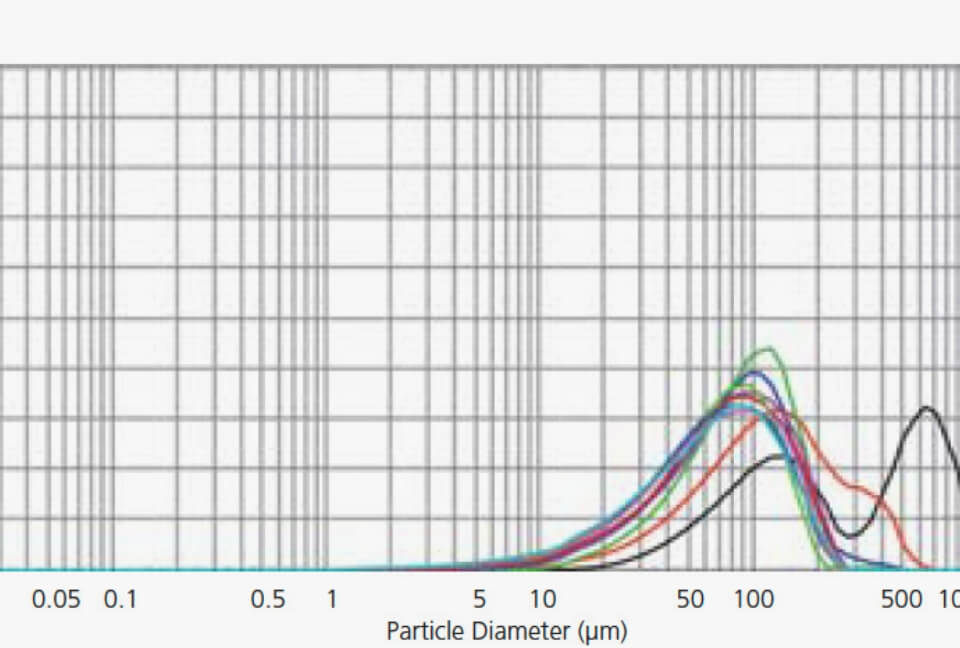
Changes in particle size distribution can be monitored in real-time. Continuous measurement function at 1-second intervals can record these processes for additional analysis.
Particle size distribution data and light intensity distribution data can be displayed in real-time.
This means that sample changes over time or shifts in the dispersion status can be monitored in real-time.
Since both the light intensity distribution data, which is the raw data, and particle size data can be monitored simultaneously, they can be compared to keep track of any changes in the status of samples.
Reliably reproduces particle size distributions with complicated distribution shapes. This is an example of measuring a mixture of five types of particles, with diameters of 0.7, 2, 5, 25, and 100μm.
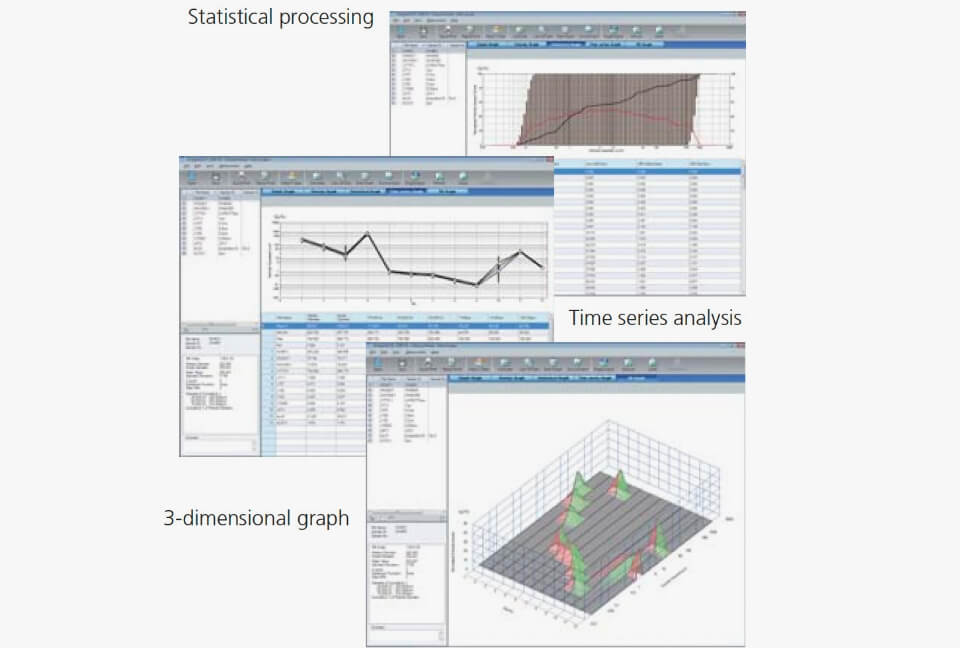
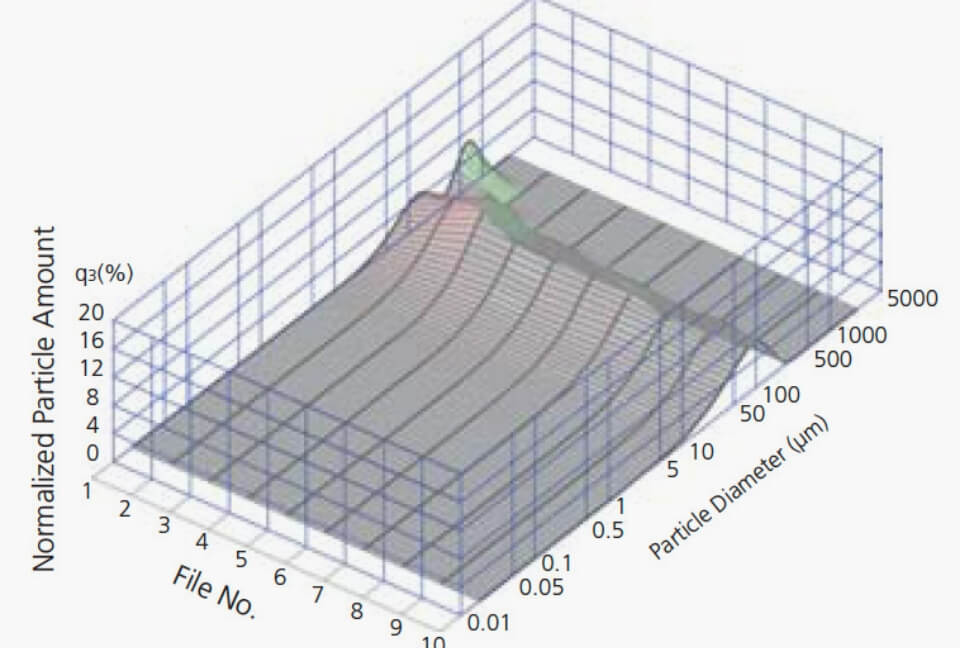
Continuous measurement can record a maximum of 200 data sets at minimum 1-second intervals.
Maximum 200 particle size distributions at minimum 1-second intervals can be measured and stored continuously. These data can be analyzed from various angles using statistical processing, time series analysis and 3-dimensional graph functions.
Cross reference of particle size distribution and light intensity distribution
enables multilateral evaluations of dissolution process.

High efficiency
Processes multiple sets of data more efficiently
Multiple sets of data can be stored as a group, which enables easier organization, re-displaying, and reanalysis of data. Data can be loaded as a group and displayed or analyzed at the same time, rather than having to load each set separately.
High analysis capability
Measurement data from multiple facets
–Extensive assortment of data analysis applications included standard
The following data analysis applications are included standard.
Evaluation of Scattering Angle
Graphs the components of scattered light intensity at each angle. This takes advantage of the features of the highly-integrated photodiode array to allow evaluating the low-angle scattered light with high resolution. Application Fields: Evaluating the scattering characteristics of films and sheets.
Data Emulation Function
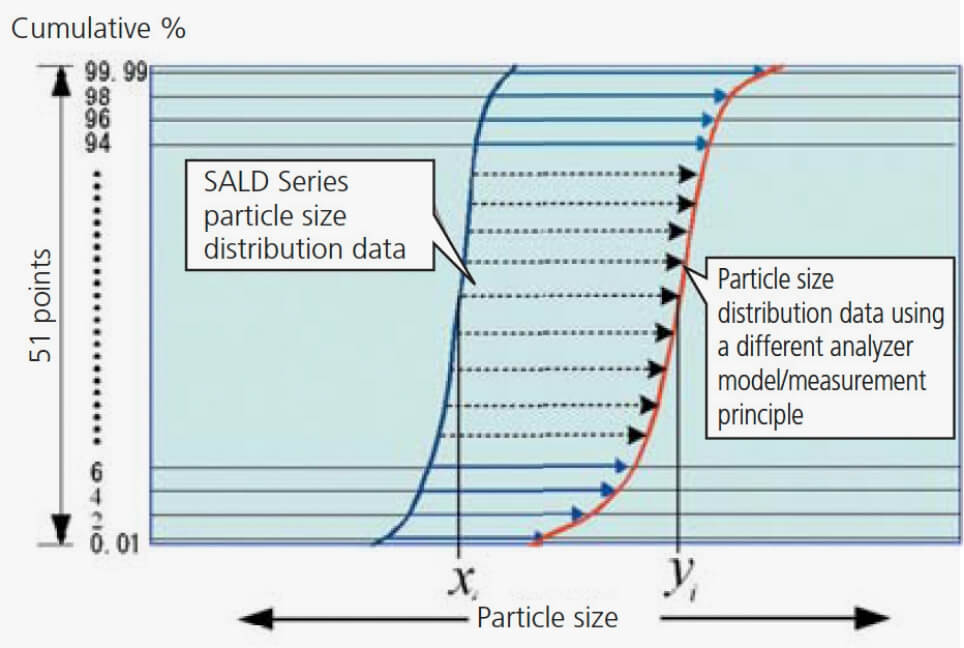
Based on SALD series measurement results, this function allows emulating measurement results obtained using other models or other measurement principles. This maintains compatibility with data results obtained with previous measurement methods.
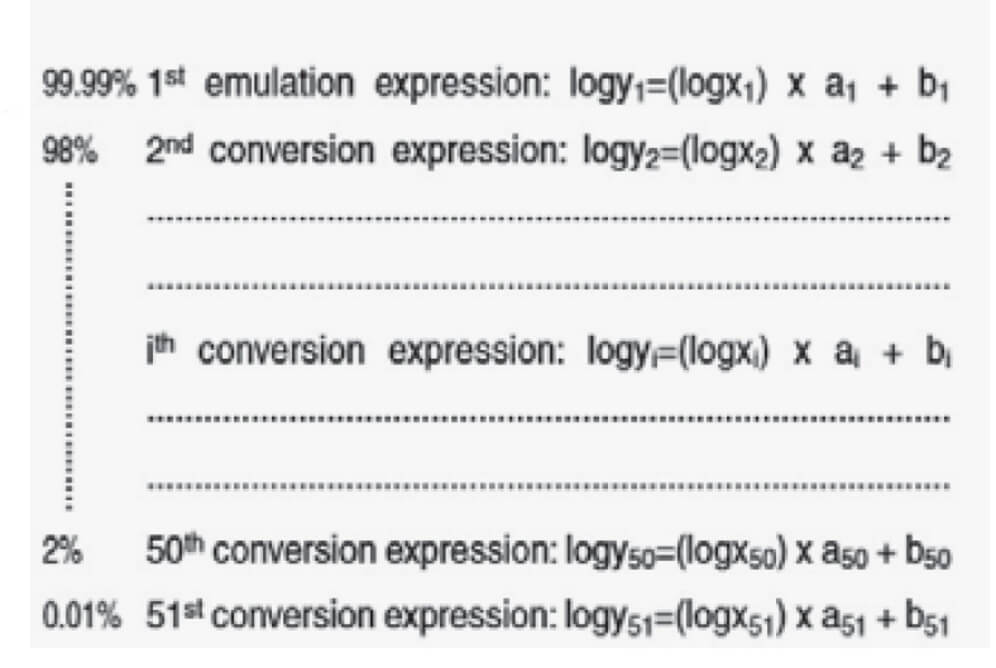
Emulation by 51 conversion expressions
51 conversion expressions can be obtained at the cumulative % points (0.01%, 2%, 4% …… 96%, 98%, 99,98% on vertical axis) to express the relationship between the particle size distribution data measured by SALD-2300 and that measured by another instrument or technology. 102 parameters ai (I = 1,2,..…, 51) and bi(I = 1,2,..…, 51) used in 51 conversion expressions can be stored as a parameter table, which can be used for emulations.
This emulation function may be able to reduce some problems when an old particle size analyzer is upgraded to a new instrument.
Mixture Data Simulation Function
Allows simulating particle size distributions using any mixture ratio of multiple particle size distributions. This makes it possible to determine the optimal mixture ratio for obtaining the desired particle size distribution, without repeatedly measuring the particle size distribution of sample mixtures.
Data Connecting Function
Allows combining the measurement results for two different measurement ranges at any particle size point to create a single particle size distribution. For example, sieve data for particles above 2000 μm can be combined with SALD series data for particles below 2000 μm to create a wide-ranging particle size distribution, which is required for civil engineering, disaster prevention, and environmental fields.
System Structure
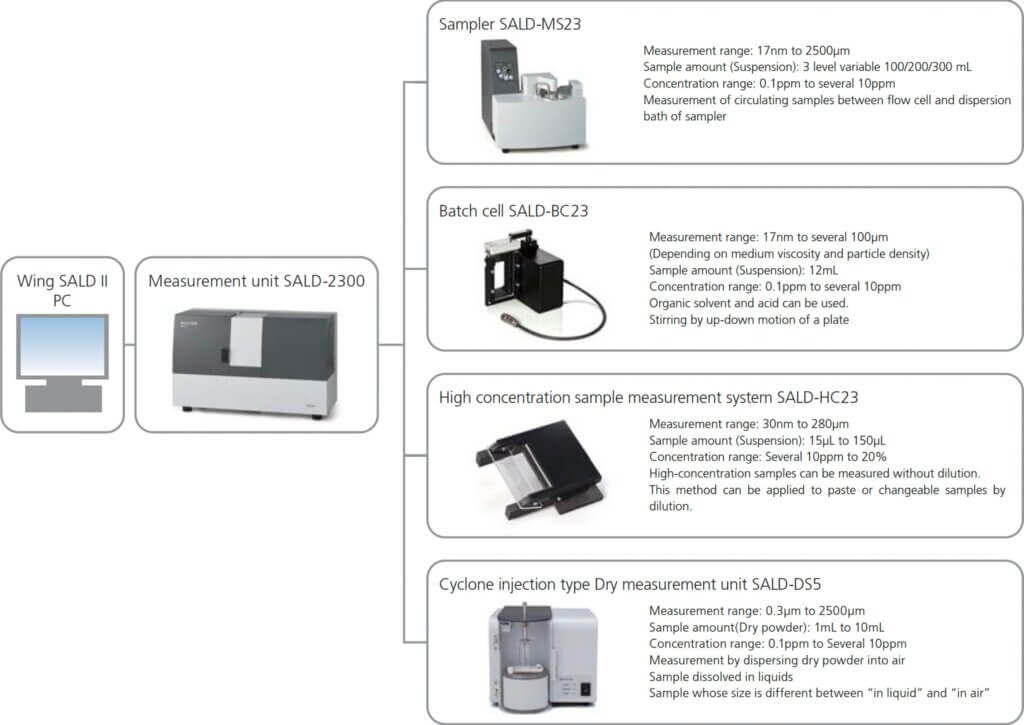
Wide range of system configurations can be designed by adding optional units.
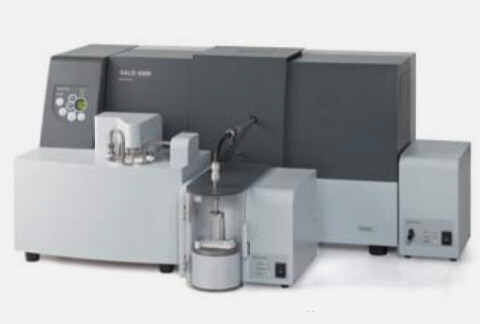
Wet Measurement System
(SALD-2300 and SALD-MS23)
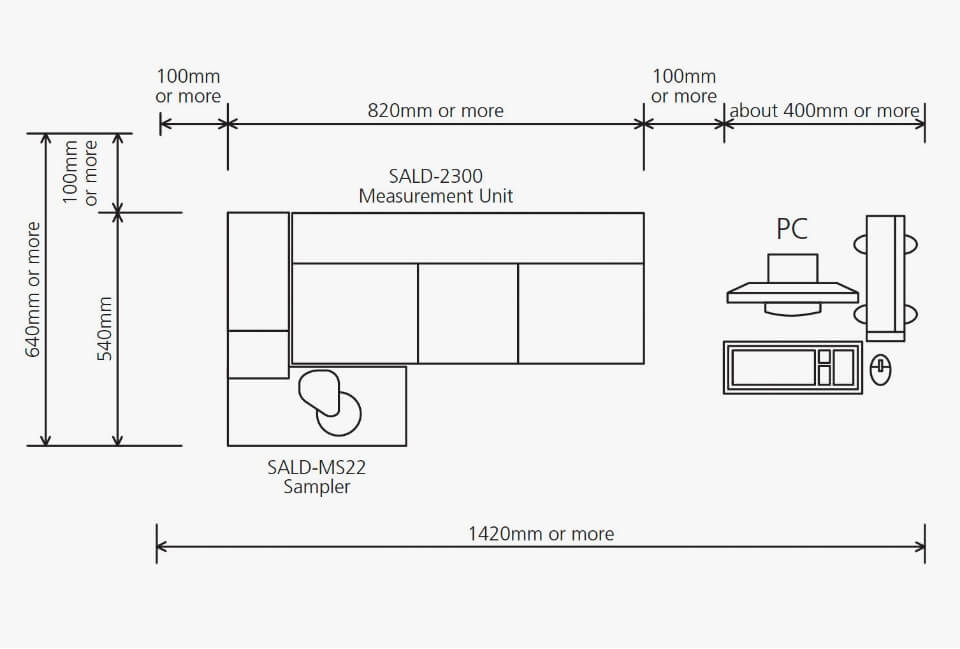
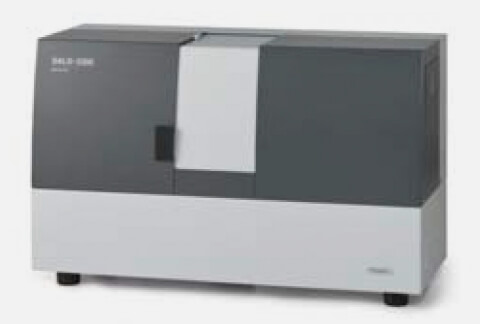
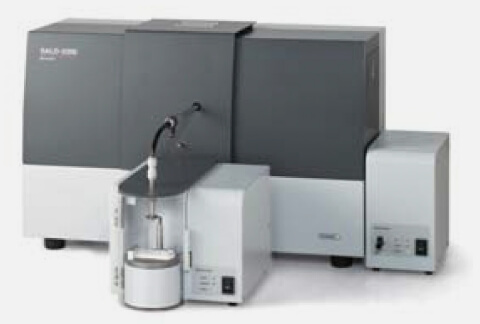
Measurement Unit SALD-2300
The batch cell and the high-concentration sample measurement system can be set in the measurement unit.
Small-Volume Measurement System
(SALD-2300 and SALD-BC23)
High-Concentration Sample Measurement System
(SALD-2300 and SALD-HC23)
Very Small-Volume Measurement System
(SALD-2300 and SALD-HC23 and
“Glass Slides with Indentation”)
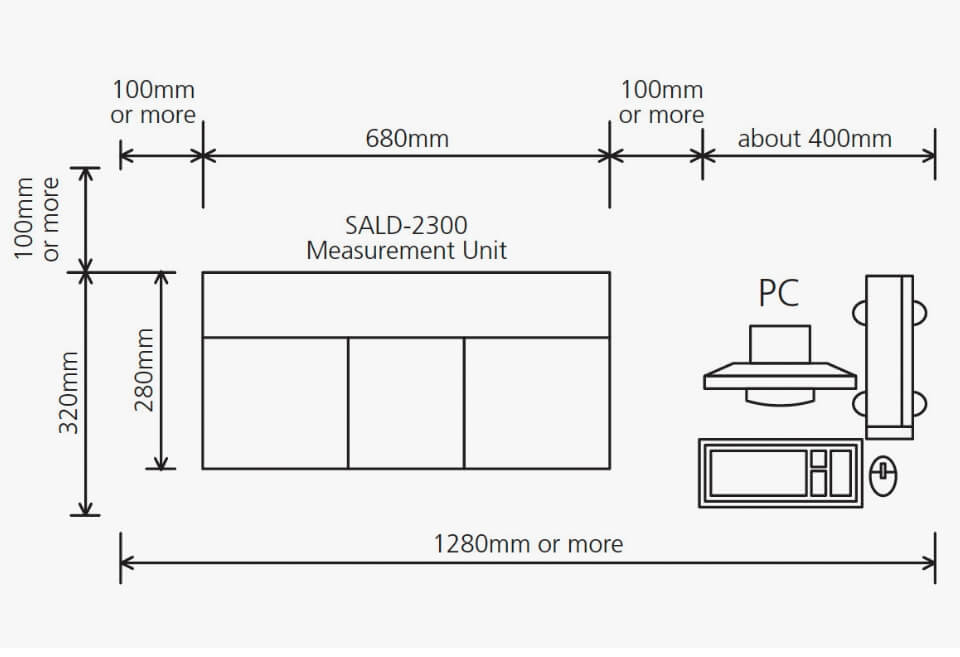
Dry Measurement System
(SALD-2300 and SALD-DS5)
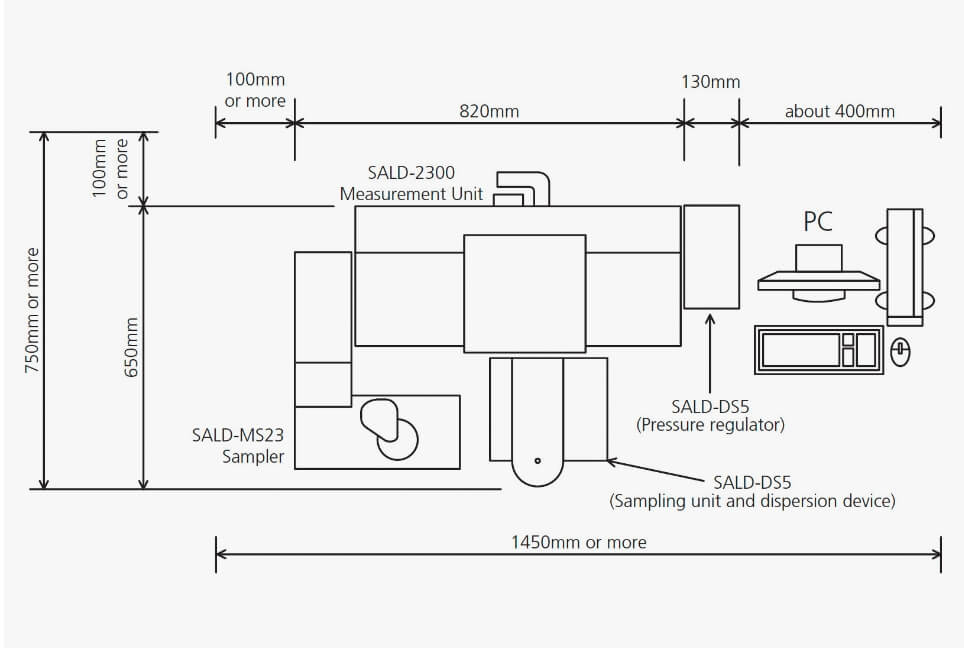
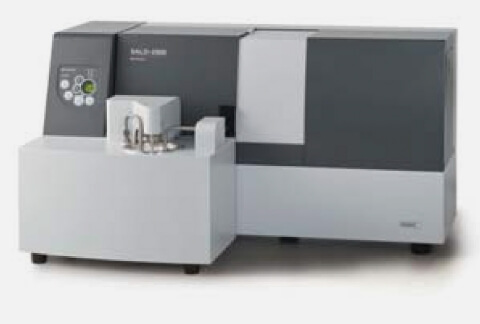
Wet/Dry Measurement Full System
(SALD-2300 and SALD-MS23 and SALD-DS5)
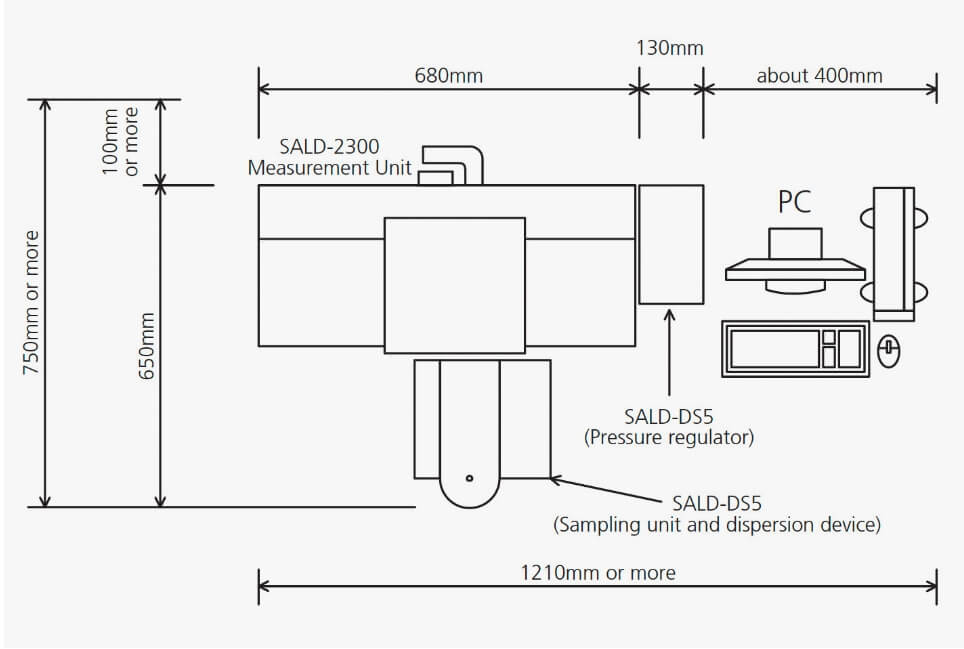
System Configuration
Batch Cell SALD-BC23
Wet measurement for small amount of sample / Almost all dispersion media can be used.
- Measures using small quantities of samples (particles being measured) and liquid media (dispersion media). Organic solvents or acids can be used.
- Less liquid waste is disposed of when using suspensions containing organic solvents or acids.
- Vertical motion of the stirring plate inhibits settling of particles. A funnel made of tetrafluoroethylene resin is included to prevent spilling the suspension.
- This reduces the chance of getting it on hands or fingers and prevents contaminating the cell surface.
Measurement Results
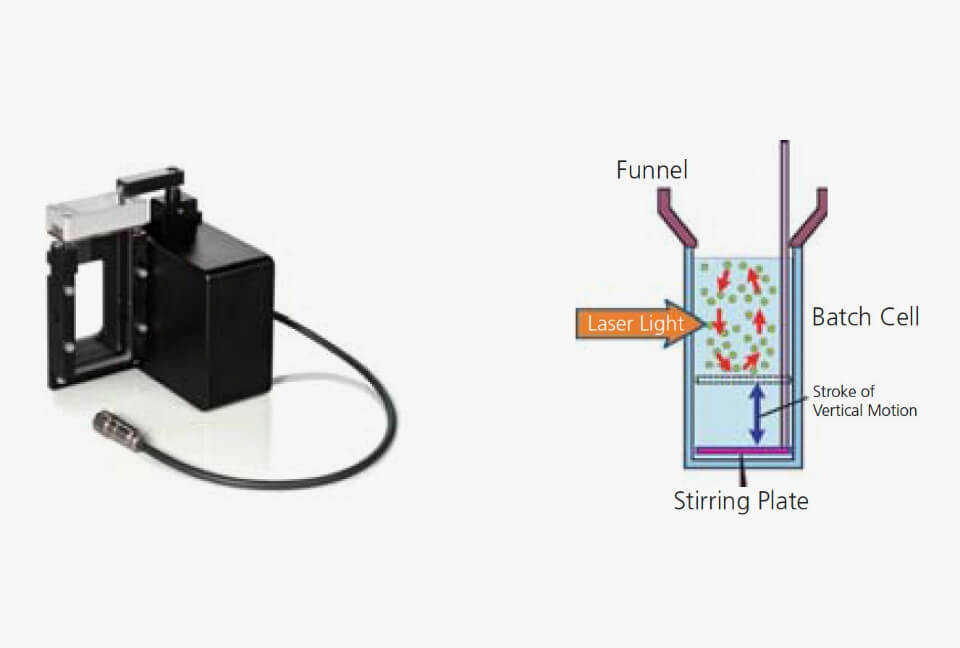
Batch Cell
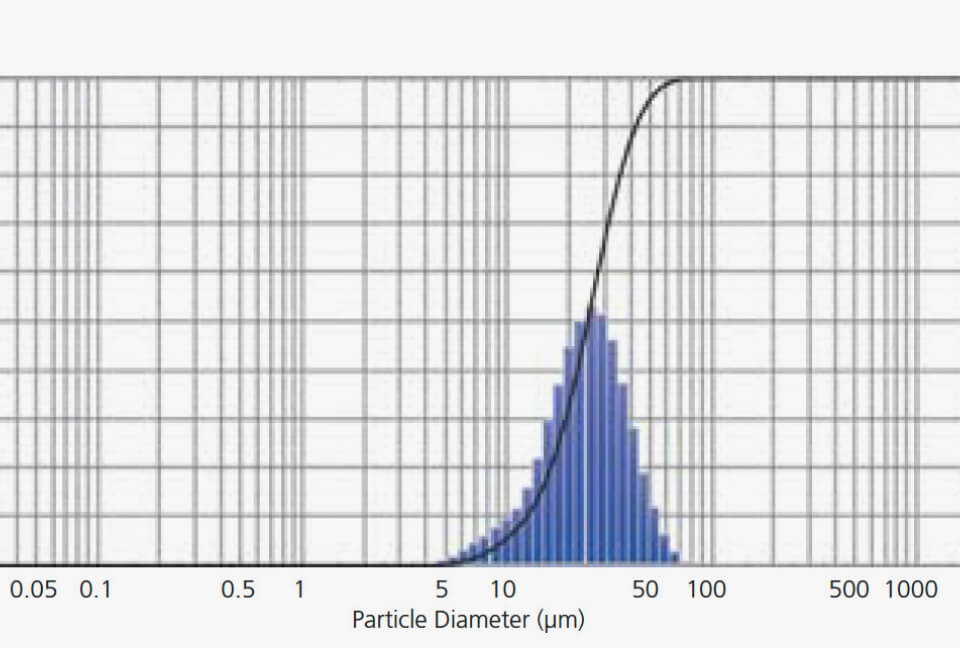
Agricultural chemicals
Particle size distribution may affect the aerial spraying property and resistant toxicity. Disposalof the sample after measurement is easy because the sample amount is small.
Silicon
Particle size distribution is one of the very important quality control items because it may influence the yield of final products
Sampler SALD-MS23
General wet measurement for a variety of samples
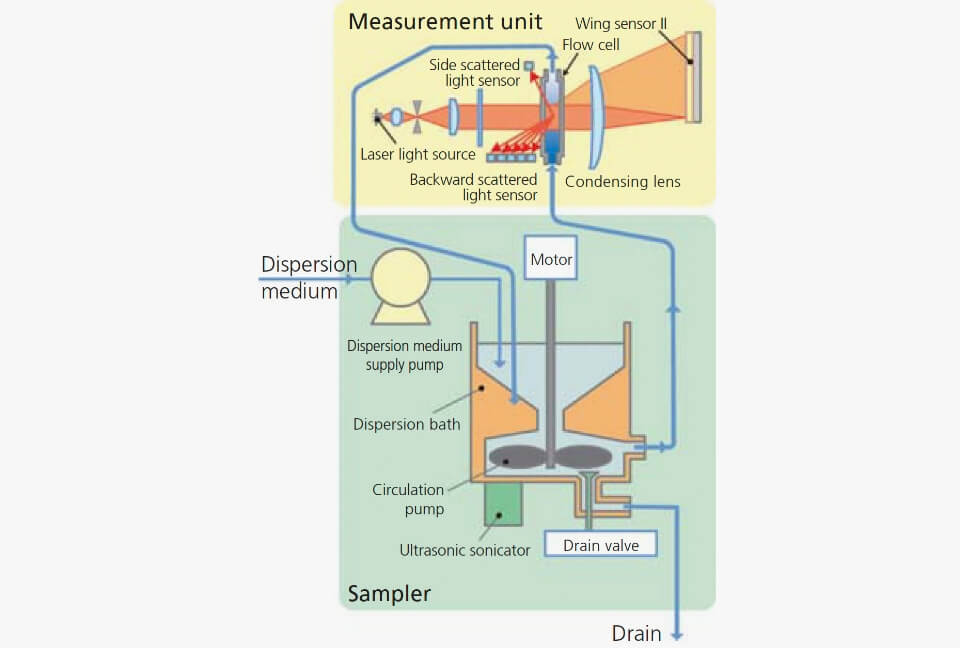
- Groups of particles are dispersed in a liquid medium and measured as they are circulated between the flow cell, which is placed in the measurement unit, and a dispersion bath in the sampler.
- The dispersion bath incorporates a stirrer and an ultrasonic sonicator. A pump delivers the dispersed suspension to the flow cell.
- The pump is specially designed to ensure both the liquid medium and the particles are circulated. A stainless ball of 2mm circulates and it is possible to measure it.
- Most organic solvents can be used as dispersion media. The sample quantity is changeable. 100mL, 200mL or 300mL can be selected.
Measurement Results
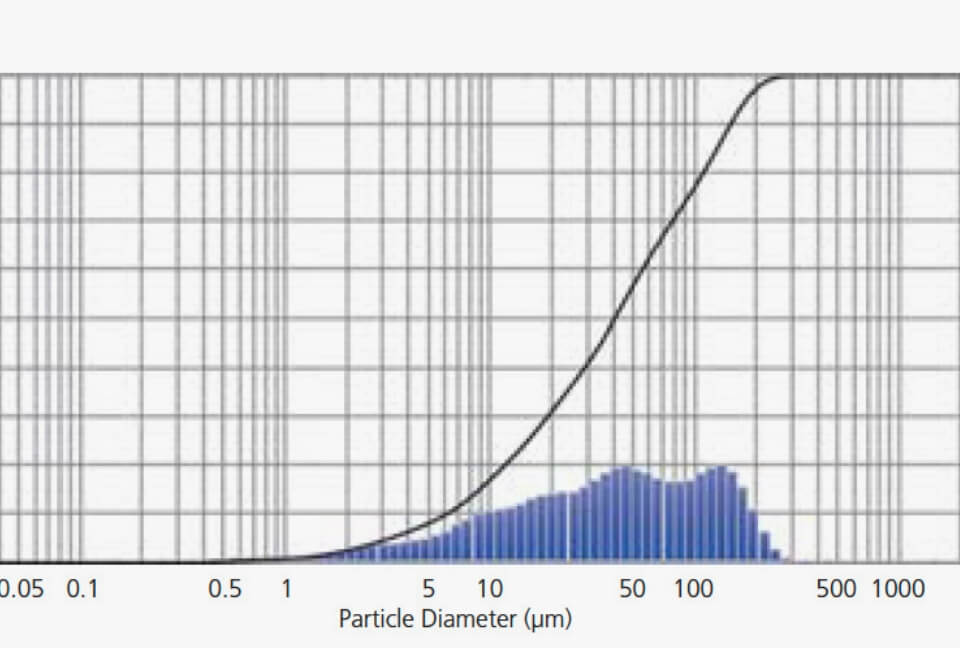
Soybean powder
SALD-2300 can accurately measures samples which have wide distributions and complex profiles. Soybean powder is a material which is used to make various foods. Its particle size distributions can affect quality, taste, tongue feeling and teeth feeling.
Zirconia
Zirconia can be used as a heat-resistant ceramics material. For ceramics products, particle size distribution is one of the most important quality control items, because the strength and heat-resistant property can depend on particle size distribution.
Measurement unit
High-Concentration Sample Measurement System SALD-HC23
Measurement without Dilution
- High-concentration samples can be measured using the laser diffraction method.
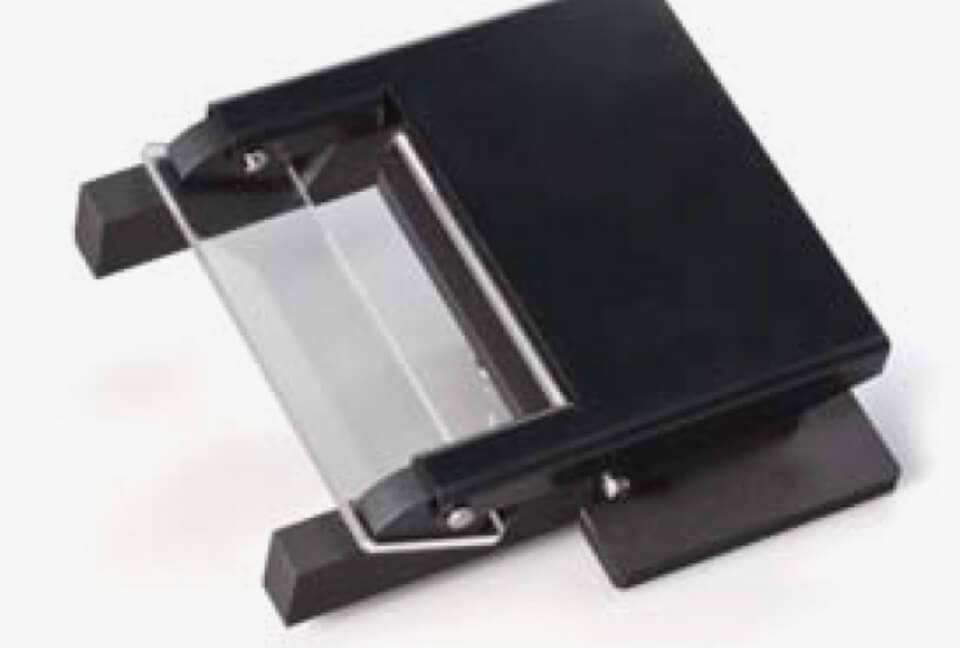
- Measurement is possible by simply holding the high-concentration sample particles between two glass slides.
- Samples for which the particle size distribution would be changed by dilution can be measured in their original state, or with the minimum required level of
dilution, and true images of the measurement object can be obtained. - Commercial hand creams, face creams, and rinses can be measured with hardly any pretreatment.
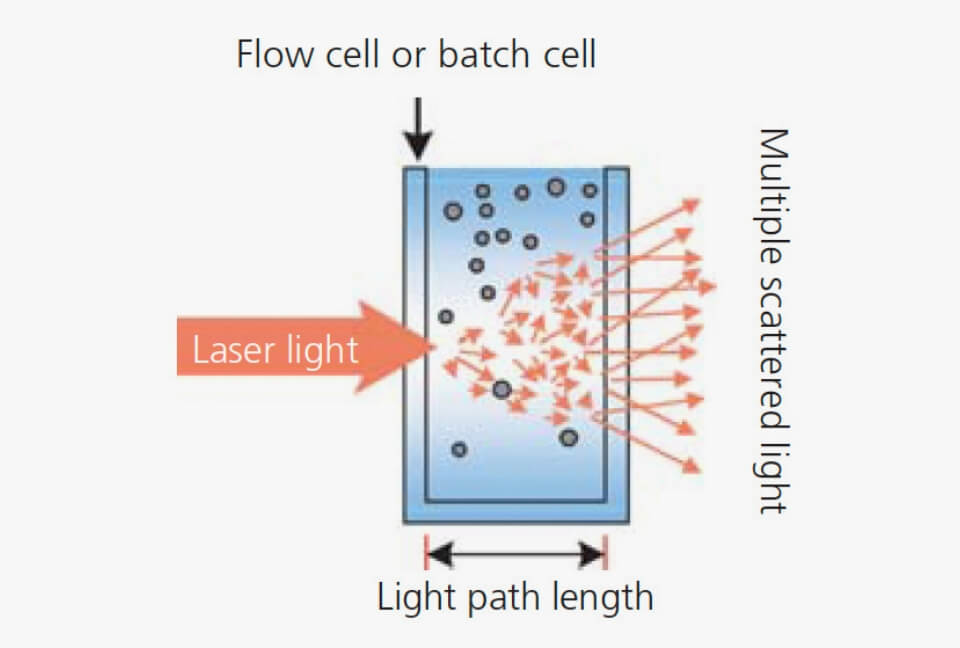
Measurement with Standard Flow Cell or Batch Cell
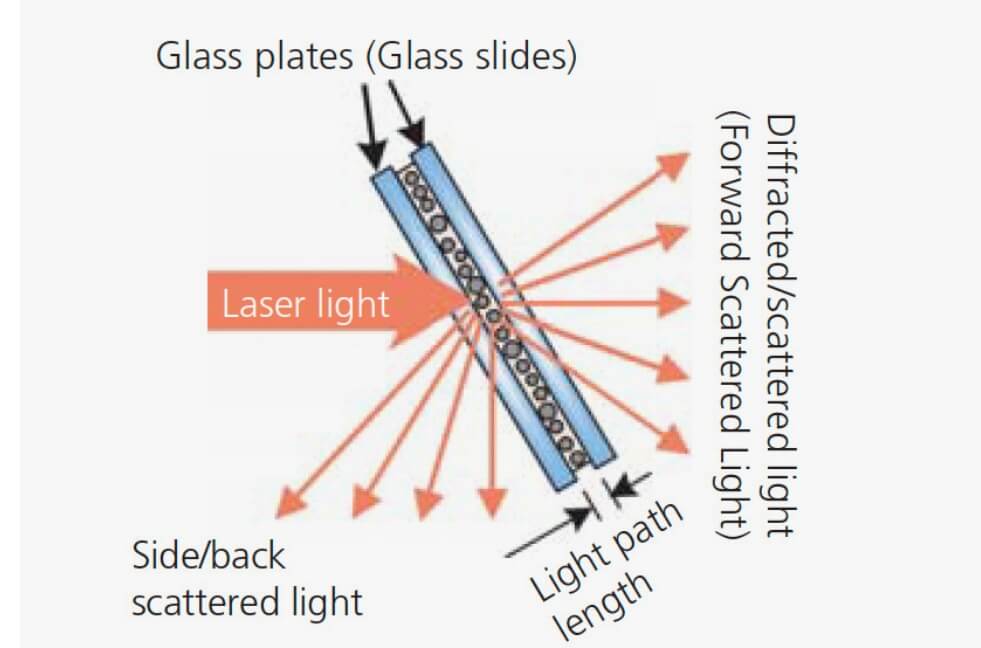
Cell Holder for High-Concentration Sample Measurement System
Sample Held between Two Glass Slides
If a standard flow cell or batch cell is used to measure a sample at a high concentration, the long light path length results in multiple scattering, making it impossible to obtain accurate measurements. With this system however, is possible by simply holding the high-concentration sample particles between two glass slides, which shortens the length of the light path, avoids the negative effects of multiple scattering and makes accurate measurement possible.
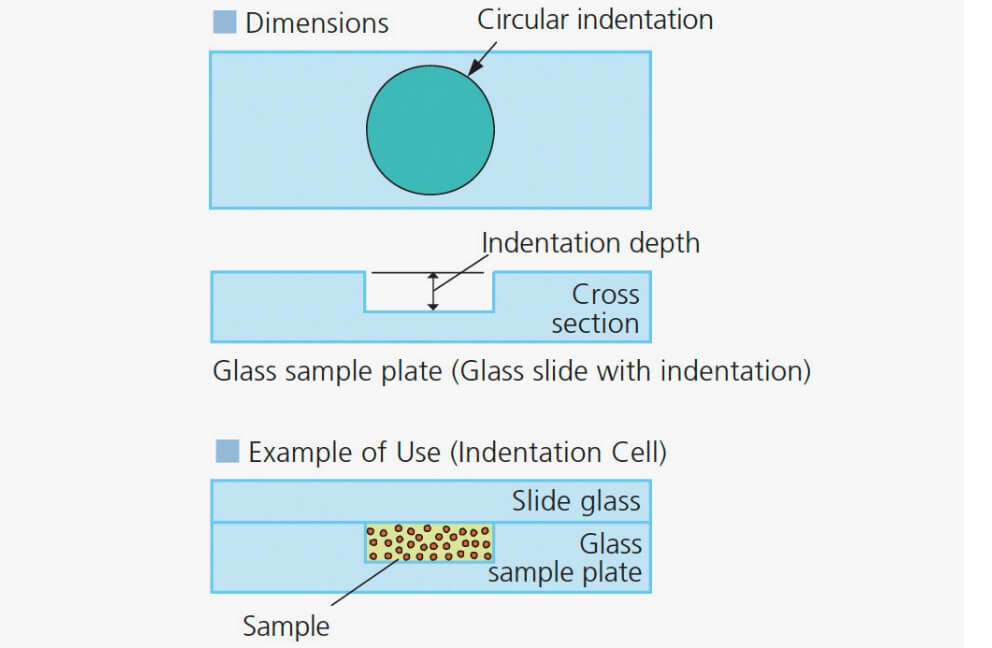
Glass sample plates (glass slides with indentation) (Option)
Effective for measurement of samples with relatively low concentrations, or expensive samples that can only be used in small amounts.
Hair color
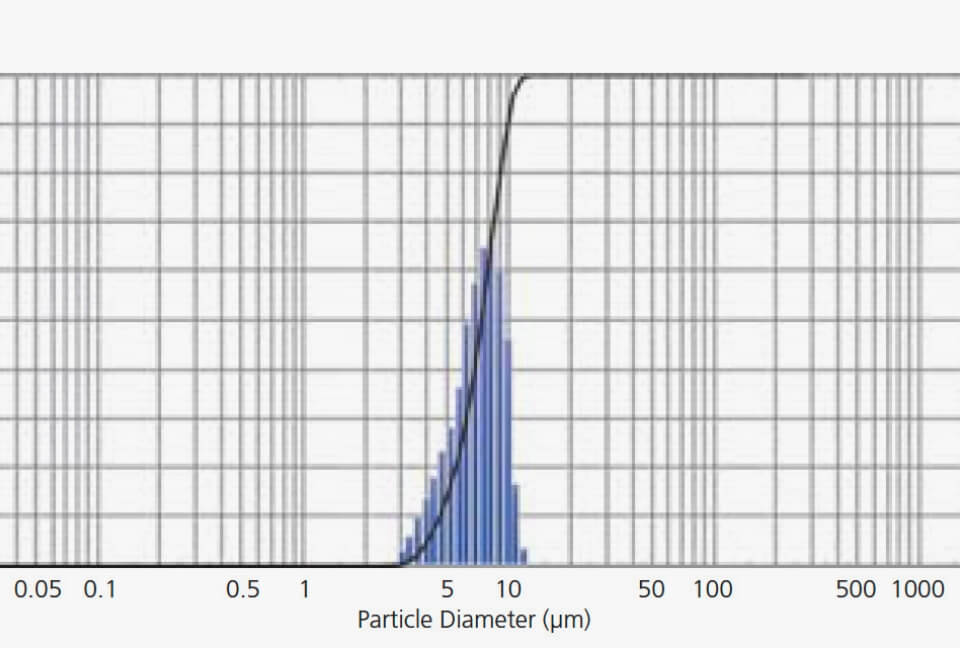
Properties of hair color such as color, gloss and adhesive strength depend on particle size distribution. And these properties can determine its product value. Particle size distribution of these kinds of samples may be changed by dilutions, so high-concentration sample measurement without dilution is better.
Eye drop medicine
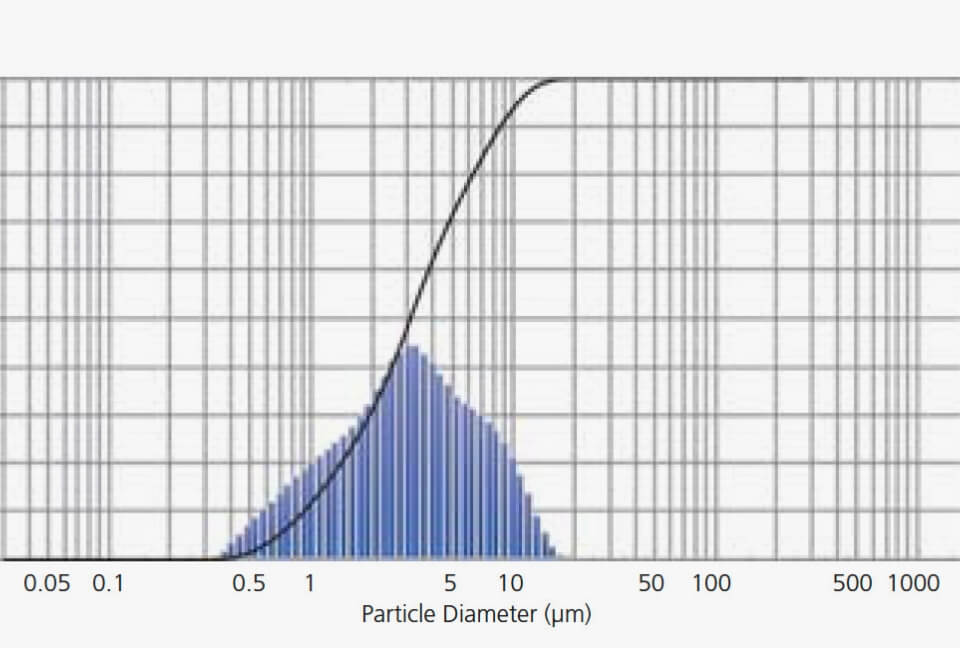
Particle size distribution of eye drop medicine may adversely affect the medicine as well as the feeling of an eye, which is very sensitive. Measurement of the initial particle concentration without dilution is essential.
Glass sample plates
High reliability
Cyclone Injection Type Dry Measurement Unit SALD-DS5
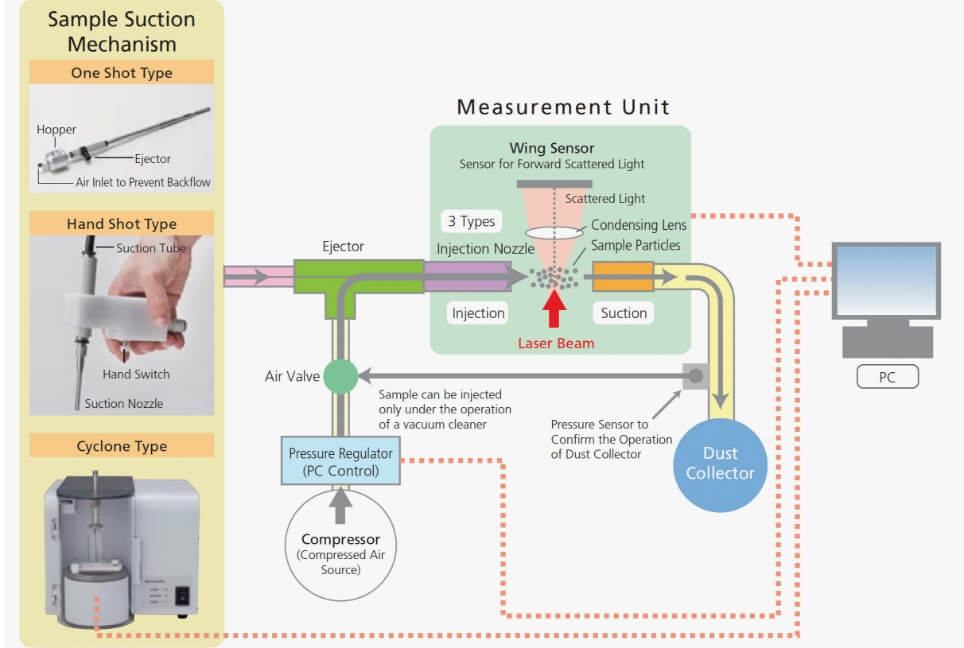
A cyclone type sample suction mechanism has been developed. Strong double dispersion process of suction and injection can be used. Measurement with high precision, high sensitivity, high reproducibility and high resolution
- Sample to be applied
Easily dissolved samples (medicine, powder foods)
Easily agglomerated samples (magnetized particles) - Features
Optimum combination can be selected from 3 sample suction mechanisms (cyclone type, one shot type and hand shot type) and 3 injection nozzles, considering properties and the amount of sample particles. - When the cyclone type is used, sample is sucked from the vial, which is rotated and moved upward, injected from the injection nozzle, and measured. The double dispersion process enables measurement with good reproducibility, whenever samples contain many agglomerates. Use of the vial can prevent the scattering of the sample and dirt from the operator’s hands.
- When the one shot type is used, putting the sample into a small hopper is the only operation required for measuring. This type is suitable for a small sample amount.
When the hand shot type is used, the sample can be sucked directly from the beaker or chartula for measurement.
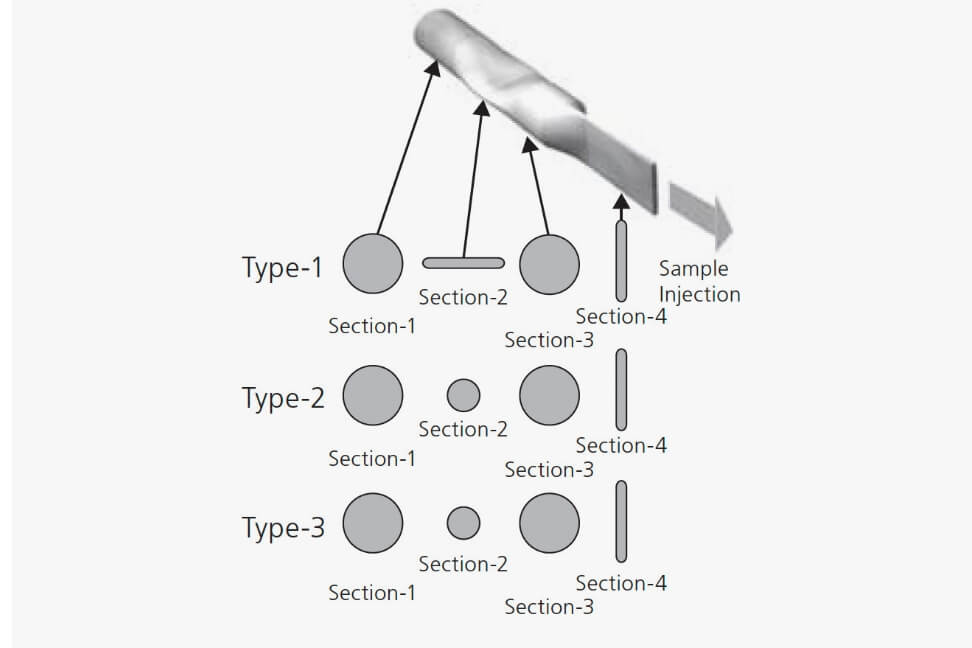
When compressed air, including the sample, flows through the injection nozzle, the shape, area, and direction of the cross section is changed in order to obtain the large changes in volume, pressure and direction of air flow. Therefore, agglomerates can be strongly dispersed into air.
An injection nozzle to obtain optimum dispersion can be selected from the 3 types of injection nozzles, depending on the sample property.
Magnetized particles, which are easy to cohere in liquid, can be strongly dispersed into air using the type-1 injection nozzle. Therefore, accurate measurement results can be obtained.
When the cyclone type is used, the double dispersion process of suction and injection enables measurement with good reproducibility.
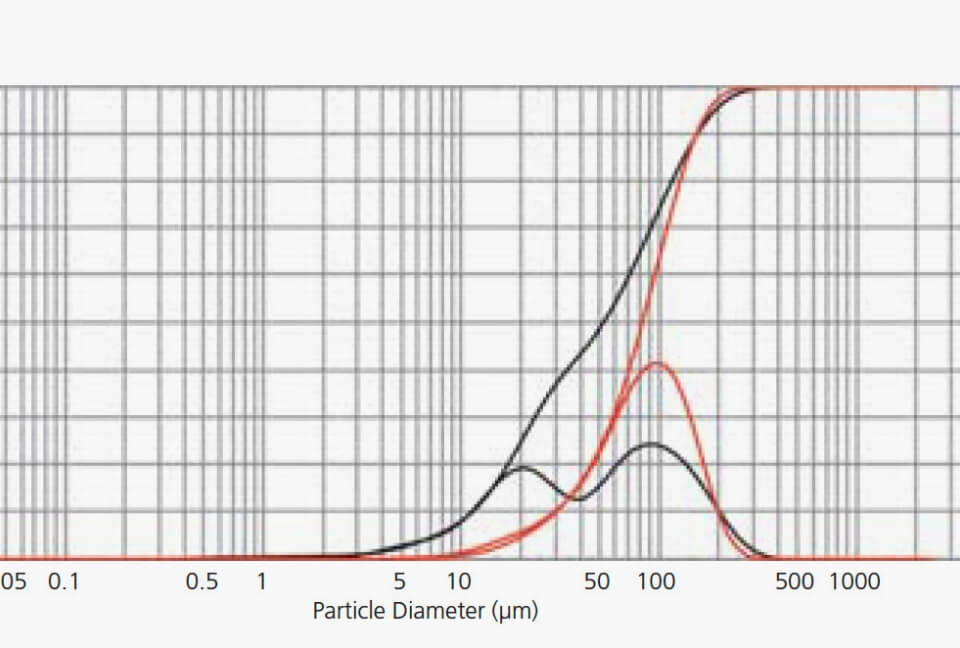
Red= Hard flour / Black= Soft flour
Dispersion of flour by water is so difficult that organic
solutions such as IPA must be used for wet measurement. Cyclone injection mechanism can disperse flour in air easily, enabling dry measurement with good reproducibility. Moreover, the sample can be gathered into a vacuum cleaner and disposed of easily.
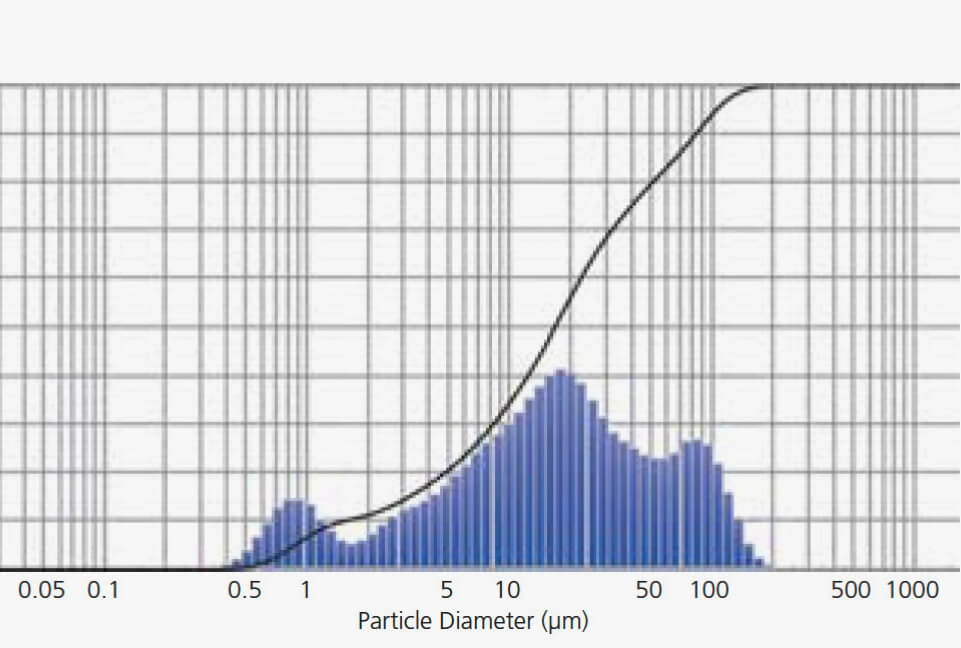
2 types of gastrointestinal medicines
2 types of gastrointestinal medicines
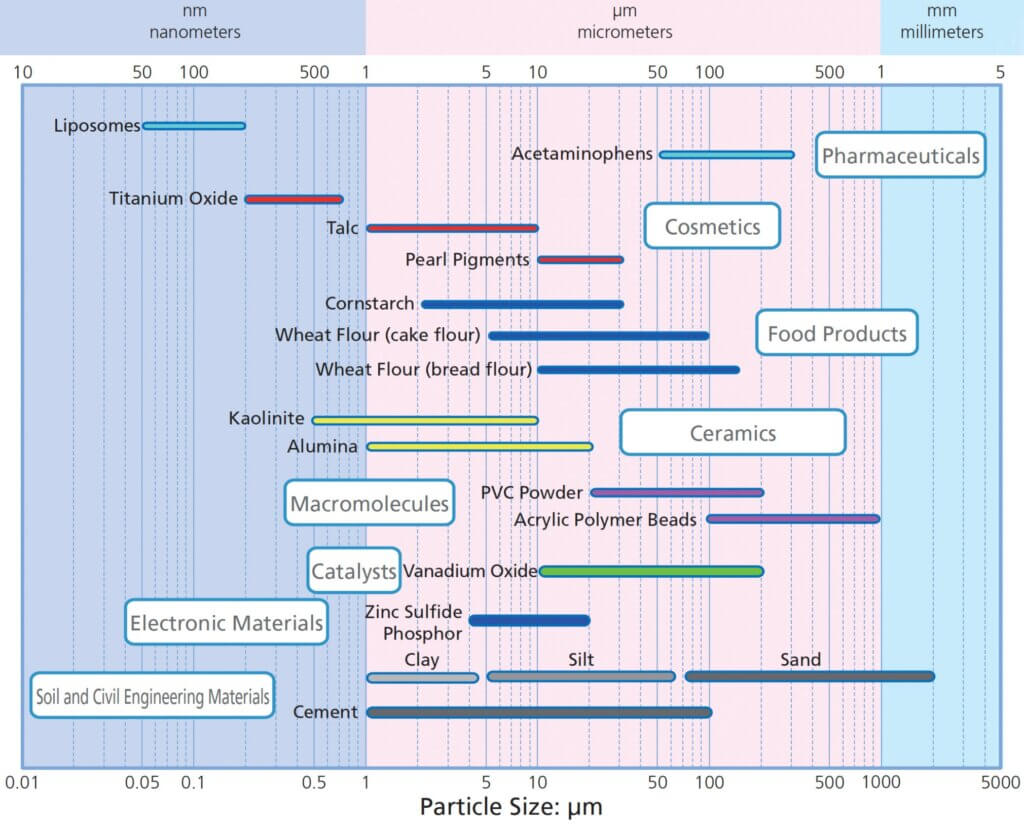
Particle Size Analyzer Applications
Particle size distribution is one of the main factors determining the characteristics of powders and particles. Powders and particles are used in a wide variety of fields for a wide range of objectives and applications. In some cases, they are used directly as pharmaceuticals, catalysts, additives, or binders while in other situations they are used as raw ingredients. In either case, the particle size distribution can have a major effect on the characteristics desired for a given application or objective, or on the performance and quality of a final product. Consequently, measuring the particle size distribution is essential for stabilizing or improving the characteristics, performance, or quality of powders or particles.
Shimadzu particle size analyzers are used in a wide variety of fields, for a wide range of purposes and applications.
1. Pharmaceuticals
The smaller the particles, the larger their specific surface area and the more quickly they dissolve. In the case of particles in medical injections, the particle size determines how they pass through or penetrate capillaries and blood vessel walls and which parts of the body they reach. This has a major influence on the efficacy and side effects of pharmaceuticals.
5. Macromolecules
When particles are used as ingredients in pipes, films, and sheets, the particle size distribution can affect the strength and light permeability of the final product.
2. Cosmetics
For lipstick, mascara, and eye shadow, subtle differences in color and shine are controlled by differences in the particle size distribution. The smoothness or UV light-blocking properties of creams also vary depending on the particle size distribution.
6. Catalysts
Though chemical reactivity is affected by the specific surface area and pore structure, given the same material, the chemical reactivity can be controlled by varying the particle size distribution.
3. Food Products
Many food products include powdered ingredients. The mouth, tooth, and tongue feel and other characteristics of bread, cakes, pasta, etc. depend on the particle size distribution. Also, controlling the particle size distribution in beverages is important to ensure consistent quality. For example, smaller particle sizes are used in milk and lactic acid beverages to prevent differences in concentration and taste between the upper and lower portions of the container
7. Electronic Materials
The manner and degree to which particle size affects electronic materials differ depending on the application and material. However, the quality control of particle size distribution is increasingly being required to ensure higher and more consistent quality of the final product.
4. Ceramics
The strength, density, hardness, heat resistance, water and air permeability, and other characteristics of ceramics depend not only on the type of ingredient particles, but also significantly on the particle size distribution.
8. Soil and Civil Engineering Materials
The particle size distribution of soil and cement has a significant effect on the stability and strength of supporting ground, the strength of buildings and other structures, and how much these change over time. Also, measuring the particle size distribution is an important factor in understanding the scale of environmental pollution in soil.
Measurement Technology Laser Diffraction Method
There is a one-to-one correspondence between the particle diameter and the light intensity distribution pattern.
When a particle is irradiated with a laser beam, light is emitted from the particle in every direction. This is “scattered light”. The intensity of the scattered light varies with the scattering angle and describes a spatial intensity distribution pattern. This is a “light intensity distribution pattern”. If the particle diameter is large, the scattered light emitted from the particle is concentrated in the forward direction (i.e., the direction of the laser beam), and fluctuates intensely in an angular range too small to be represented in a diagram. Compared to the light emitted in the forward direction, the intensity of all other light is extremely low. As the particle diameter becomes smaller, the pattern of the scattered light spreads outwards. As the particle becomes even smaller, the intensity of the light emitted to the side and backwards becomes higher. The light intensity distribution pattern becomes gourd-shaped and spreads out in every direction. In this way, then, there is exists a one-to-one correspondence between the particle diameter and the light intensity distribution pattern. This means that the particle diameter can be ascertained by detecting the light intensity distribution pattern.
Measurement is performed on particle groups.
Particle size distribution measurement is not performed on individual particles, but rather on particle groups made up of large numbers of particles. Particle groups contain particles of different sizes, and the light intensity distribution pattern emitted by a group is composed of all the scattered light emitted from all the individual particles. The particle size distribution, in other words, what particle sizes are present in what proportions, can be obtained by detecting and analyzing this light intensity distribution pattern. This is the basic principle behind the laser diffraction method used in laser diffraction particle size analyzers.
Optical System in SALD-2300
The laser beam emitted from the light source (semiconductor laser) is converted into a thick beam with a collimator and this is directed at the particle group. The scattered light emitted from the group in a forward direction is concentrated with a lens, and concentric scattering images are formed at a detecting plane positioned at a distance equal to the focal length. This is detected with the wing sensor in which light-receiving elements are arranged concentrically. The scattered light emitted to the side and backwards is detected with side and back scattered light sensors. The light intensity distribution data can be obtained by detecting scattered light data of all directions.
Flow of Light Intensity Detection and Data Processing
With the SALD-2300 laser diffraction particle size analyzer, particle size distributions are calculated using light intensity distribution data. The overall flow of detection and data processing is shown in the diagram to the left. In measurement, the whole range of operations from the detection of scattered light intensity distribution patterns to the calculation of the particle size distribution is executed as one process, and the particle size distribution data is output. Recalculation of particle size distributions can be performed by using the previously detected and saved light intensity distribution data and selecting a refractive index that is different from the time of measurement.


Diffraction/Scattering by Particle

Particle Sensore

Particle Calculation
Applications
Technical data: Hardware Specifications SALD-2300
 | |
| SALD-2300 | |
|---|---|
| General Specifications | |
| Measurement principle | Laser Diffraction Method |
| Measurement range |
|
Measurement Unit: SALD-2300 (P/N: 347-61700-42[115V], 347-61700-44[230V]) | |
| Light source | Red Semiconductor laser (Wavelength 680 nm) |
| Light detector | Detector elements for UV semiconductor laser Total 84 elements (78 forward, 1 side, 5 back) |
| System Compliance | Class 1 Laser Product, CE compliant |
| Required power supply | 115 or 230 VAC as ordered 100 VA |
| Dimensions & weight | W680mm×D280mm×H430mm, 31kg |
| Operating Environment | Temperature: 10 to 30°C, Humidity: 20 to 80 % (no condensation) |
| Sampler: SALD-MS23 (P/N: 347-61701-42[115V], 347-61701-44[230V]) | |
| Dispersing bath | Capacity: 100~280cm3 |
| Sonicator | Frequency about 32 kHz, output about 40 W |
| Liquid Pump | Radial pump, maximum flow rate 2000cm3/min |
| Liquid Pump Material | Stainless (SUS 304, SUS 316), Tetrafluoroethylene (PTFE), Perfluoroelastmor (FEP) or Kalrez, Thermoflon Pascal (inside) |
| Liquid Supply Pump | Diaphragm pump, maximum flow rate 750cm3/min |
| Liquid Supply Pump Material | Tetrafluoroethylene, polyvinyl dene fluoride |
| Flow Cell | Quartz glass |
| Required power supply | 115 or 230 VAC as ordered, 200 VA |
| Dimensions & weight | W390mm×D520mm×H430mm,18kg |
| Operating Environment | Temperature: 10 to 30°C, Humidity: 20 to 80 % (no condensation) |
| Batch Cell: SALD-BC23 (P/N: 347-61702-42) | |
| Cell Material | Quartz glass |
| Required Liquid Volume | Approx. 12 cm3 |
| Stirrer Mechanism | Up-and-down movement of blade |
| Dimensions & weight | W100mm×D120mm×H140mm, 0.8kg |
| Operating Environment | Temperature: 10 to 30°C, Humidity: 20 to 80 % (no condensation) |
High-concentration Sample Measurement System: SALD-HC23 (P/N: 347-61703-42) | |
| Cell Material | Borosilicate glass |
| Required Liquid Volume | Approx. 0.15 cm3 |
| Dimensions & weight | W20mm×D100mm×H9mm, 0.2kg |
| Operating Environment | Temperature: 10 to 30°C, Humidity: 20 to 80 % (no condensation) |
Cyclone Injection Type Dry Measurement Unit: SALD-DS5 (P/N: 347-61706-42[115V], 347-61706-44[230V]) | |
| Sample suction types | Cyclone type / One shot type / Hand shot type |
| Suction nozzle | Can be selected from 3 types |
| Sampling Unit Specifications | |
| System | Cyclone type |
| Communication method | USB (PC control) |
| Required power supply | 115/230VAC(±10%), 100VA, 50/60Hz (excluding dust collector and compressor) |
| Dimensions & weight | W 240×D 310×H 210 mm, 10 kg |
| Operating Environment | Temperature: 10 to 30°C, Humidity: 20 to 80 % (no condensation) |
| Pressure Regulator Specifications | |
| Primary pressure | 0.6 to 0.8 MPa |
| Secondary pressure | 0.05 to 0.5 MPa |
| Filtration rating | Removing particles of 5 μm or larger |
| Connection to air source | Tube of 6 mm outside diameter |
| Communication method | USB (PC control) |
| Required power supply | 115/230VAC(±10%), 100VA, 50/60Hz (excluding dust collector and compressor) |
| Dimensions & weight | W 130×D 223×H 233 mm, 3 kg |
| Operating Environment | Temperature: 10 to 30°C, Humidity: 20 to 80 % (no condensation) |
| Requirements for compressor and dust collector | |
| Compressor |
|
| Dust collector |
|
Technical data: Software Specifications SALD-2300
 | |
| SALD-2300 | |
|---|---|
| Measurement and Data Display Functions | |
| Measurement of Particle Size Distribution | Allows measurements using measurement assistant function (interactive process based on SOP) |
| Refractive Index Setting | Automatic refractive index calculation function (LDR method: Light Intensity Distribution Reproduction Method) makes setting the refractive index easy. |
| Real-Time Display | Particle size distribution/light intensity distribution simultaneous display |
| Diagnostics/Adjustments | Self-diagnostic function and cell check function |
| Recalculation of Particle Size Distribution | Batch recalculation of max. 200 distributions |
| Display of Particle Size Distribution Data | Displays overlay of max. 200 distributions |
| Display of Light Intensity Distribution | Displays overlay of max. 200 distributions |
| Statistical Data Processing | Max. 200 sets of data (also allows overlaying max. 200 data sets) |
| Time-Series Processing | Max. 200 sets of data |
| 3-Dimensional Graphing | Max. 200 sets of data |
| Data Transfer via Clipboard | [Image Output]: Outputs entire data sheet or graph only. [Text Output]: Outputs summary data, particle size distribution data, or light intensity distribution data. |
| Data Sorting | Sorts by file name, sample ID, sample number, or refractive index |
| Output Conditions | |
| Particle Size (μm) Divisions | Fixed 51 or 101 divisions User settable 51 divisions |
| Particle Amount (%) Divisions | Fixed 51 divisions User settable 51 divisions |
| Distribution Basis | Count, length, area, or volume |
| Expression of Cumulative Distribution | Oversized or undersized |
| Expression of Frequency Distribution | q, q / Δ×, q / Δlog × |
| Smoothing Levels | 10 levels |
| Distribution Function Fitting | Rosin-Rammler distribution, logarithmic Gaussian distribution |
| Data Shifting | ±10 levels |
| Report Function | Single data sets (6 templates), overlaid data (5 templates), statistical data, time-series data, or 3D data can be selected and output using batch processing |
| Data Analysis Functions | |
| Scattering Angle Evaluation Function | Evaluates scattering characteristics within micro angle regions for samples such as optical films and sheets. |
| Data Emulation Functions | Emulates measurement results from other instruments and measurement principles, using SALD series measurement results. |
| Mixture Data Simulation Function | Simulates particle size distributions using any mixture ratio of multiple particle size distributions. |
| Data Connection Function | Combines two particle size distributions with different measurement ranges at any particle size point to create a single particle size distribution. |
| Continuous Measurement Function | Continuously measures changes in particle size distributions and particle diameters over time, at intervals as short as one second, and saves the results. |
Technical data: PC Requirements SALD-2300
 | ||
| SALD-2300 | ||
|---|---|---|
| OS | Windows 7 | |
| CPU | Pentium Dual-Core 2.5GHz min. 7 | |
| MEMORY | 2GB min. | |
| HDD | Min. 1 GB of free space required | |
| CD-ROM Drive | Required for software installation | |
| USB Port | Unit Name | Required USB port |
| SALD-2300 | 1 port | |
| SALD-BC23 | 0 | |
| SALD-MS23 | 1 port | |
| SALD-HC23 | 0 | |
| SALD-DS5 | 2 ports | |
| Printer | 1 port | |
| Display | SXGA (1280×1024 pixels) min. | |
| Printer | Must be compatible with operating system. |
Numerous Subjects of Observation Requiring Time
Resolution of One Millionth of a Second or Less
Aerospace Equipment
- Airflow in wind tunnel tests
- High-speed impact tests for aerospace materials
- The behavior of high-speed flying objects
- The generation and propagation ofshockwaves
Automobiles
- The failure behavior of automotive body materials
- The combustion process in engines
- The injection process in fuel injection equipment
Advanced Medical Equipment
- The drug release process in drug delivery systems
- The generation and disappearance process of microbubbles, which are utilized for sterilization and ultrasound diagnosis
Consumer Electronics
- The inkjet ink discharge process materials
- The failure process of smartphone glass
- The behavior of MEMS equipment devices used in projectors
Visualization technology, based on the high-speed recording and slow motion replay of phenomena via a high-speed video camera, is widely used in a variety of fields.
The following are examples of fields requiring high-speed observation, requiring time resolution of one millionth of a second or less.
Aerospace Field
- Airflow in wind tunnel tests
- High-speed impact tests for aerospace materials
- The behavior of high-speed flying objects
- The generation and propagation ofshockwaves
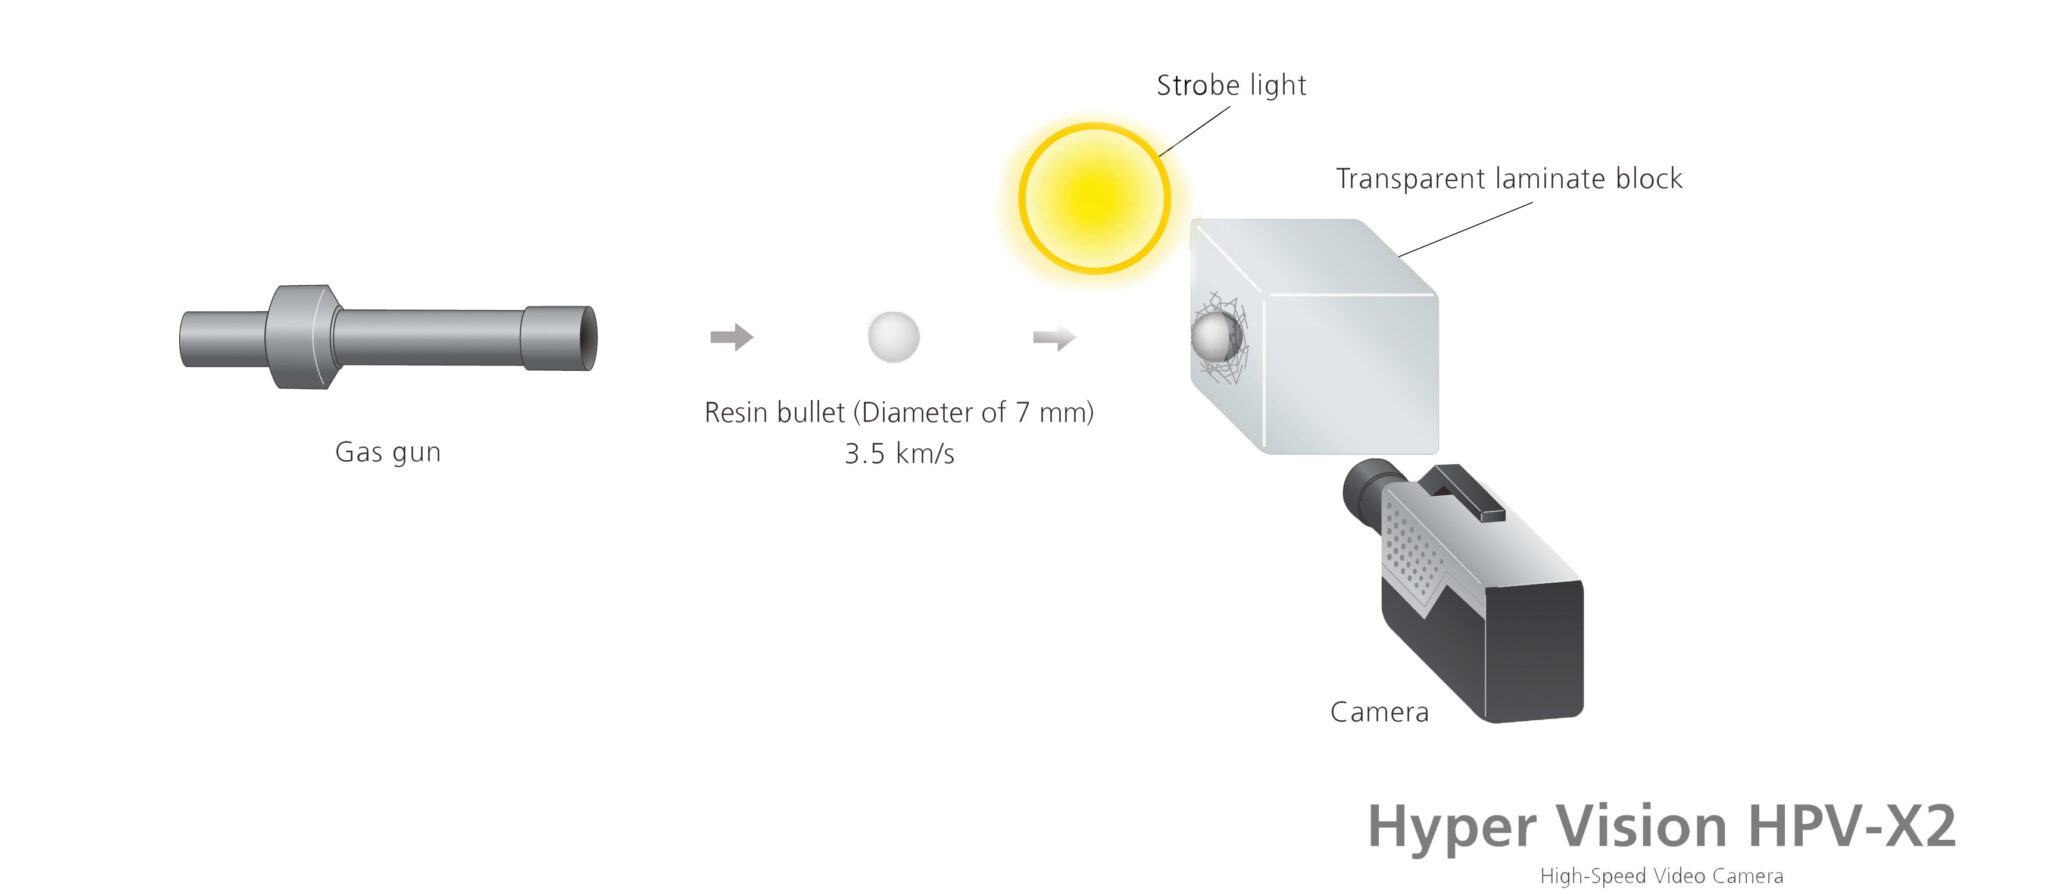
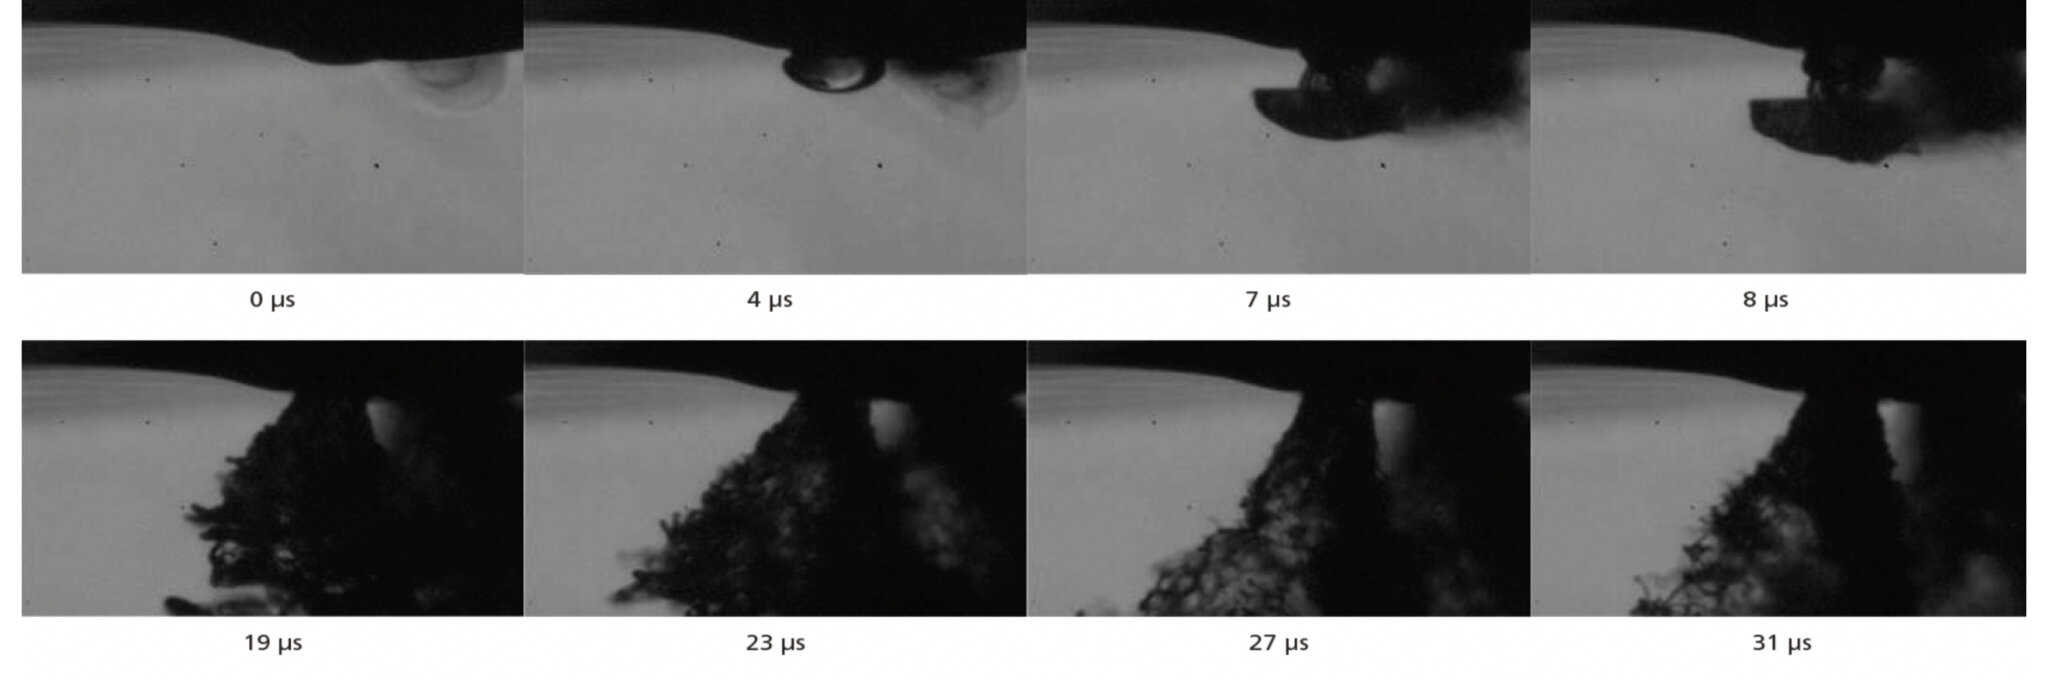
High-Speed Collision of a Transparent Laminate with a Resin Sphere
CFRP Lightning Strike Tests
Lightning strike tests are used to investigate damage from lightning strikes to carbon fiber reinforced plastics (CFRP), which are increasingly used as structural materials for aircraft. The image illustrates the instant gasification of the resin by the lightning current flowing along the direction of the CFRP fibers
Supersonic Wind Tunnel Test
Sonic booms, the shockwaves generated by ultrasonic passenger planes, cause a thunderous noise on the ground, so aerodynamic designs are studied as a means to reduce this problem. The image shows a Mach 2 ultrasonic wind tunnel test. Subtle variations in airflow are captured by the high-speed camera.
Satellite and rocket debris, referred to as space junk, circles the earth at high speeds in satellite orbits. Space junk causes problems when it collides with spacecraft in flight, causing damage. In addition, in recent years, the conversion of aircraft parts to carbon fiber reinforced plastics (CFRP) has advanced. However, aircraft experience lightning strikes and collisions with birds and hail midflight, so the impact resistance of materials and the damage caused by these occurrences must be investigated beforehand. In the development of aerospace materials, high-speed cameras are used to investigate the failure behavior of materials caused by high-speed flying objects, and the deformation and failure behavior of materials caused by high-speed impacts. In addition, high-speed cameras are utilized for the development of thrust generators, aerodynamic design via wind tunnel tests, the observation of damage in lightning strike tests, and basic research into shockwaves, detonation waves, and other high-speed wave motion phenomena.
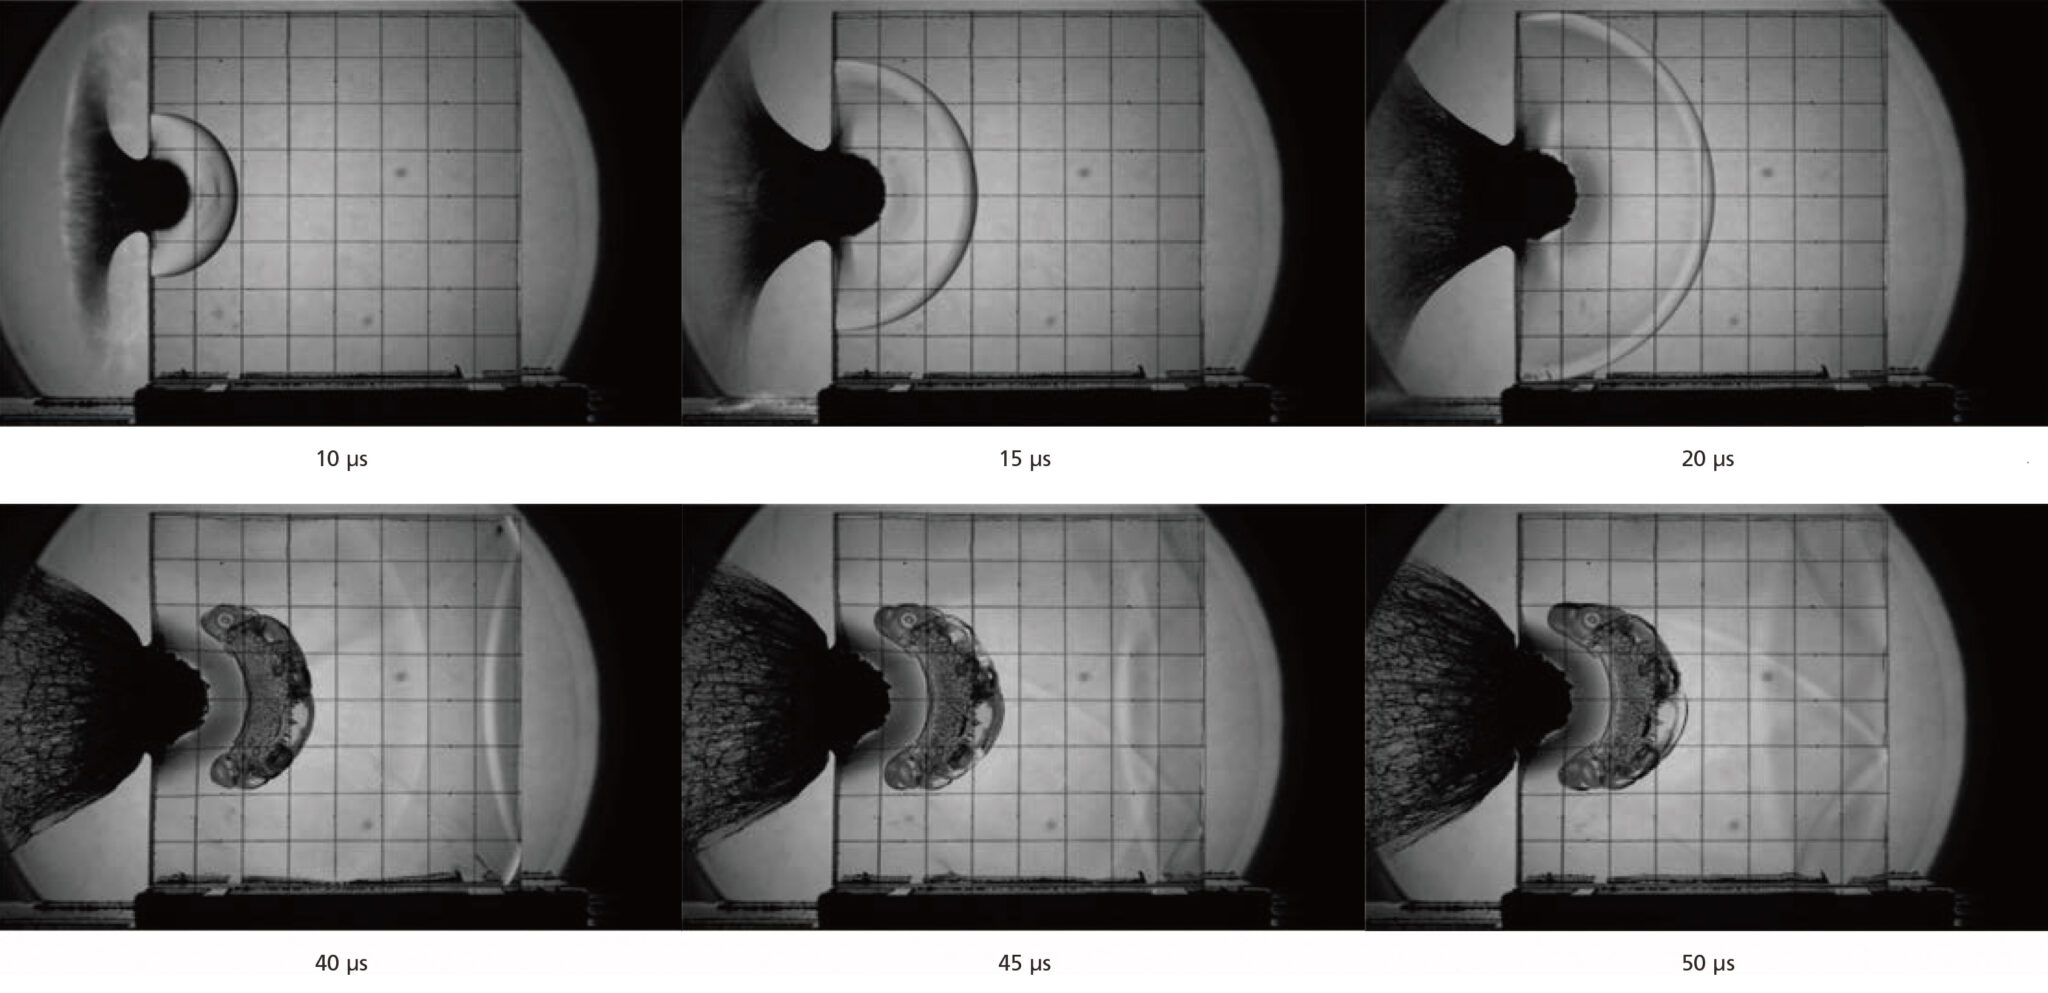
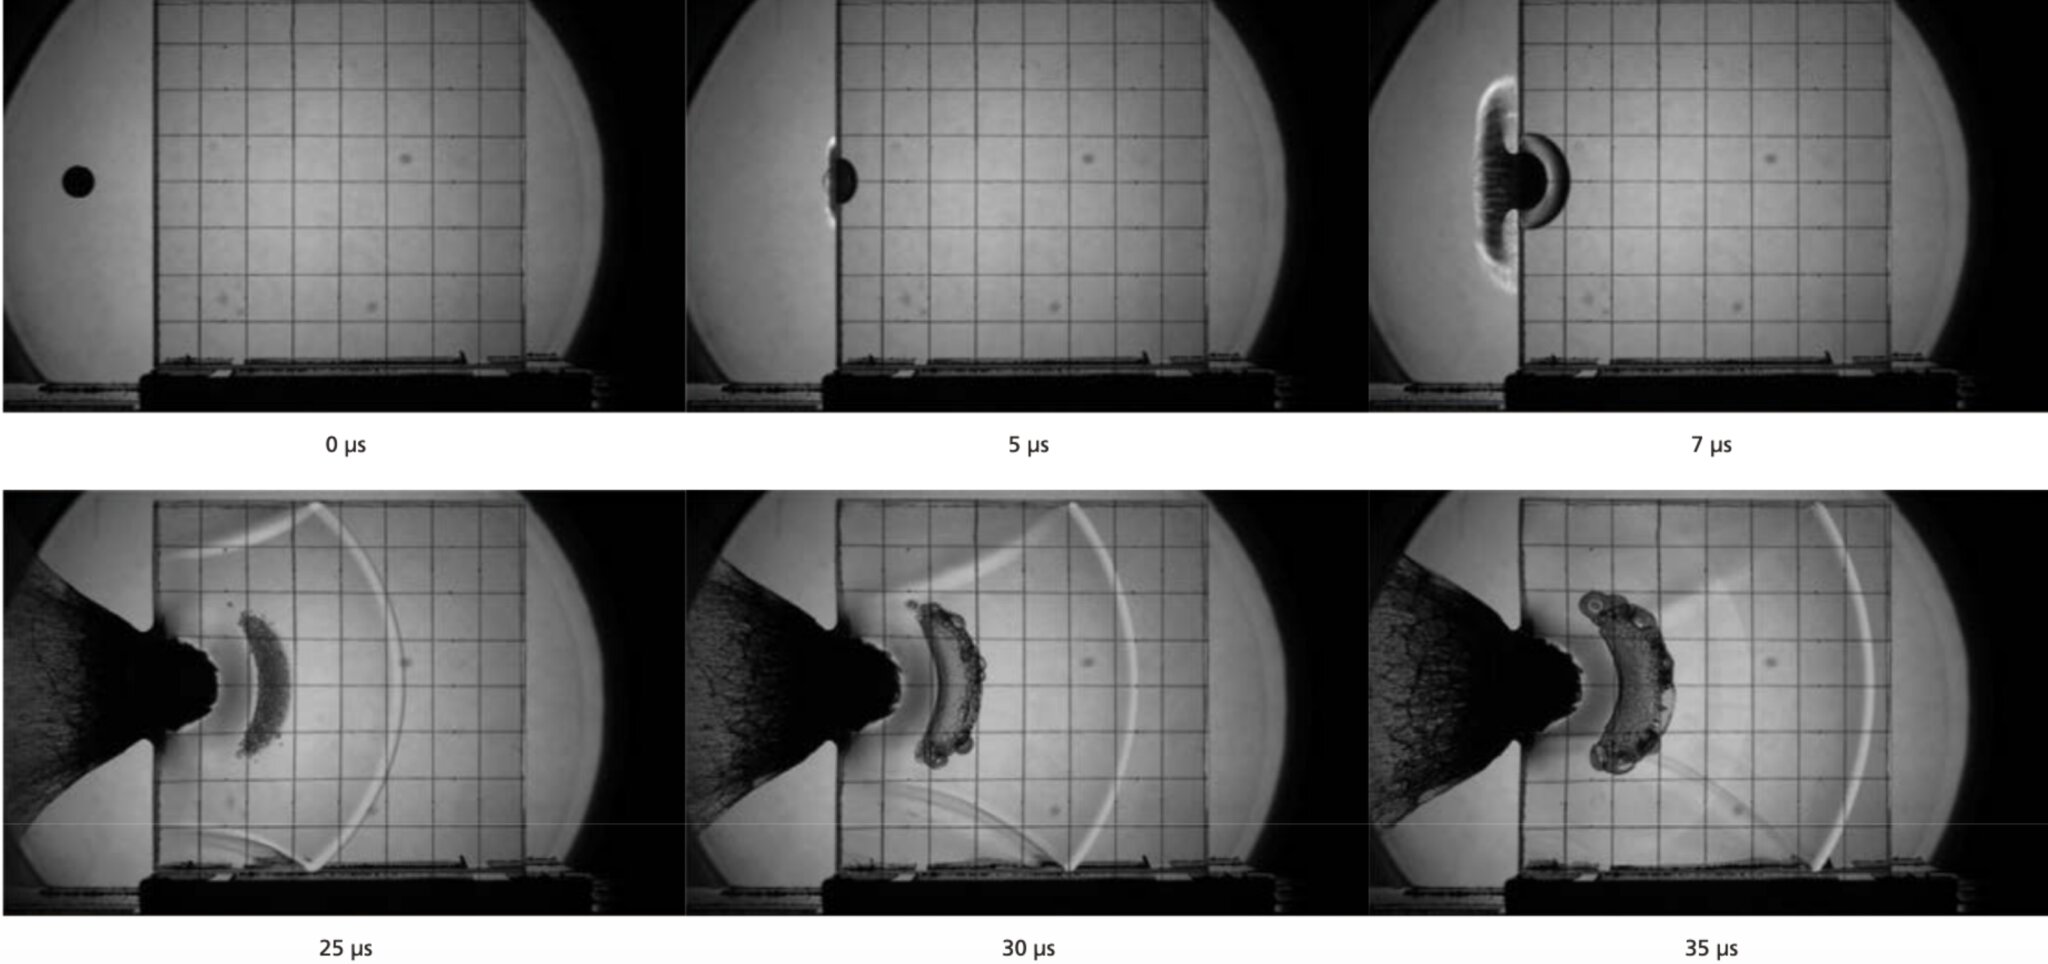
These images show the failure process caused by the high-speed collision of a resin sphere (nylonsphere) with a block of a transparent laminate (polycarbonate). The images illustrate the production and growth of cracks inside the block due to the stress wave caused by the collision.
Provided by Professor Arai of Hosei University, Professor Sato of JAXA, Professor Kawai of Kumamoto University
High-Speed Collision of a Transparent Laminate with a Resin Sphere
A resin sphere is injected at 3.5 km per second from the gas gun. The high-speed collision of a transparent laminate with the resin sphere is captured in the backlight system to face the camera and strobe light.
Fuel Injection Nozzle (Injector) for an Automobile Engine
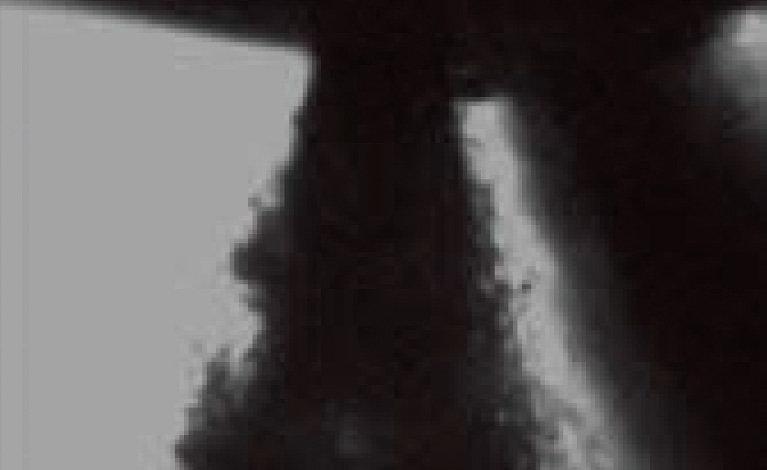
Liquid fuel is injected from the engine’s fuel injection nozzle. Analysis of the process of atomization, by which the fuel is changed into fine particles of uniform size, is indispensable for the development of high-power, high-efficiency engines. The images illustrate how the liquid fuel injected at high speed from the pores in the nozzle tip forms a cone-shaped film, which then changes into droplets.
Provided by Professor Kawahara of Okayama University
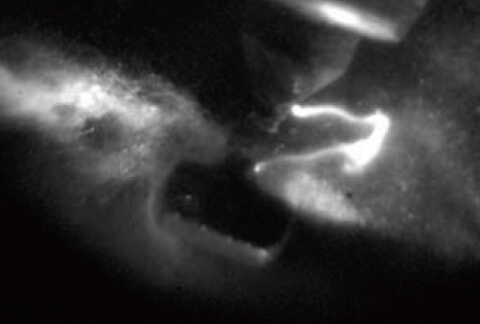
Spark Plugs
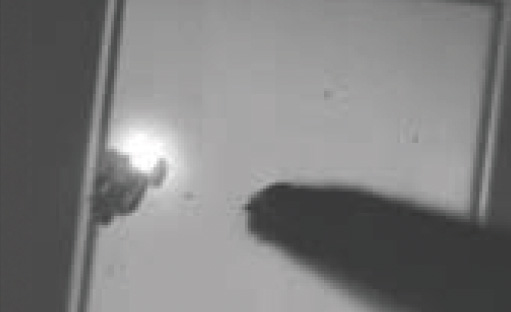
The recorded image shows the spark discharge occurring between the electrodes of the spark plug. It is evident that the spark is bent significantly by the impact of the fuel injected from the left side to the right side of the image. Provided by Professor Kawahara of Okayama University
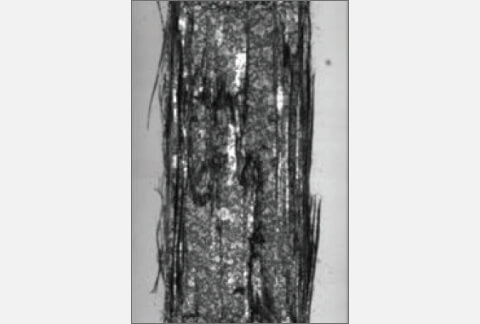
High-Speed Tensile Test of Carbon Fiber Reinforced Plastics (CFRP)
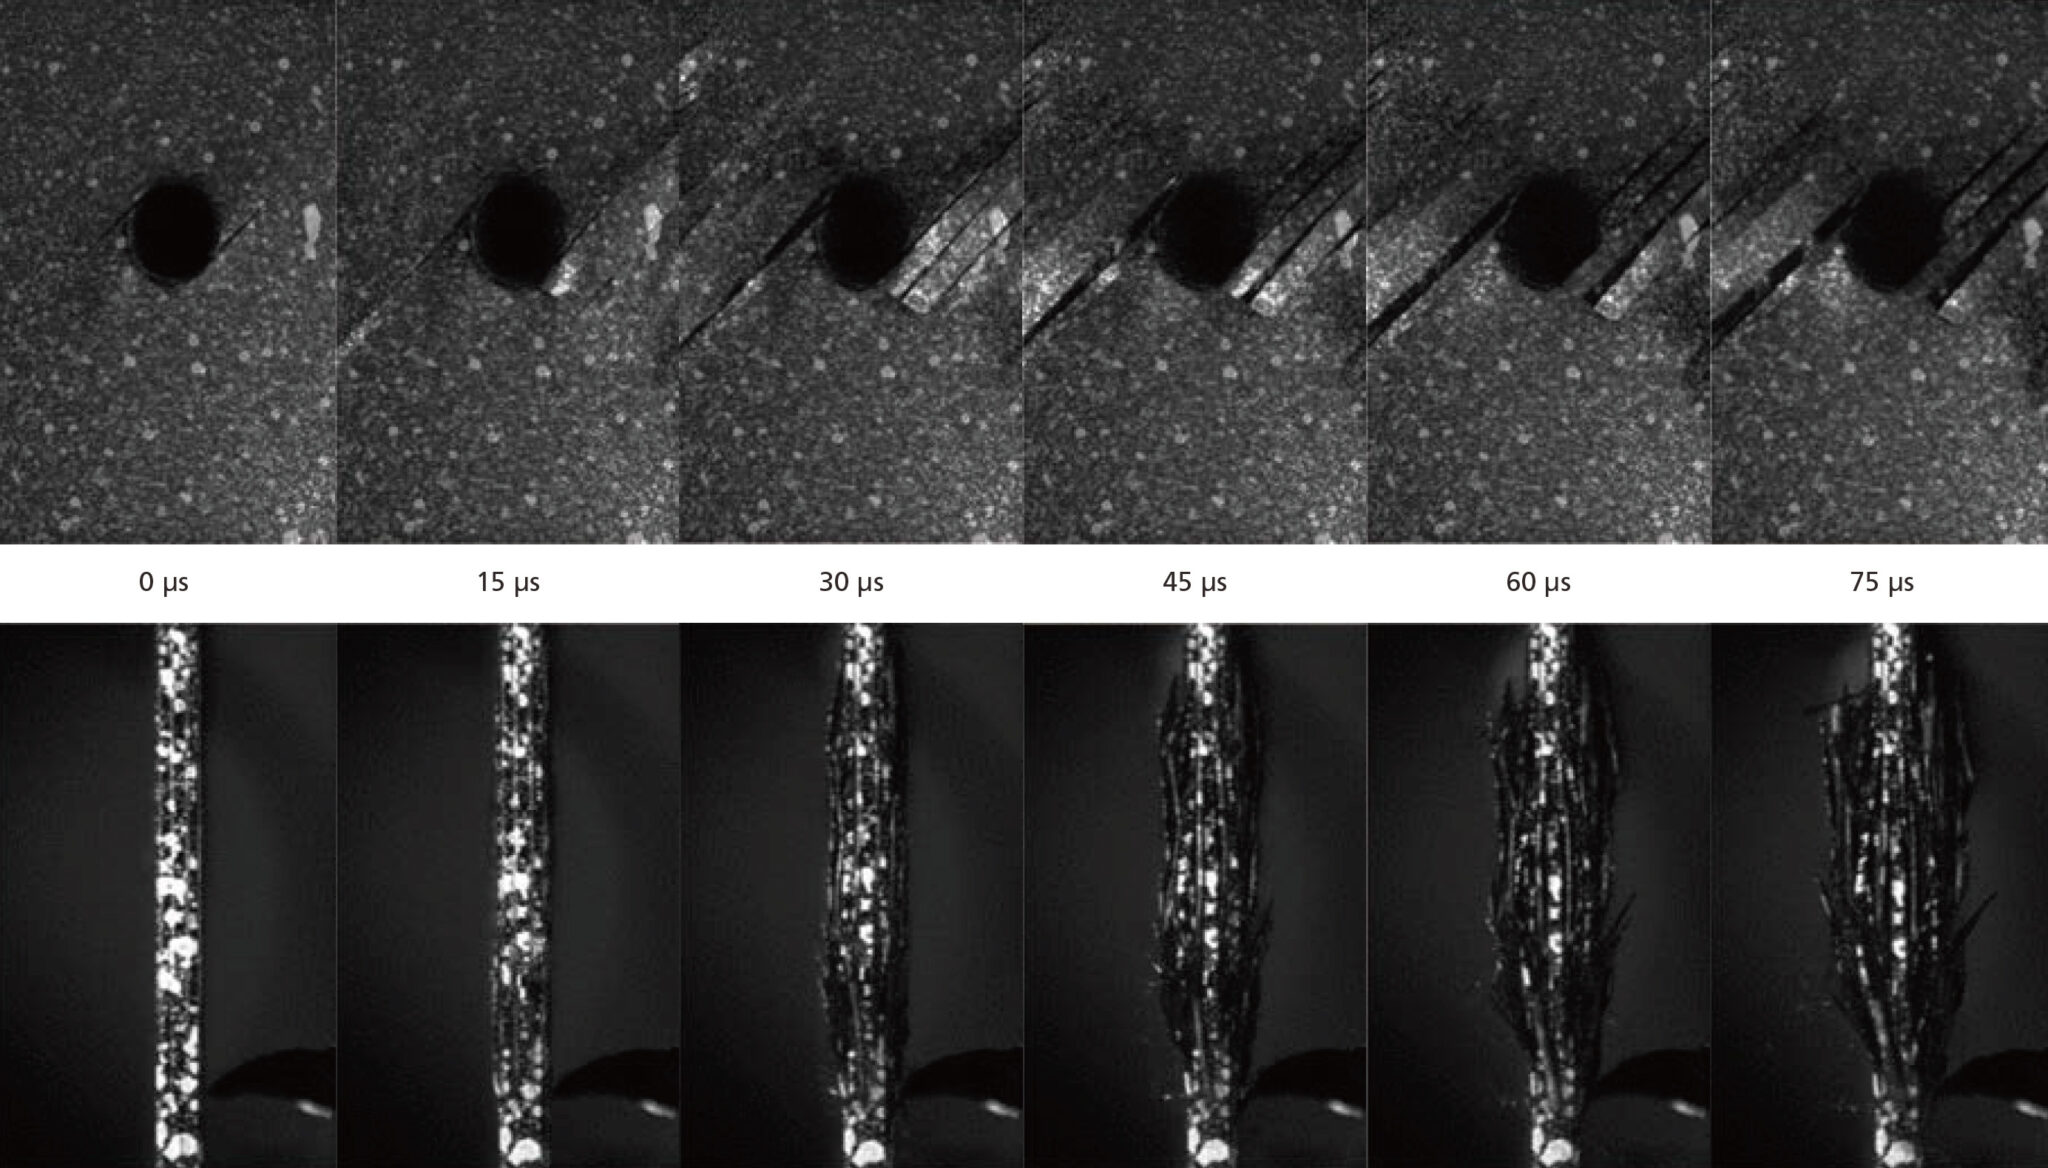
The image illustrates the breakage of the CFRP by the high-speed tensile testing machine. The CFRP fractures instantaneously at the limit load, so a recording speed of 10 million frames/second is required to capture the fracturing process in detail.
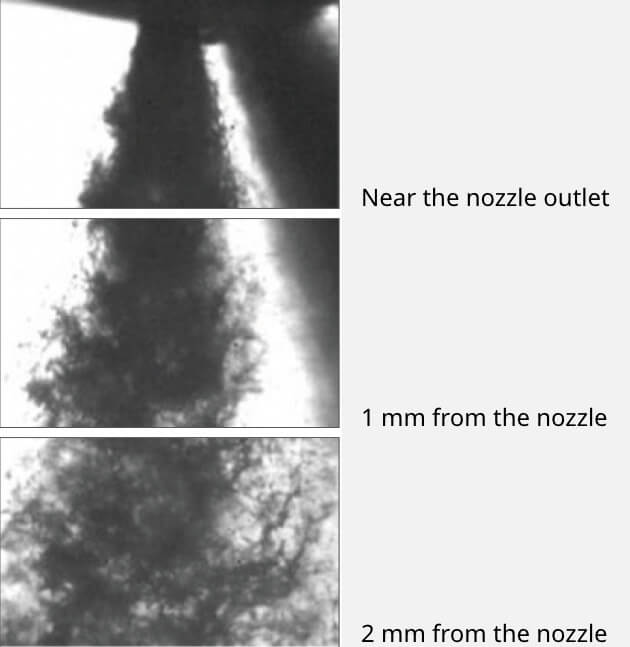
Atomization Process of Fuels
Recording speed: 10 million frames/second Width of field of view: Approx. 1.2 mm.
The liquid fuel injected from the nozzle is captured. The liquid film turns into the droplets with increasing distance from the nozzle. Provided by Professor Kawahara of Okayama University
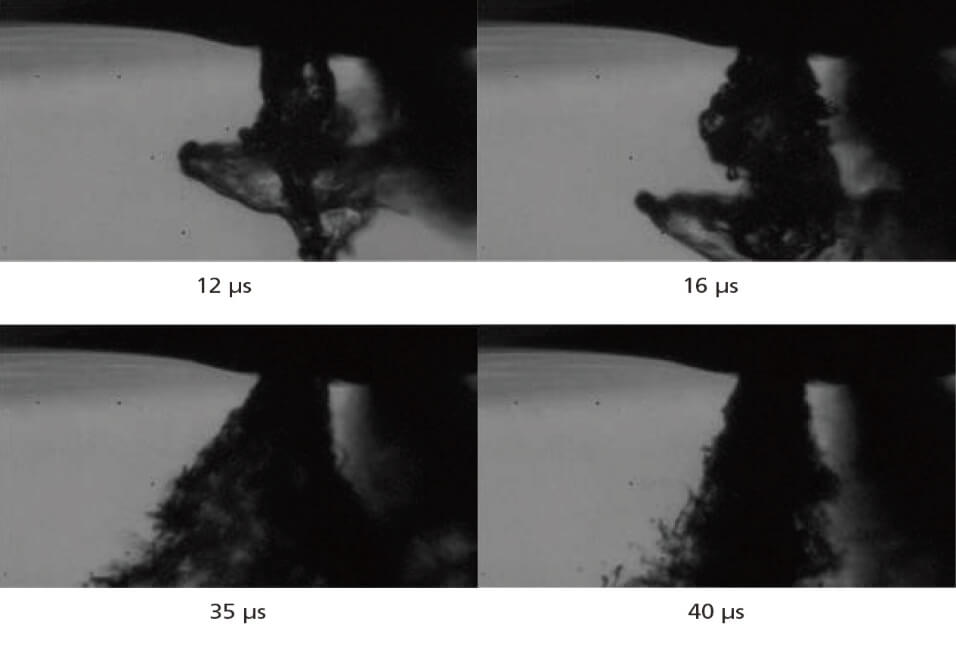
Atomization Process of Fuels
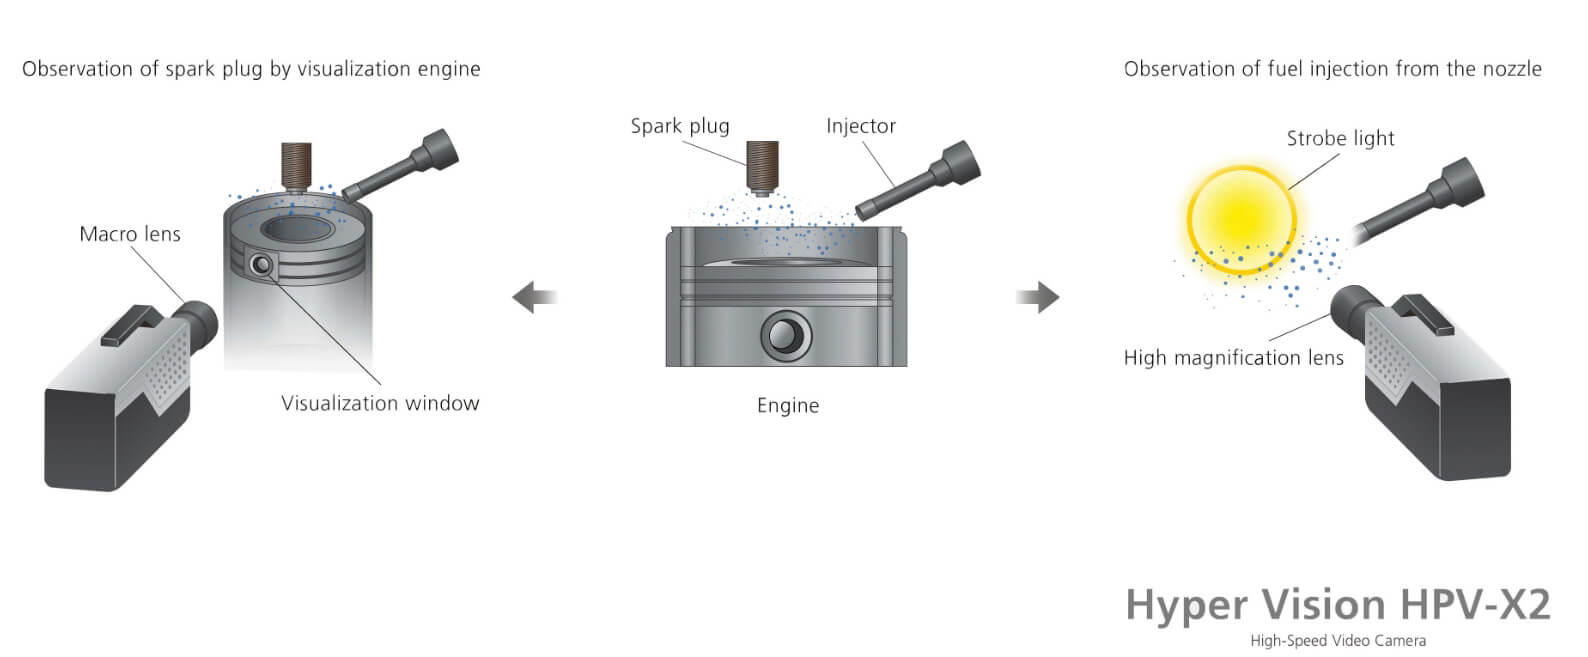
In order to develop high-output, high-efficiency automobile engines, detailed observations and analyses of the structural components of the engine are required. This includes the process of fuel injection by fuel injection equipment (injectors), and the process of fuel ignition by spark plugs. In addition, the development of automobile bodies utilizing new materials such as lightweight and very strong carbon fiber reinforced plastics (CFRP) is actively being pursued.
However, in developing such new materials, it is necessary to observe and analyze the deformation and failure behavior of materials when they undergo an impact. In recent years, the deformation behavior of materials recorded using high-speed cameras has been analyzed using image analysis software. Dynamic analyses of the 2D or 3D strain distributions in the material are also performed. In addition, high-speed cameras are used to observe the engine combustion process and the behavior of airbags.
Observation and Analysis of Engine Components
Discharge of spark plug or fuel injection from the nozzle can be observed in part alone or by visualization engine and analyzed in detail.
In medical treatment and biotechnology fields, research is advancing using the dynamics of so-called microbubbles, microscopic bubbles on the order of 1 to 100 microns. When microbubbles in a fluid are exposed to ultrasonic waves, they expand, contract, and then disappear, a process that generates a localized, high-speed flow referred to as a microjet. Research is being performed regarding the use of this phenomenon to open pores in cells so as to introduce genes and pharmaceutical agents directly into cells. Microbubbles are extremely minute, so the process of expansion, contraction, and destruction occurs at very high speeds. Accordingly, a high-sensitivity, high-speed camera is required to analyze this behavior. In addition, high-speed cameras are used to observe the behavior of ultrasonic waves from ultrasonic generators.
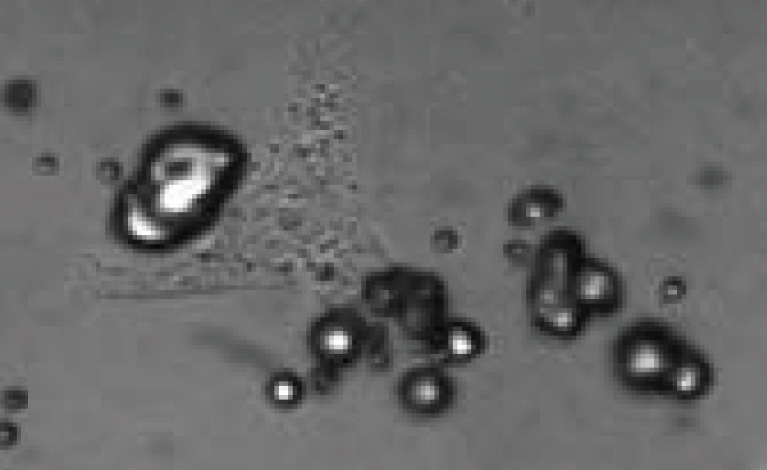
Research is advancing into a drug delivery system in which microcapsules containing pharmaceutical agents and microbubbles are introduced in proximity to cancer cells. Exposure to ultrasonic waves is used to rupture the capsules, and the pharmaceutical agents are then guided into the cancer cells. The images illustrate the expansion, contraction, and destruction of microbubbles in proximity to cancer cells, and the mechanical impact of this process on the cells.
Provided by Division of Bioengineering and Bioinformatics at Hokkaido University
High-Speed Contraction of Microbubbles
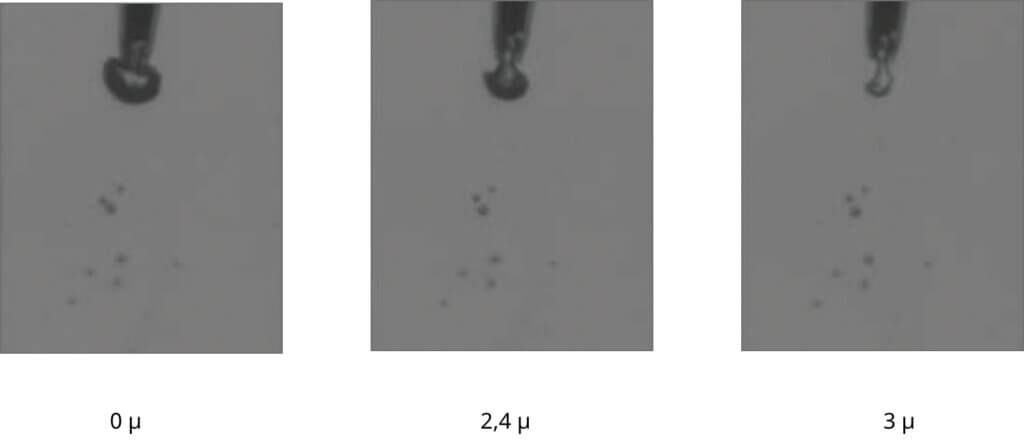
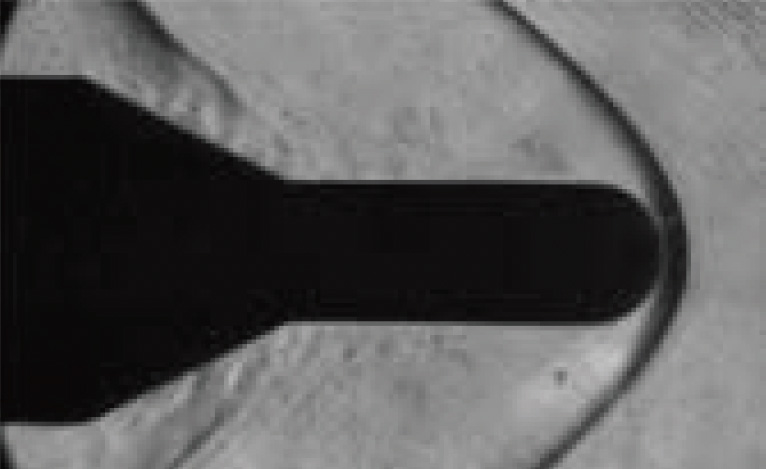
The images illustrate the contraction and disappearance of microbubbles resulting from an electrical discharge at the tip of a microscopic tube. Research is being conducted into micro-scalpels and other applications using the high-speed flow generated when microbubbles disappear.
(Provided by the Yamanishi Laboratory at the Shibaura Institute of Technology)
Laser Ablation Deposition System
High-speed cameras are used to observe and measure high-speed phenomena. These include the behavior of plasma in etching systems, sputtering systems and other plasma equipment, and machining processes in laser machining systems, electrical discharge machines, and cutting machines. In addition, they are used for failure mode analysis, including observations of the moment of destruction of the insulating film on the semiconductor devices.
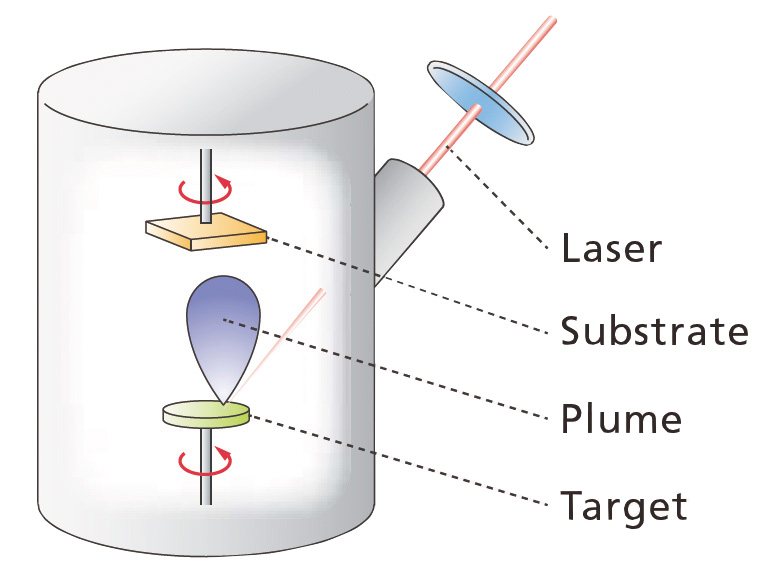
Laser Ablation Film Forming Apparatus
If the laser pulse is irradiated to a target substance, a substance surface stripped (ablation), particles with a
light-emitting called plume will pop out. The laser ablation film forming apparatus utilizes this
phenomenon, a substrate to be formed a film is arranged opposite to the target substance, and a film by
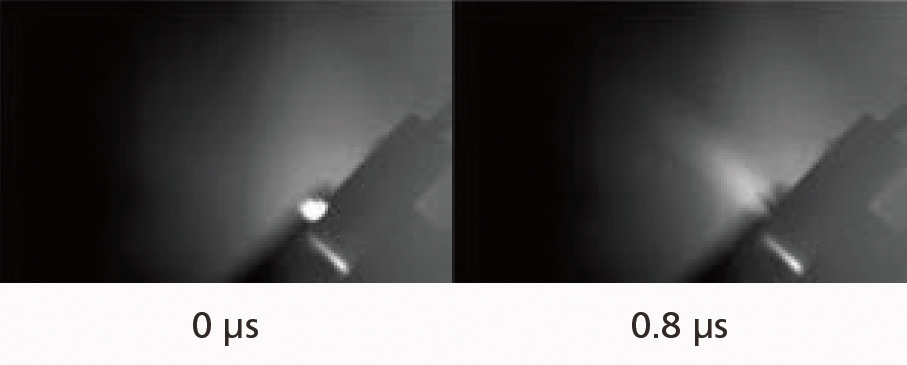
depositing the particles generated by abrasion on the substrate. The image is obtained by observing the
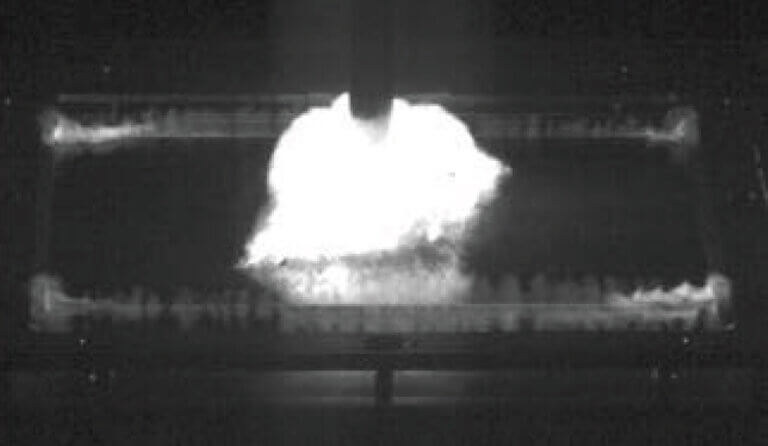
generation and disappearance process of the plume with the laser pulses emitted horizontally from the left.
Provided by the Tanabe Laboratory at Kyoto University
Provided by Professor Kawahara of Okayama University
Dielectric breakdown of the semiconductor device
Dielectric breakdown of MOS (Metal – Oxide – Silicon, the basis of semiconductor integrated circuit) device is observed. The breakdown process is captured in which the thin-film metal electrode is going to peel from the oxide film while emits a flash.
Provided by the Sugawa Kuroda Laboratory at Tohoku University

Width of field of view: Approx. 0.8 mm
FTCMOS2 Advanced,
Next-Generation Burst Image Sensor
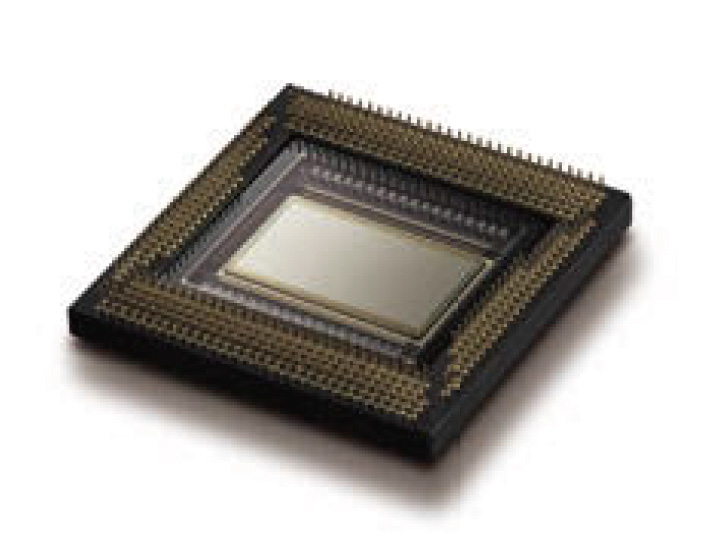
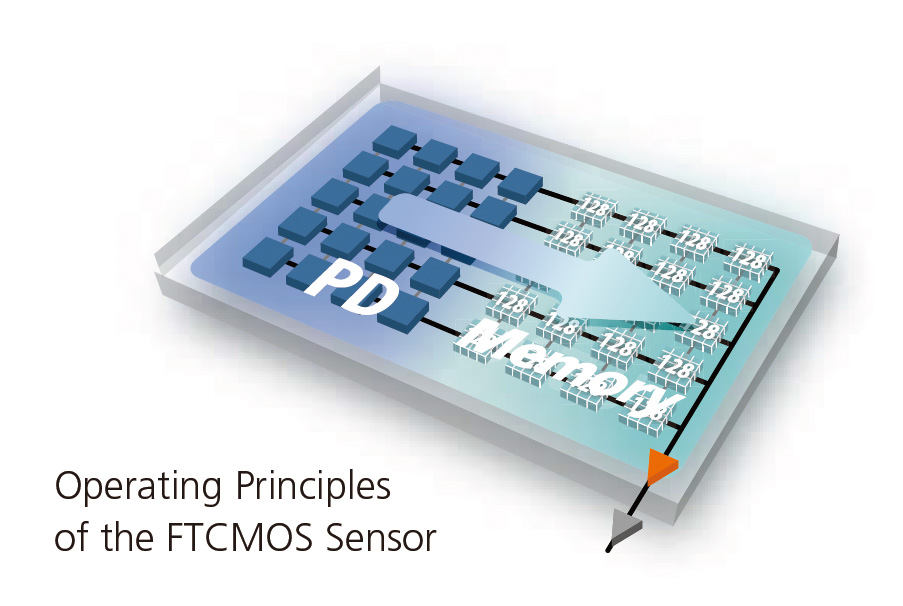
Burst Method Enables Ultra High-Speed Recording
For typical high-speed video cameras, image storage memories are located outside of the image sensor. Because the number of signal output taps are overwhelmingly small compared to the number of pixels, the transfer of the video signals from the pixels to the memories must be a sequentially serial process; therefore, ultra high-speed recording of more than 1 million frames per second could not be realized. In contrast, Shimadzu’s burst image sensor has the same number of built-in memories as number of frames recorded. Furthermore, a pixel and memories are connected by wire in a one-to-one manner in order to completely parallel transfer the video signal from the pixels to the memories. This makes it possible to realize ultra high-speed recording at 10 million frames per second. In addition, since it not limited to the number of signal output taps as with conventional serial transfer system, high-resolution recording at ultra high speed is available.

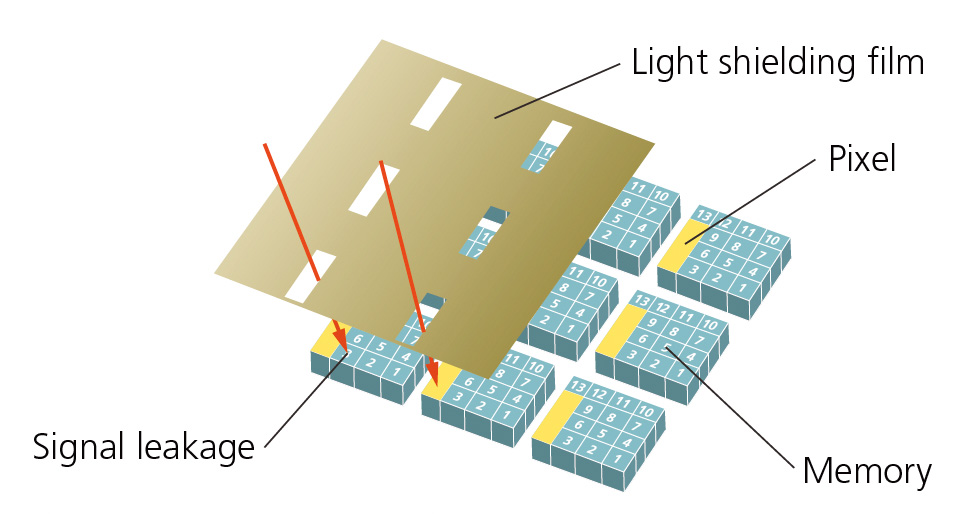
Next-Generation Burst Image Sensor Based on CMOS Technology
Conventional burst image sensors are based on CCD technology, in which the memory is positioned adjacent to the pixels. As a result, there are problems with decreased image quality due to signal leakage from pixels to memory. Accordingly, the Shimadzu FTCMOS burst image sensor adopts CMOS technology, in which the pixels and memory are spatially separated to achieve high image quality with no signal leaks. In addition, with the FTCMOS2, light sensitivity is six times better than with FTCMOS, thanks to the adoption of a new CMOS process.
Note: FTCMOS and FTCMOS2 sensors were developed through collaborative research with Prof. Shigetoshi Sugawa of Tohoku University. Patents: 04931160, 04844853, 04844854
Improved Signal-to-Noise Ratio Thanks to Six Times the Conventional Sensitivity
The light sensitivity of the HPV-X2 has been improved six-fold compared to our conventional products by adopting the FTCMOS2 image sensor. The resulting improvement in signal-to-noise ratio yields clearer images compared to conventional products, if the optical systems are the same.
FP Mode and HP Mode
- The FTCMOS2 sensor has 100,000 pixels and a 12.8 million bit memory.
- In FP mode, each 128 bit memory element is assigned to 100,000 pixels.
- In HP mode, each 256 bit memory element is assigned to 50,000 pixels.
- The maximum recording speed in HP mode is 10 million frames/second, and the number of frames recorded is 256, twice the number in FP mode. However the resolution is 1/2, at 50,000 pixels.*
* When images are displayed using software, and when saving image data, the pixels that are not used in HP mode are supplemented by the software, so the equivalent of 100,000 pixels is displayed or saved.
New FTCMOS2 Image Sensor
Conventional FTCMOS Image Sensor

| HP (Half Pixel) Mode | FP (Full Pixel) Mode | |
|---|---|---|
| Max. Recording Speed | 10 million frames/second | 5 million frames/second |
| Resolution | 50,000 pixels | 100,000 pixels |
| Number of Frames Recorded | 256 | 128 |
High-Speed Synchronized Recording Function Using Two Cameras
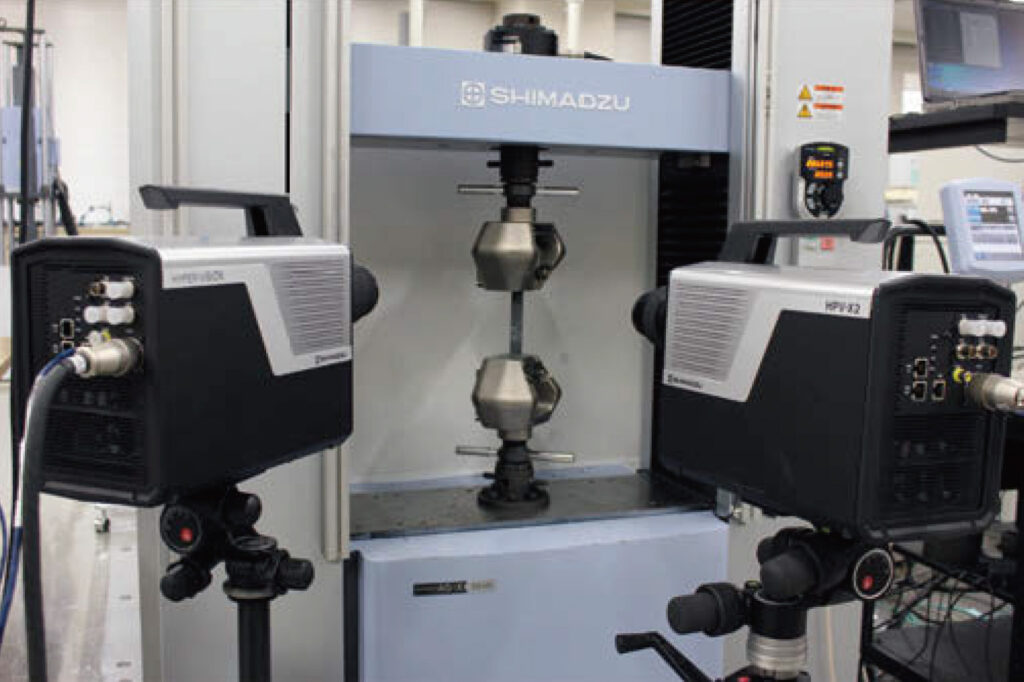
Accurate synchronized recording can be performed using two cameras at a frame rate of 10 million frames/second, so high-speed phenomena can be recorded simultaneously from two directions. Also, 3D image analysis can be performed in combination with commercially available image analysis software.
- Two directional simultaneous recording using two cameras
- 3D image analysis in combination with commercially available image analysis software
Two Directional Simultaneous Recording of the Breakage of Carbon Fiber Reinforced Plastic (CFRP) in a Tensile Test
Windows Compatible Control Software
- Windows compatible control software is provided. Just connect the camera and PC using a LAN cable and configure the simple settings to start recording at high speeds immediately.
- In addition to a special format, the recorded images can be saved in common formats such as AVI, BMP, JPEG, and TIFF.
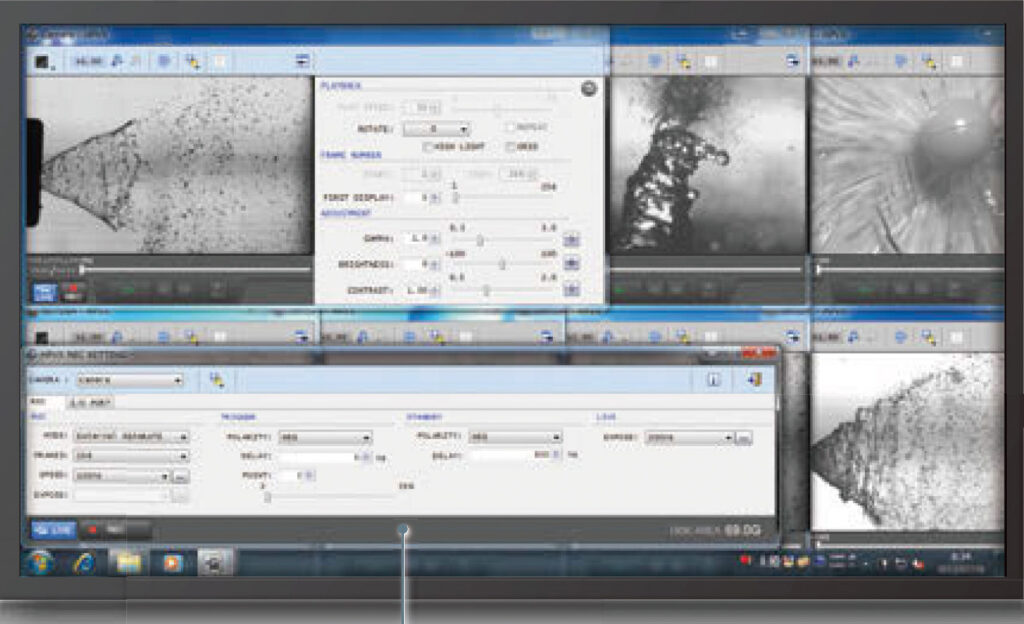

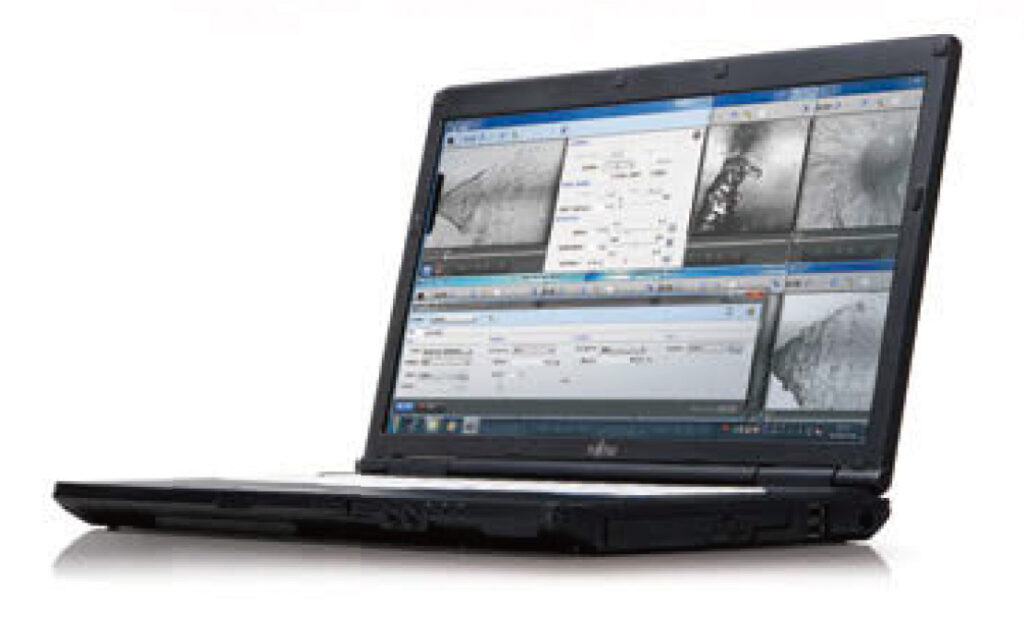
The Camera Can Be Used in Combination with CommerciallyAvailable Image Analysis Software
- High-speed phenomena can be subjected to image analysis and numerical analysis by saving the recorded images in a common format, and then loading them into commercially available image analysis software.
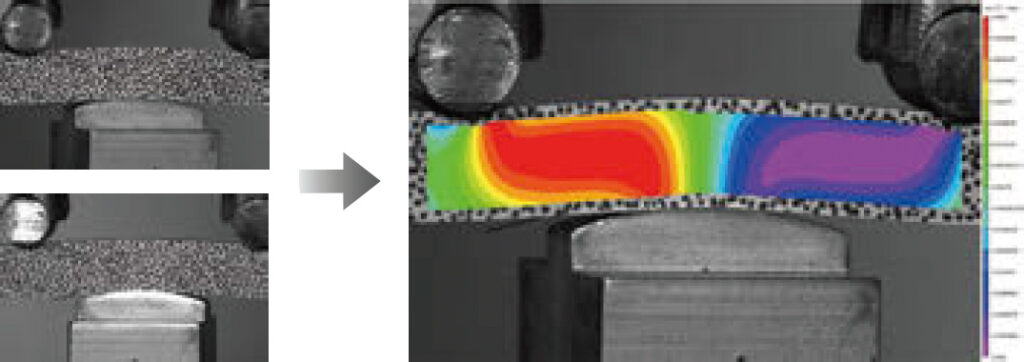
- In particular, to obtain strain distributions for samples during material tests, commercially available strain distribution analysis software can be used, which operates on the principle of digital image correlation (DIC).
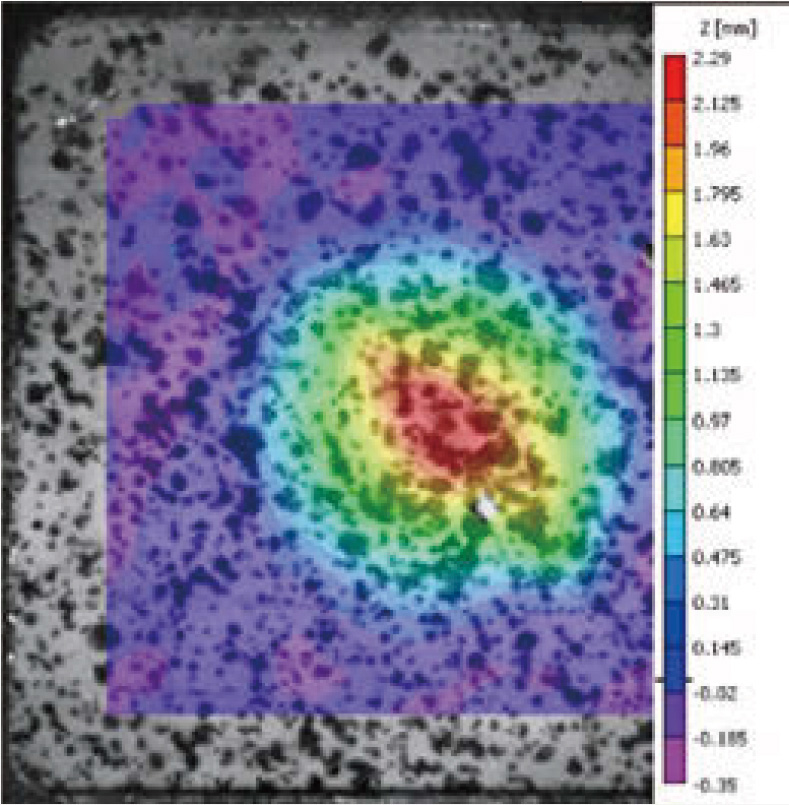
3-D strain analysis of CFRP thin plate
The deformation behavior of a CFRP thin plate colliding with a steel ball emitted by a gas gun at supersonic speed has been captured by two high-speed cameras. By using 3D-DIC software, it is possible to analyze a temporal change of the strain distribution in the direction perpendicular to
the thin plate.
Provided by the Tanabe Laboratory at Nagoya University
3D-DIC Analysis Software VIC-3D
(Option: Correlated Solutions Inc.)
VIC-3D can control two HPV-X2 units in direct through its’
graphical user interface to perform high-speed three-dimensional strain analysis.
*In order to make HPV-X2 direct control function by VIC-3D available, a license
authentication kit (S348-09838-01) is required in addition to VIC-3D.
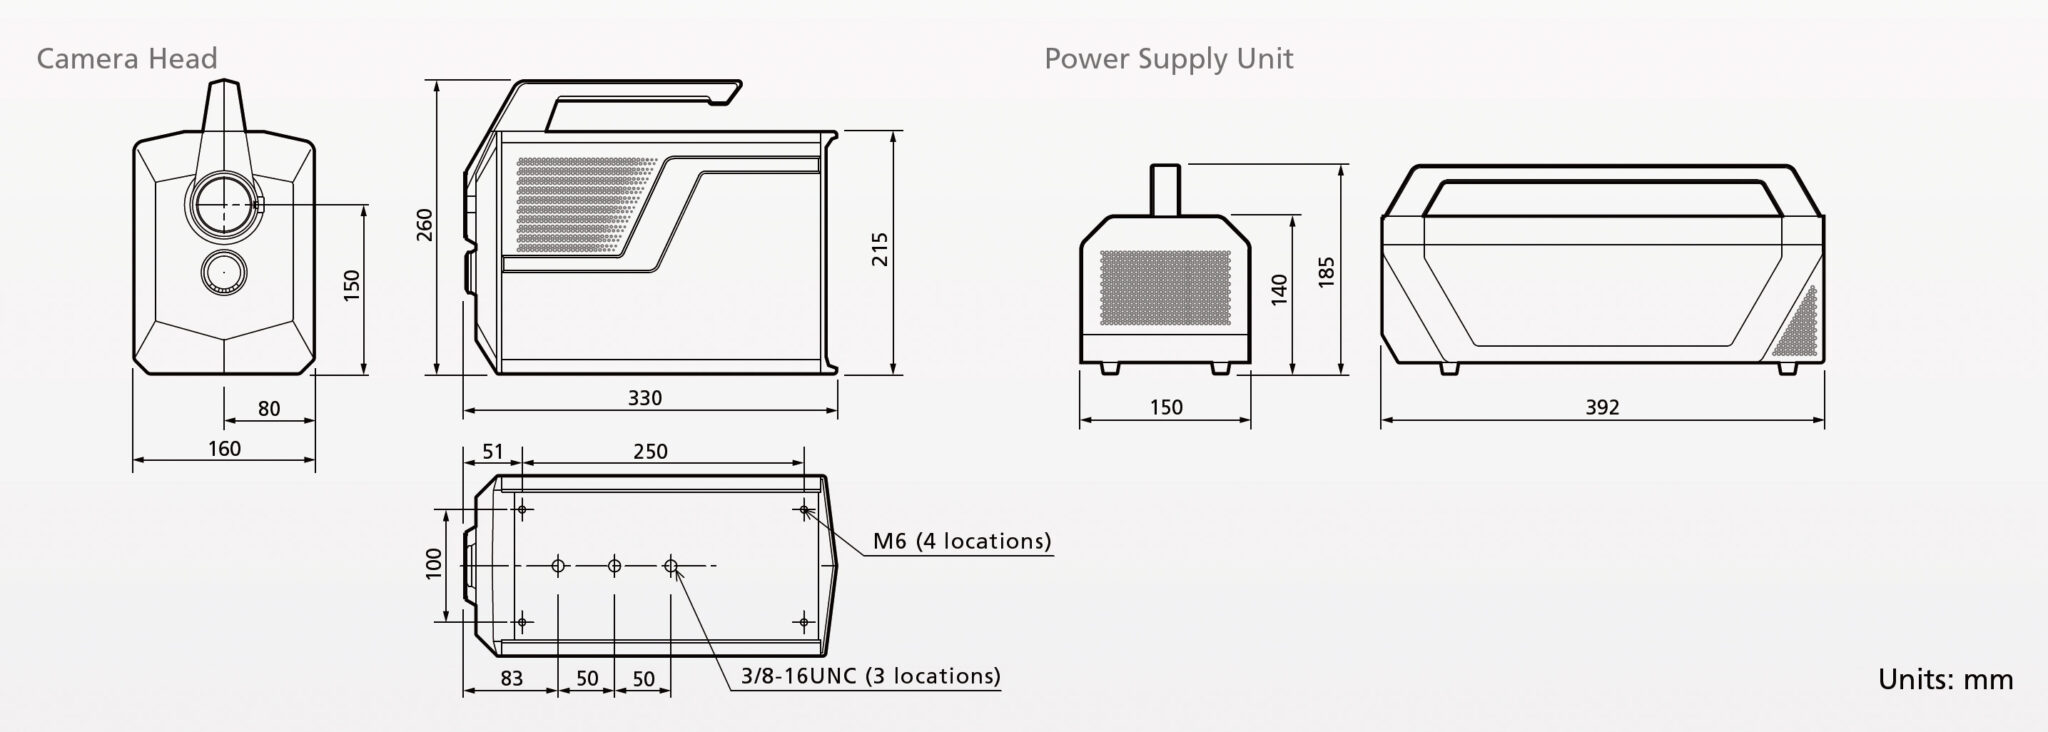
External Dimensions
