Abstract
We examined the applicability of the modified notched compression interlaminar shear test method, which is effective for obtaining the interlaminar shear properties of thermoplastic CFRP, to GFRP plain woven materials, which are widely used in industry. A CAE analysis model was created based on the results of mesoscale structure observation by X-ray CT, and homogenization analysis was carried out focusing on the constraint conditions of the test specimen from the viewpoint of friction coefficient. The measured values and the analysis results showed good agreement.Introduction
In recent years, Glass Fiber Reinforced Plastics (GFRP), which has high specific strength and excellent processability and moldability, has been widely applied to electronic substrates, ships and automotive exterior parts, and has become an indispensable material. GFRP, which is a composite material, has anisotropy, and shows complicated deformation and fracture behavior depending on the direction of the principal axis of applied stress: tension, compression, bending, in-plane shear, interlaminar and out-of-plane shear, or a combination of these. When designing products using Computer Aided Engineering (CAE), there is a strong need for testing methods that can evaluate the failure behavior of each component individually.
*1 Cybernet Systems Co., Ltd. Mechanical CAE Div.
*2 SHIMADZU CORPORATION
Flame Retardant Type 4 (FR4), which is made of glass fiber and epoxy resin, is widely used in printed circuit boards for electronic devices.
The background to the heavy use of FR4 is the fact that the GFRP plain woven material has high electrical insulation properties and non-flammability, and that there is little dimensional change in the surface due to heat because of the reinforcing effect of the glass fiber. However, because this material has a laminated structure, the fibers are oriented in- plane, but there is almost no fiber orientation between laminas, making it a resin-rich structure. Therefore, while excellent mechanical properties are exhibited in the in-plane direction, the reinforcing effect of fibers is weak in the interlaminar direction, so the physical properties of the matrix resin are dominant, and nonlinear behavior due to yield of resin is expected. It is important to accurately understand the interlaminar shear properties in order to reproduce by numerical simulation the deformation behavior that is greatly affected by the properties of the matrix resin, such as bending and peeling.
Several testing methods have been proposed as representative methods for measuring the interlaminar shear properties of composites (1-3). In any test method, the shape of the jig is complicated, and it is difficult to manufacture a test specimen for an interlaminar shear test because the size of the test specimen must be made long with respect to the direction of lamination of the composite material
(4). Incidentally, the interlaminar shear strength test method by notch compression, which applies a compressive load to the end face of a small test specimen adopted in JIS K 7092, is widely used as a test method that can easily evaluate the interlaminar shear strength of Carbon Fiber Reinforced Plastics (CFRP)
(5). The test specimen size in the lamination direction required for this test is as short as 3.5 to 6.5 mm, making it possible to easily manufacture test specimens with a small amount of material. However, this test method cannot obtain the shear strain because the area where the interlaminar shear strain is concentrated is very narrow.
However, with respect to the compression test method of thermoset CFRP, in past research
(6) it has been suggested by calculation that the interlaminar shear strain region can be expanded by increasing the amount of overlap of the notch grooves. In recent years, there have been published examples of modified notched compressive interlaminar shear tests in which the interlaminar shear strain region can be expanded by deepening the notched groove of a test specimen, and a strain gauge can be attached to the deformation region
(4). It was found that the nonlinear characteristics of interlaminar shear can be directly obtained from the calculated nominal shear stress obtained by dividing the compressive test force obtained from the testing machine by the shear area between the notched grooves and the measured strain obtained from the strain gauge. In this test method, a digital camera synchronized with the testing machine was used to observe and evaluate small areas, and strain measurement was performed by Digital Image Correlation (DIC) analysis. By using DIC analysis for strain measurement, it has been found that interlaminar shear strain can be measured easily from small deformation to large deformation without worrying about falling off or measurement limits during strain gauge measurement. In this paper, we examine whether the modified notch compression test method, which is effective in obtaining the interlaminar shear properties of thermoplastic CFRP, is applicable to plain woven GFRP, which is a continuous fiber reinforced material widely used in industry.
On the other hand, efforts to replace part of actual tests with numerical simulation (CAE analysis) have become increasingly important in response to reduction of various costs associated with the production of prototypes and the recent movement to promote digital transformation (7) associated with the novel coronavirus problem. The input information required to achieve CAE analysis can be broadly divided into three types: analysis models, material properties, and boundary conditions. In particular, it is very difficult to obtain material properties for composite materials with anisotropy. Elastic behavior in isotropic materials is characterized by four properties: Young’s modulus, Poisson’s ratio, shear modulus, and bulk modulus. In general, Young’s modulus and Poisson’s ratio, which are experimentally easy to measure, are applied as input values, and measurement of shear modulus is not required. However, for anisotropic materials, Young’s modulus and shear modulus are independent of each other and must be measured independently.
In parallel with the efforts to obtain the shear modulus as described above by testing, many studies have been conducted to analytically predict material properties.
The mixing rule (8), which is known as the most classical method, allows the prediction of material properties through simple calculations that can be performed manually. However, the mixing rule assumes that the fibers and resins that make up the composite are connected in series or in parallel with the direction of the load axis, or in other words, idealized conditions are assumed for ease of calculation, so it can only be applied to very limited composite materials such as unidirectional reinforcement. The equivalent inclusion method proposed by Eshelby (8) and its extension, the Mori/Tanaka Theory (9), can be applied to more composite materials than the mixing rule, but its effectiveness is not sufficiently demonstrated except for composite materials with discontinuous fibers such as injection molded products, because the theoretical development is based on the assumption that the inclusion shape is a spheroid. The homogenization method (10) employed in this paper is attracting attention as a method that can solve these problems. In the homogenization method, a model that represents the mesoscale structure of a composite material (in the case of GFRP, the size at which the heterogeneous structure of fiber and resin can be observed) is used to simulate a material test using the finite element method, and a numerical test is performed to evaluate the apparent material response and to measure the material properties. Because the interaction between the fibers can be closely taken into consideration, the above problem can be solved generically for any composite material.
In recent years, there is a strong tendency to actively utilize new materials in order to improve the performance of products, and new composite materials are introduced into the market one after another. The versatility of the homogenization method makes it most suitable approach for the trends in this material market. For details on the homogenization method, refer to existing Application Note No. 58 (11). It is important to emphasize here that the homogenization method also requires input information such as the shape of the microstructure and the material properties of individual fibers and resins in order to conduct simulations. In other words, the problem of obtaining physical properties cannot be solved by analysis technology alone, but the characteristics of composite materials can only be determined by a combination of measurement and analysis.
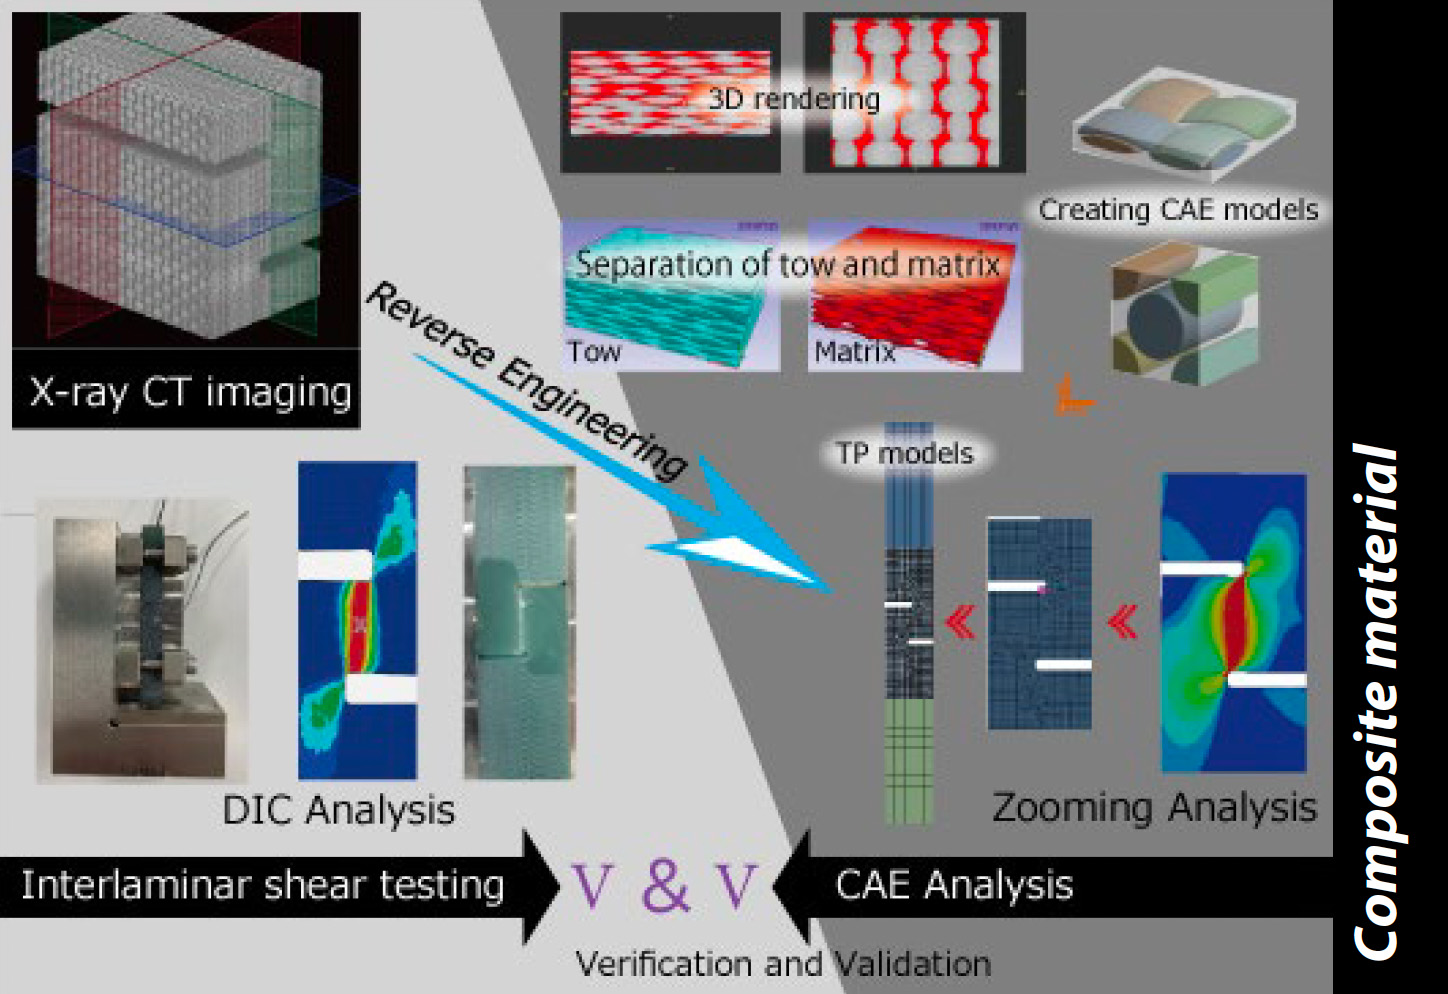
In Application Note No. 58, verification examples of uniaxial tensile properties of composite materials by a combination of measurement and analysis were introduced. In this article, the focus is on the shear deformation mode and a research example that combines measurement and analysis is introduced. First, an analytical model was created based on the results of observation of the heterogeneous mesoscale structure by X-ray computed tomography (CT), and the property values were predicted by conducting homogenization analysis. The validity of the model was verified by comparing the predicted results with the actual results for pure shear. In addition, an analysis in which the constraint conditions of the test specimen imposed by the test jig used in the experiment (a jig conforming to JIS K 7092) were reproduced using a friction coefficient was separately conducted. The analytical results were compared with the experimental results to verify the validity of the experimental results.
Determining the various parameters required to create the model
Evaluation of interlaminar shear properties of GFRP plain woven materials
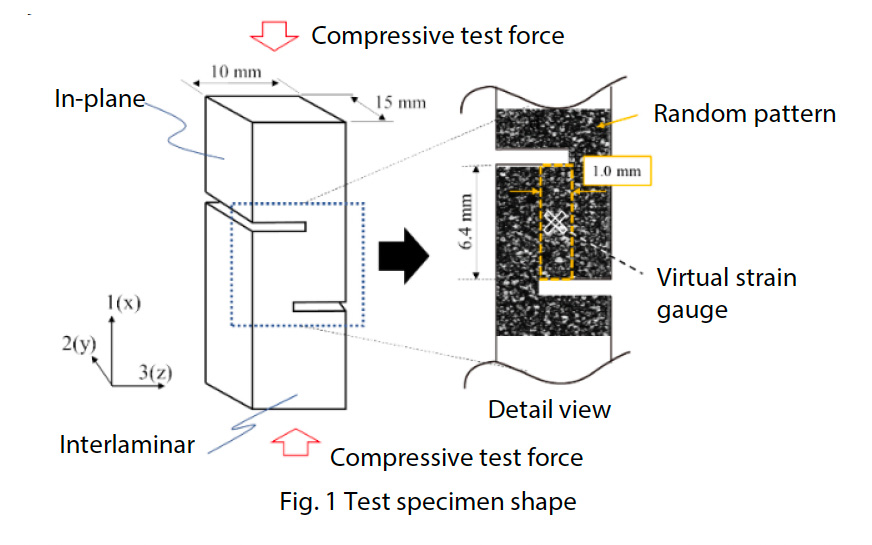
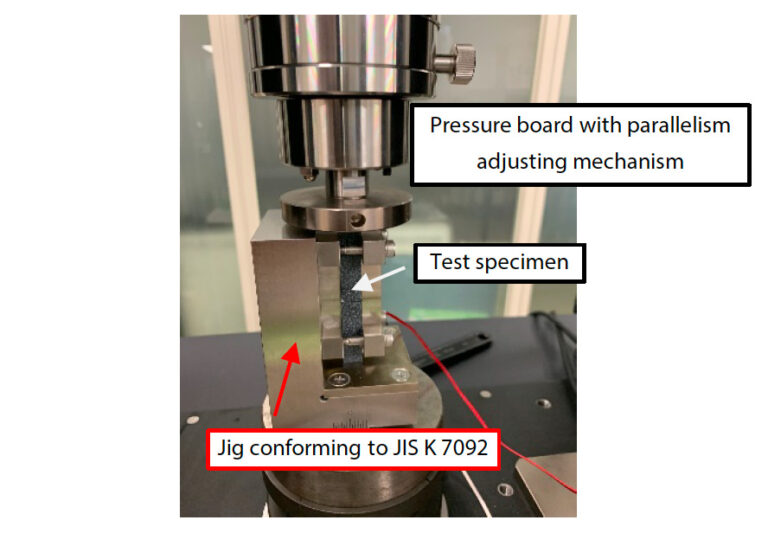
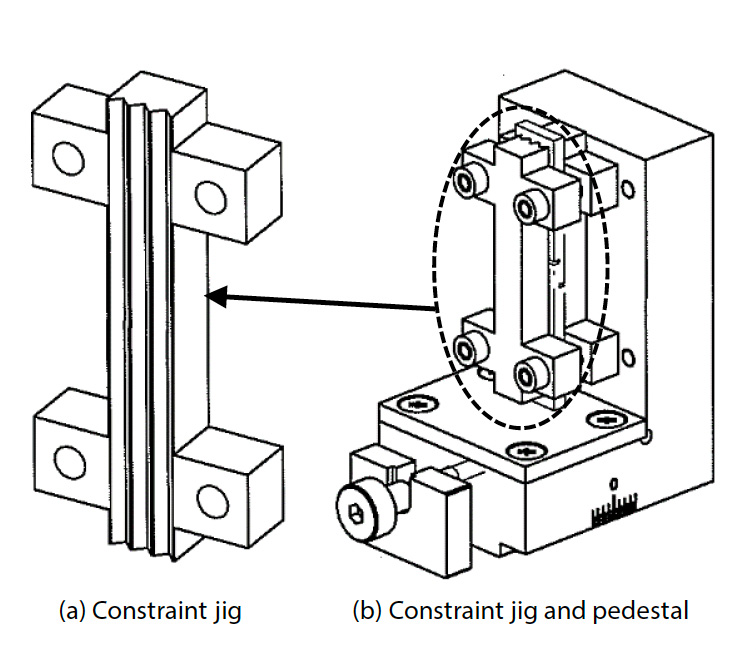
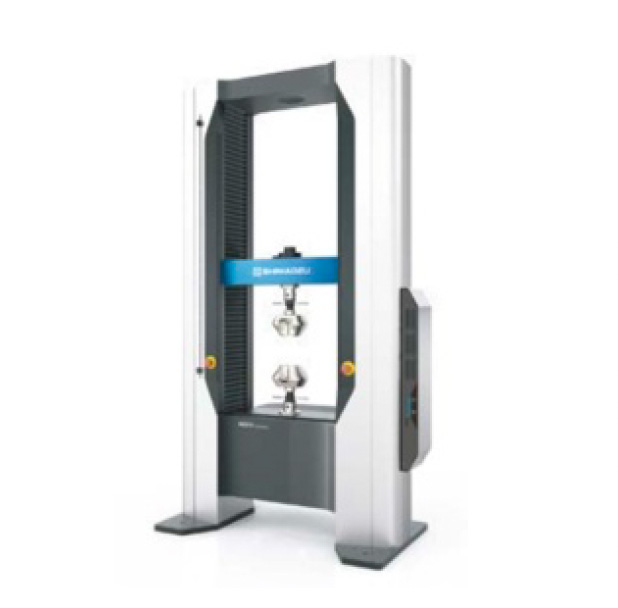
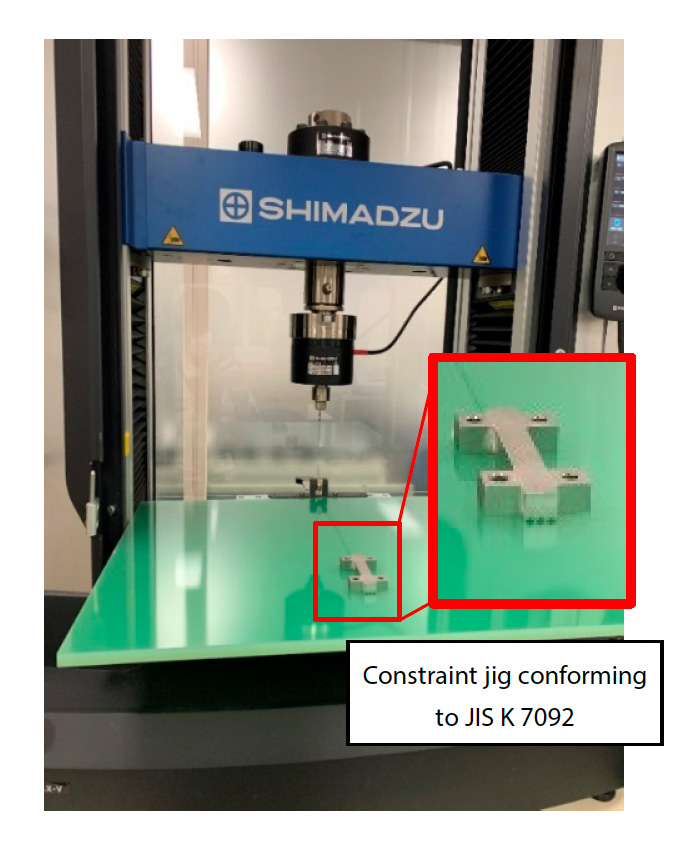
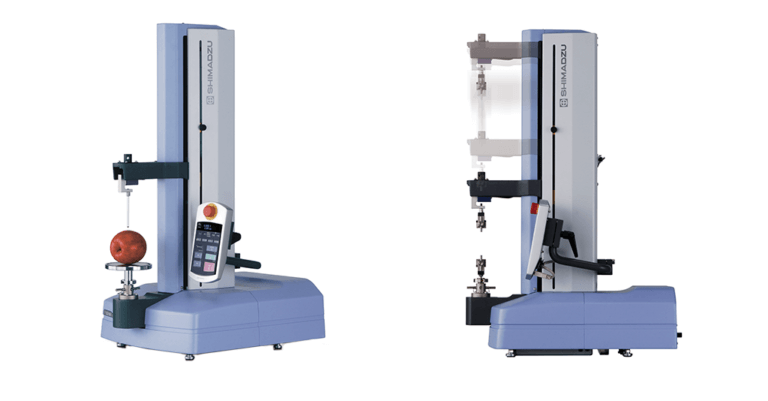
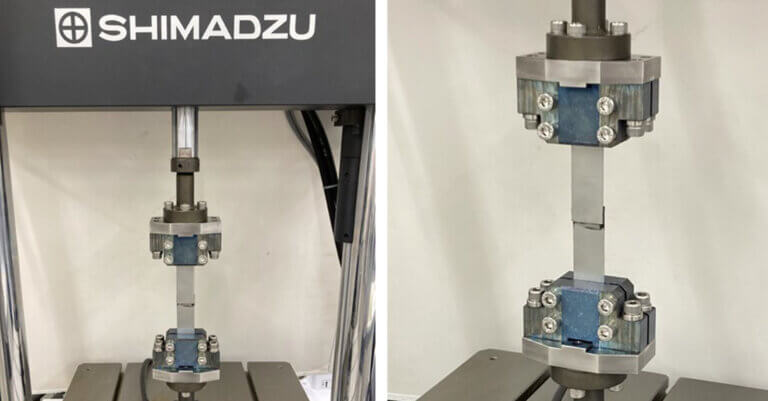
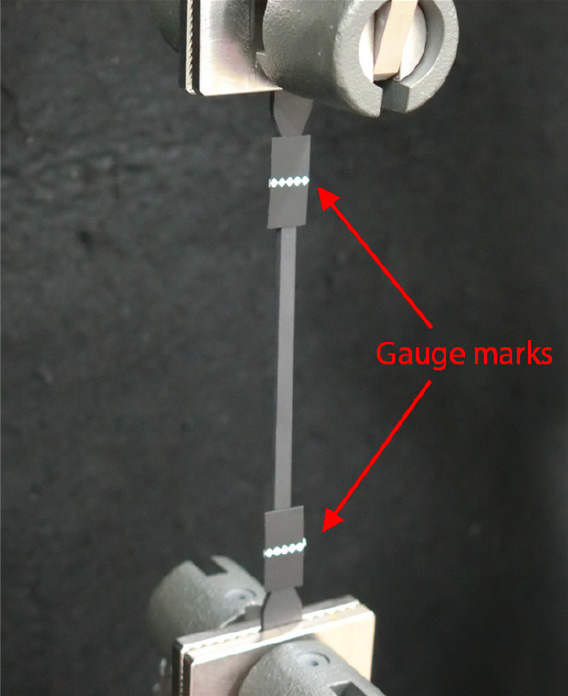
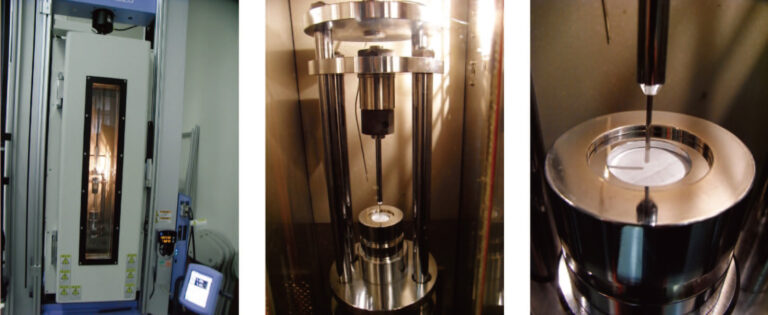
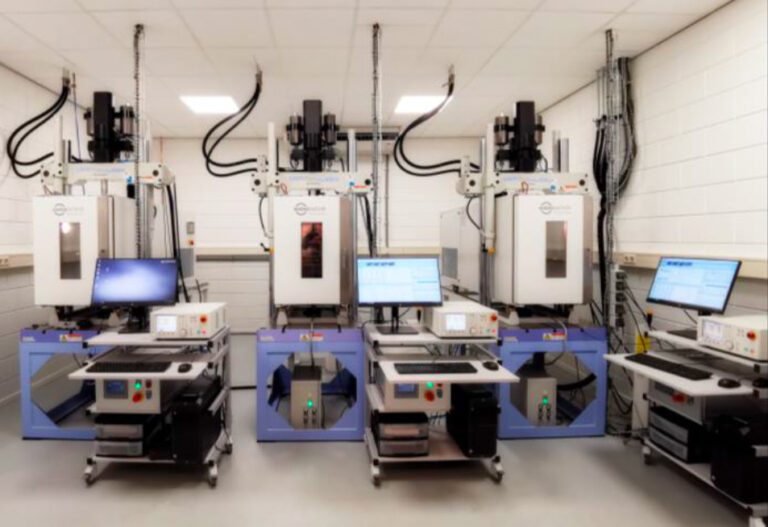
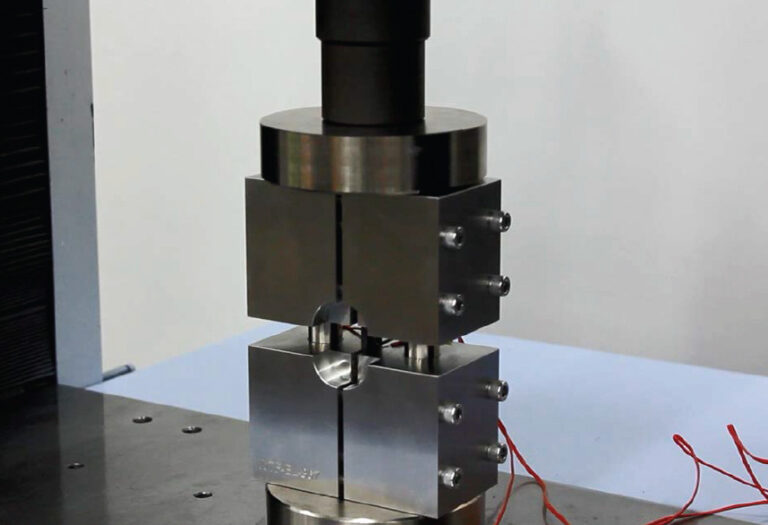
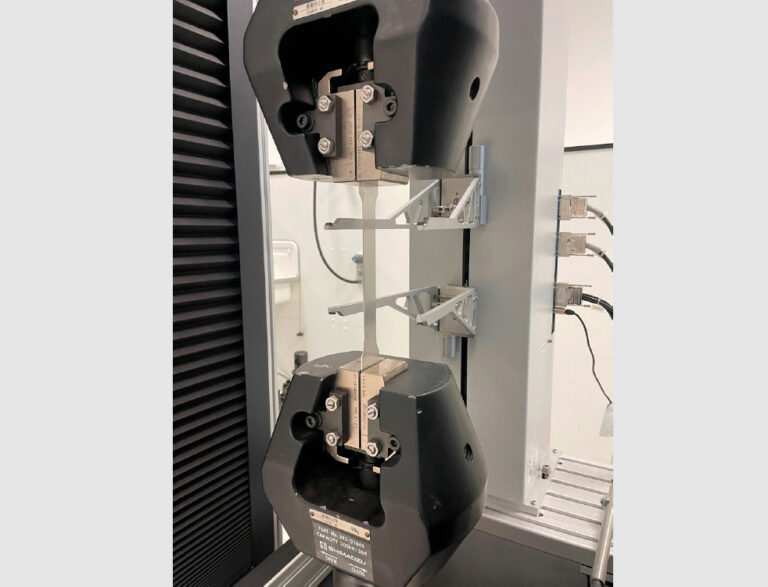
As shown in Fig. 1, the test specimen was made of a GFRP plain woven flat plate with a thickness of approximately 10 mm. The total length of the specimen was 80 mm, and in order to concentrate shear strain between the notched grooves subjected to shear load, the notched grooves were overlapped by 1 mm to widen the shear deformation area from the shape specified in JIS K 7092 (5), and the strain distribution in the shear deformation area was made uniform (4). The notch groove gap width was designed to be 1 mm. A random pattern was applied to the surface of the test specimen by applying a black spray followed by a white spray. The specimen was set in an interlaminar shear test system consisting of a JIS K 7092 compliant jig and a pressure board with a parallelism adjustment mechanism. Fig. 2 shows the interlaminar shear test system and the state after setting the test specimen. Fig. 3 shows the structure of the JIS K 7092 compliant jig. The jig conforming to JIS K 7092 is roughly classified into a constraint jig that prevents the test specimen from buckling out of plane and a pedestal component that loads compressive force to the lower end face of the test specimen. In order to suppress sliding resistance with the test specimen, the constraint jig has a groove structure parallel to the direction of the test load. Sliding resistance can also be adjusted by changing the tightening torque of the four bolts for fixing and connecting the constraint jig to the pedestal component. In this test, a tightening torque of 0.15 N•m as exemplified in JIS K 7092 was adopted. Using the precision universal testing machine Autograph™ AGX™-50kNV shown in Fig. 4 and a special type non-contact extensometer TRViewX that is not affected by out-of-plane behavior of the test specimen, a test system that can acquire observation images synchronized with the test force signal of the testing machine was constructed. The test speed was 0.5 mm/min. The shear strain was obtained from a DIC analysis using GOM Correlate 2016, which is made by GOM GmbH.
γXZ=|ε_ (+45) |+|ε_ (-45) | (1)
|ε_ (+45) | : Absolute value of strain obtained from the output of the virtual strain gauge installed at + 45°
|ε_ (-45) | : Absolute value of strain obtained from the output of the virtual strain gauge installed at -45°
The nominal shear stress τXZ was calculated from equation (2).
τXZ= F/ab (2)
F: Test force (N), a: Distance between notched grooves (6.4 mm), b: Specimen width (15 mm)
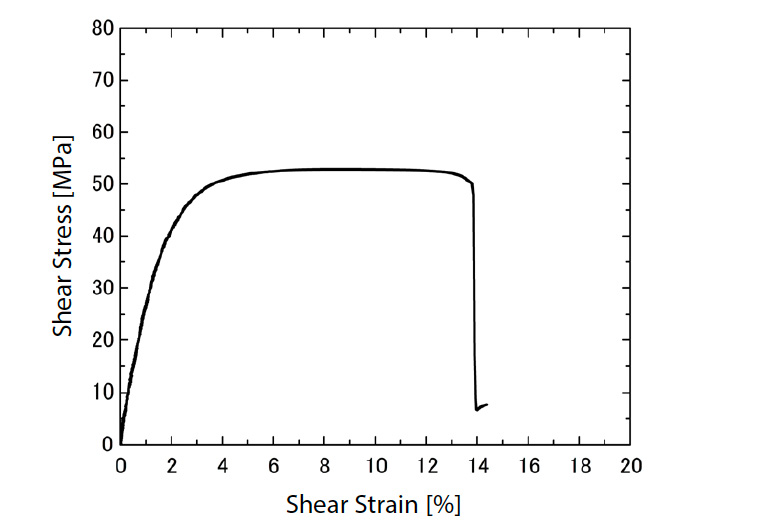
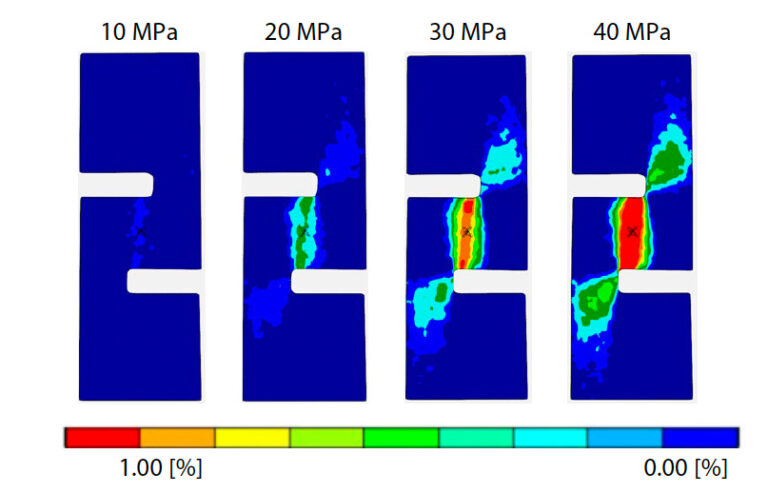
Fig. 5 shows the interlaminar shear stress-strain diagram of the plain woven GFRP obtained in this test. The relationship between stress and strain of plain woven GFRP is linear up to about 30 MPa shear stress, but after that it becomes nonlinear and it yields at about 50 MPa. As mentioned above, GFRP plain woven material has a structure in which glass fiber cloth impregnated with resin is laminated. Therefore, the GFRP plain woven material is rich in resin in the interlaminar direction, and it is considered that the nonlinearity appeared due to the ductility characteristics of the resin. Fig. 6 shows contour diagrams of interlaminar shear strain from the DIC analysis results at 10 to 40 MPa. The interlaminar shear strain is distributed uniformly and widely between the notches of the GFRP plain woven material from the beginning of the test, and this tendency is the same even when the load applied to the test specimen increases. From the relationship with the stress in the linear initial region, 0.1 to 0.3 % strain in Fig. 5, the interlaminar shear modulus calculated by the least squares method was 2546.1 MPa.
Evaluation of specimen constraint conditions by friction coefficient measurement
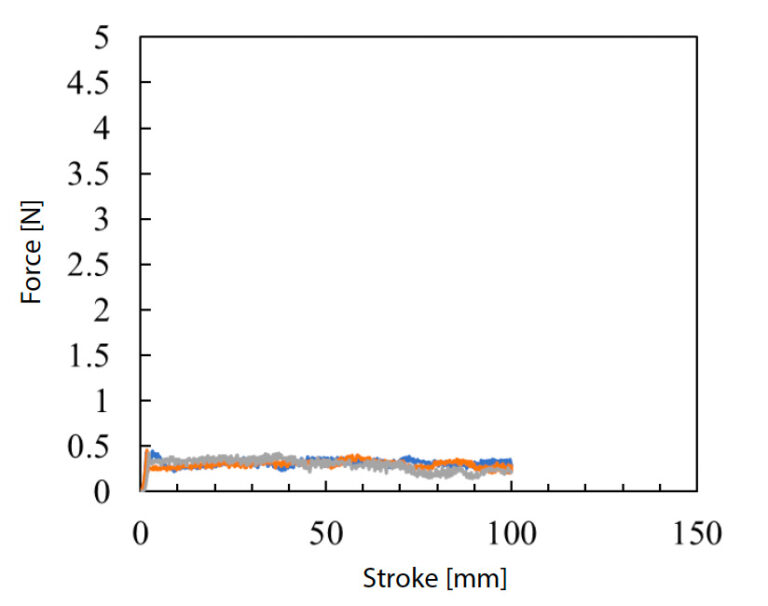
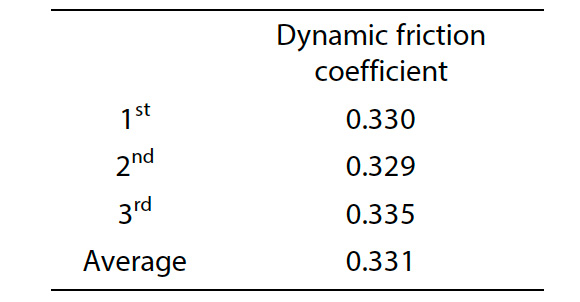
The constraint conditions of the test specimens used in the interlaminar shear test were estimated by measuring the friction coefficient using the precision universal testing machine Autograph AGX-5NV and the friction coefficient measuring device. Fig. 7 shows the test. When conducting the test, a flat plate of GFRP plain woven material with a thickness of 10 mm was placed on the test space of the testing machine after cutting out the notched specimen, and a constraining jig was installed on the flat plate so that the specimen contact surface could touch it. The test speed was set at 100 mm/min, and test force data was obtained when the stroke of the testing machine was operated at 100 mm. To confirm the reproducibility of the acquired data, three tests were performed. The coefficient of dynamic friction for application to CAE analysis was calculated from the average test force data for a stroke of 20 to 60 mm obtained with a stable test force and the weight of the jig. Fig. 8 shows the test force-stroke diagram, and Table 1 shows the calculation results of the dynamic friction coefficient. From the above results, the coefficient of dynamic friction generated at the contact surface between the specimen and the constraint jig was found to be 0.33.
Acquisition of notched specimen shape data using X-ray CT system
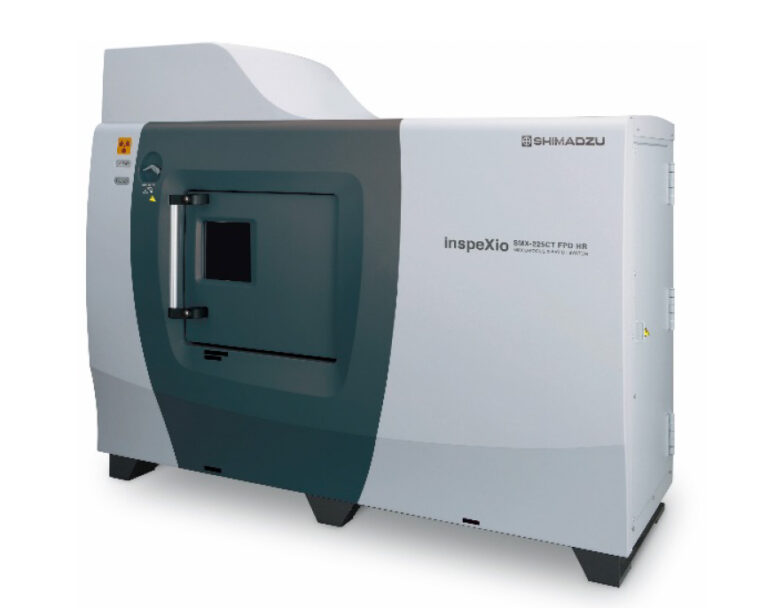
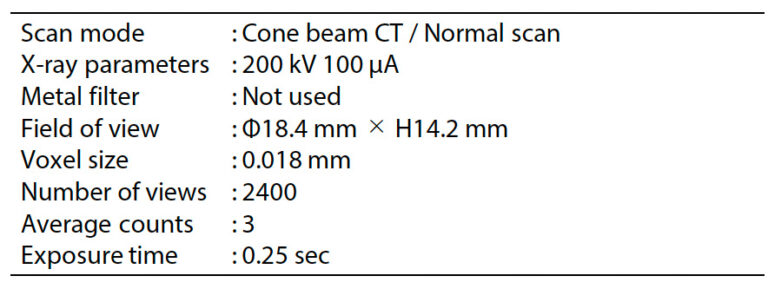
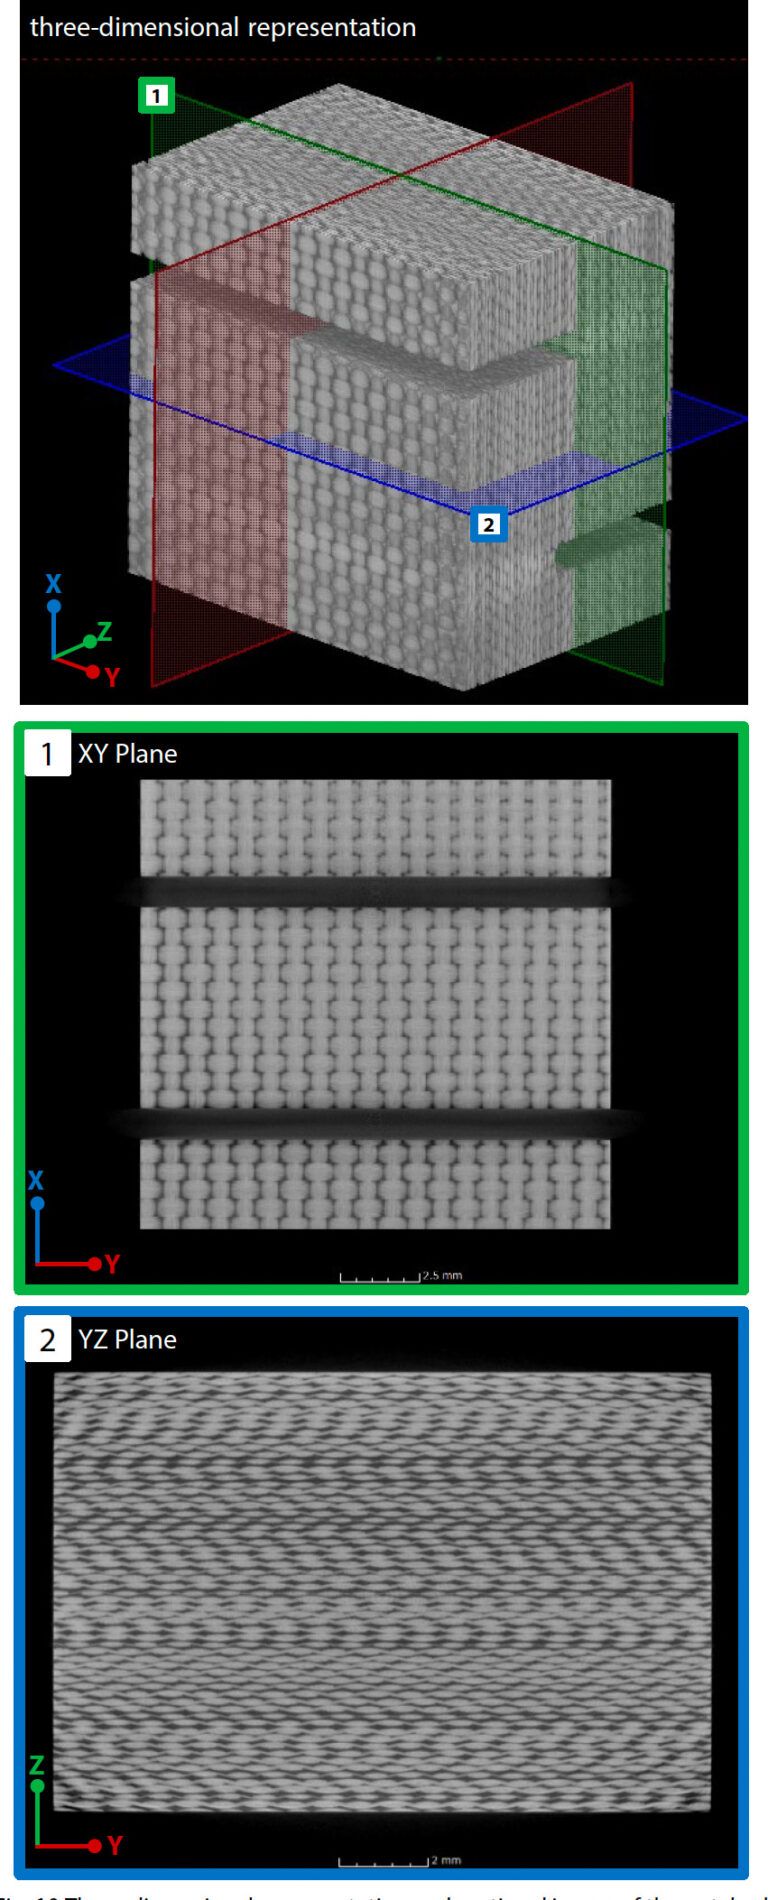
Using the micro-focus X-ray CT system inspXio™ SMX™-225 CT FPD HR Plus shown in Fig. 9, cross-sectional images of the notched specimen were obtained to determine the shape of the analytical model. Under the conditions shown in Table 2, CT images were taken near the notch groove of the test, and several hundred cross-sectional images were output in Digital Imaging and Communications in Medicine (DICOM) format. Fig. 10 shows cross-sectional images and a three-dimensional representation created using three-dimensional image analysis software based on the cross-sectional images. In a cross- sectional image, areas with high density and high X-ray absorption appear white, and areas with low density and low X- ray absorption appear black. Image processing was performed to create a model from the cross-sectional image for use in finite element analysis. By analyzing the cross-sectional images obtained by CT imaging using Simpleware™ manufactured by Synopsys, the shape parameters of the microstructure required to create the analysis model were identified. For the GFRP plain woven material to be analyzed, the factors that affect the material properties are the volume content and the cross-sectional shape of the tow (a bundle of several hundred to 1000 fibers arranged in one direction), and the spacing between adjacent fiber bundles. The content of monofilaments inside the tow also affects the material properties, but in this analysis image, it was not possible to obtain clear contrast even in the fine region inside the tow, so it was determined by matching with the mounting result. Details are described in Section 3 below. These shape parameters are not uniform throughout the material and are distributed with variations. Therefore, in the image analysis tool, a relatively wide range including multiple fiber bundles was measured, and the average value was adopted as the shape of the analysis model.Model Creation
Identification of shape parameters
Fig. 11 shows the volume fraction of tow measured by Simpleware. The tow region and the matrix region were separated by binarizing the gray scale image obtained from the X-ray CT with appropriate thresholds. The volume fraction was determined by measuring the volume of each separated region.
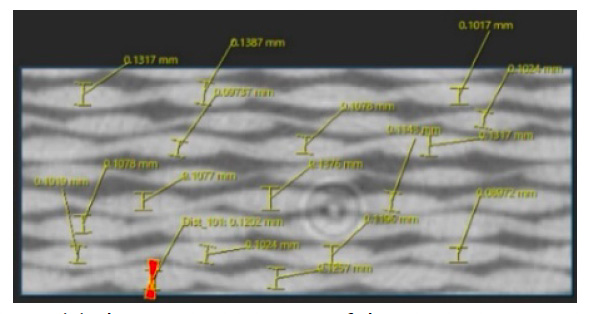
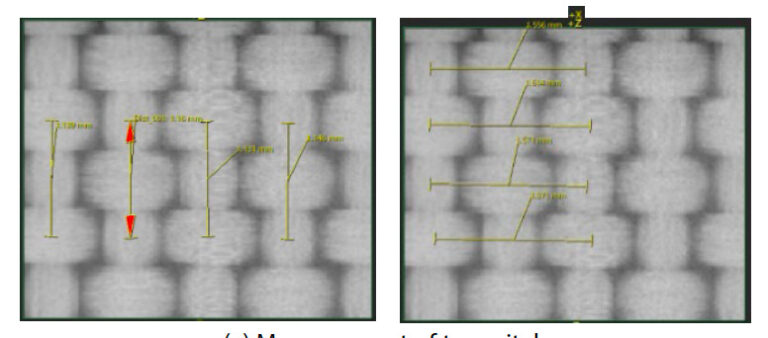
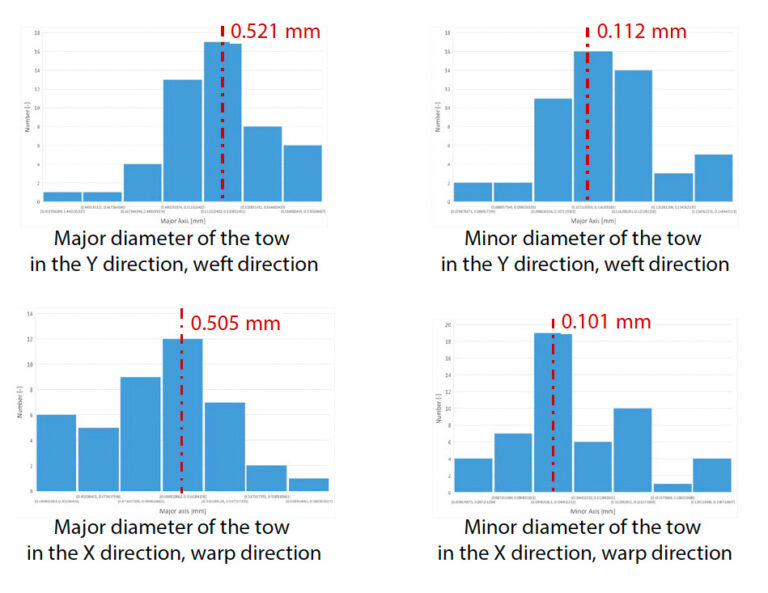
Fig. 12 shows the cross-sectional shape of the tow and the measured distance between the tows. The tow was assumed to have an elliptical cross section, and the major and minor diameters were measured. 49 tows were selected at random. Fig. 12 shows the result of drawing a histogram with 7 bins by applying the square root theorem to the number of measurement points for each measured shape parameter. Since there was no tendency for all the shape parameters to clearly agree with a general statistical function such as Gaussian distribution, the average value of the bin with the highest probability of existence was used as the shape parameter. This result shows that the shape of the tow in the X and Y directions is clearly different. However, in general, it is extremely rare to design a product with these direction-dependent microstructures in mind, so this time, a further average of the average values in both directions was applied equally to the tow in both directions.
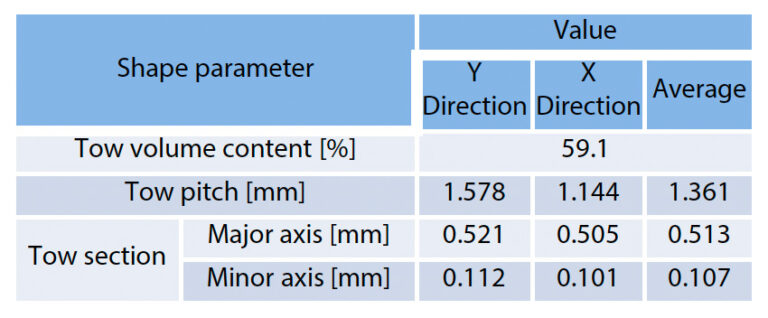
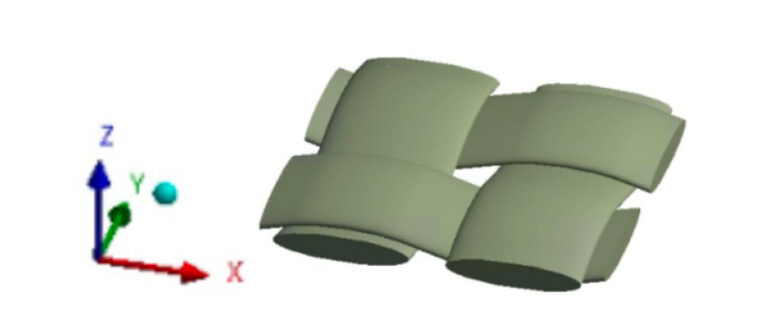
A measurement image of the distance between adjacent tows is also shown in Fig. 12 (c). This shape parameter was measured from an out-of-plane image. The border between the areas that are not obscured by the perpendicular tow and the areas that are obscured by the perpendicular tow are rich in plastic and therefore appear dark. As a result, areas that are not obscured by orthogonal tows and areas that are obscured by orthogonal tows appear as separate rectangular shapes. The tow pitch was defined as the distance between the center points of this rectangle. As with the cross-sectional shape of the tow, the distance between 49 tows was measured. For the pitch between tows, a tendency to depend on the vertical and vertical fiber directions in (c) in the same figure was observed, and then the average value was applied to the analysis model. Table 3 and Fig. 13 summarize each of the finally identified shape parameters and the analysis models actually created for numerical test.
Optimization of shape parameters
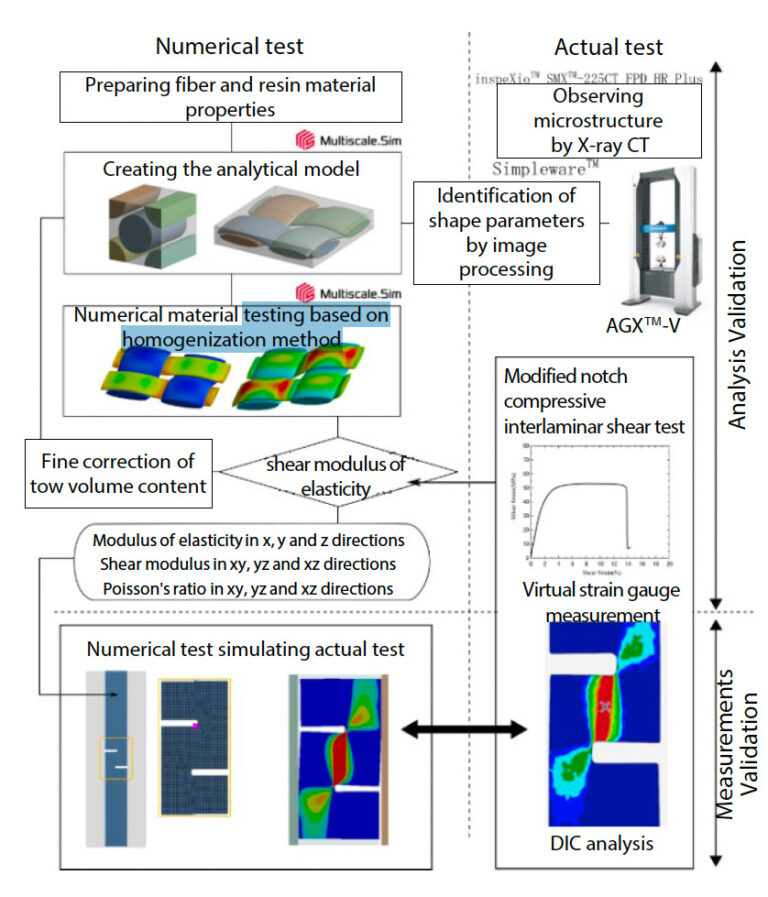
Continuous fiber reinforced materials, such as the plain woven cloth used in this analysis, tend to have extremely strong anisotropy. Analytical methods based on the homogenization method (10) are effective for analytically predicting material properties that characterize anisotropic behavior. The homogenization method provides an analytical approach to evaluate the apparent material response and ultimately identify material properties by performing a numerical test. test by numerical calculation using a finite element model that represents the inhomogeneity of the microstructure. By simply measuring the material properties of individual fibers and resins (and the properties of the material interface if they are to be taken into consideration) or by obtaining them from a database etc., anisotropic material behavior and material properties can be obtained for all types of reinforcement, based on their heterogeneous microstructure. Refer to Application Note No. 58 for details of this analysis method (11). The overall flow of the analysis is shown in Fig. 14. An attempt was made to verify the validity of both analysis and measurement aspects. The analytical validation was performed by the homogenization analysis described above. The information required was the shape of the microstructure and the properties of the materials from which it was composed. The specific values of the shape parameters required for modeling the microstructure were identified by applying the data observed by X-ray CT to image processing, as described in Section 2-3.Validation of the test method
To verify the validity of the actual test method, an analysis was conducted with the same shape and boundary conditions as those of the test. The material properties of the plain cloth material used in this analysis model were obtained in the analysis verification phase. By comparing the shear strain distribution in the specimen obtained by the analysis with the result measured by the DIC analysis, it was confirmed that the analytical result agreed well with the actual test result. At the same time, the analysis side tried to quantify the conditions affecting the test results by comparing the friction coefficient between the jig and the specimen and the analytical results obtained by virtually changing the tightening load of the jig.
Analysis Method
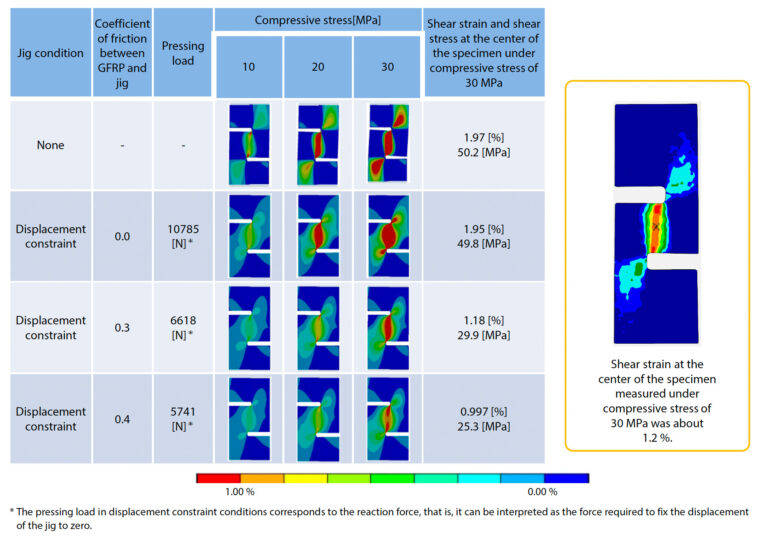
First, the orthotropic material properties of GFRP plain woven materials were calculated by homogenization analysis. Fig. 15 shows the solid and finite element models of the GFRP fabric material used in the analysis. As mentioned above, mesoscale woven structures were identified by image processing the results obtained by X-ray CT. The mesoscale model assumes that the tow region is homogeneous. In reality, the material has an inhomogeneous structure consisting of bundles of fibers oriented in one direction, so it is necessary to provide anisotropic material properties that correctly reflect the microscopic structure. Therefore, the model shown in Fig. (a-2) and Fig. (b-2) was prepared for the fiber bundles in the tow region, and a homogenization analysis was conducted separately to obtain the physical properties. The materials that make up the composite are E glass (Young’s modulus: 72.5 GPa, Poisson’s ratio: 0.2) for fibers and epoxy resin (Young’s modulus: 3.5 GPa, Poisson’s ratio: 0.35) for resins. It was assumed that both of these properties were elastic, and the values in the material database provided by the analysis tool were referred to. In the homogenization analysis, all material properties characterizing the orthotropic properties of GFRP fabric materials were obtained by conducting numerical tests simulating ideal uniaxial tension and interlaminar shear for these models. Specifically, the material properties consisted of 9 kinds of physical properties: the longitudinal modulus of elasticity, Poisson’s ratio, and shear modulus of elasticity in 3 directions. Fig. 16 shows the analytical model performed for the verification of the experimental side. The model consisted of a GFRP specimen and a constraint jig that holds the specimen in the thickness direction. Pressing loads and compressive stresses on specimens and jigs were defined directly on these part faces, and other geometry (screw holes of the jig, jig to support the specimen from the top and bottom of the figure, etc.) was not modeled rigorously. Specifically, the bottom surface of the specimen in Fig. 16 was defined with a full displacement constraint, and the top surface was defined with a compressive stress of 30 MPa. In the actual test, a pushing load in the out-of- plane direction was applied via the torque applied to the jig, but in the analysis, the jig displacement was constrained to zero. In addition, the case in which the jig was not installed was also analyzed. In the vicinity of the GFRP notch, the strain distribution was expected to be complex, but in the region sufficiently far from the notch, the stress and strain distribution was expected to be almost uniform. Therefore, the GFRP part was divided into the area near the notch and the other areas, and the mesh was finely set only near the notch. A discontinuous mesh existed between two parts with different mesh coarseness, but a realistic attachment state was reproduced by defining a Multi Point Constraint (MPC) at the interface. In terms of material behavior, the GFRP part was given the material properties obtained by the homogenization analysis shown above, and the jig was assumed to be rigid and not deformable. The friction coefficient between the GFRP plain woven material and the jig was analyzed in 3 patterns, 0.0, 0.3, and 0.4 to confirm the effecton the test results. From the analysis result data obtained here, the interlaminar shear strain distribution and the shear strain and shear stress values in the center of the specimen were observed. The validity of the test conditions was verified by comparing these results with the measured shear strain distribution obtained using the DIC analysis and the measured shear strain in the center of the specimen obtained using the virtual strain gauge. In this test, ideally the compressive stress of 30 MPa applied to the upper part of the specimen is transmitted as it is as the shear stress in the center of the specimen. The shear stress in the analysis results was observed to see if this ideal condition was achieved.CAE analysis results
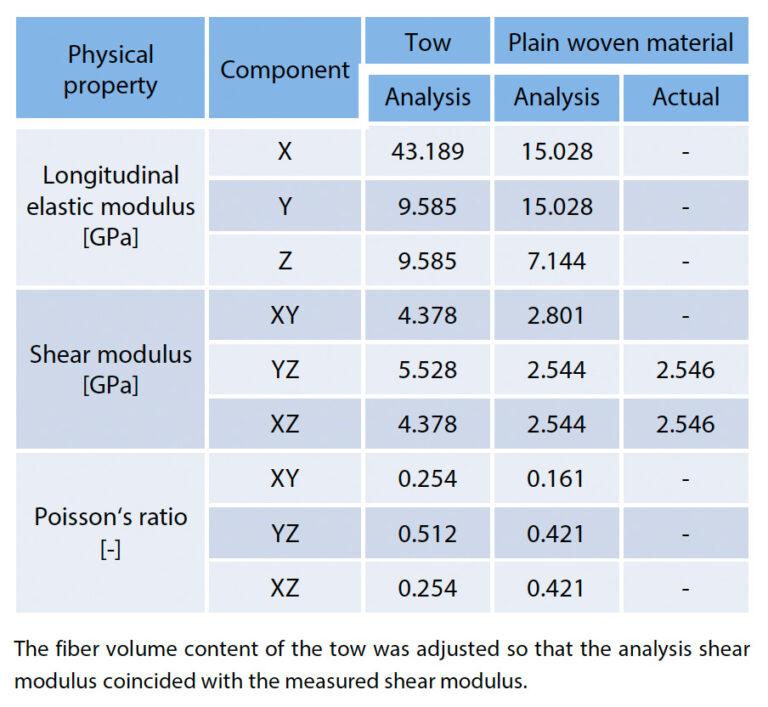
First, a homogenization analysis was performed on the analytical model shown in Fig. 16, and the results of evaluating the orthotropic elastic moduli of the tow region and the whole plain woven material are shown in Table 4. Since the shear stiffness of the plain woven material was evaluated in the test, the fiber volume content of the tow region was adjusted in the analysis so that the analysis shear modulus coincided with the measured shear modulus. The fiber volume content of the tow region finally obtained by inverse estimation was found to be about 57.27 %. This was not much different from other studies performed by SEM, and is considered to be reasonable. Table 5 summarizes the results of each case study that used the optimized model to vary the presence or absence of a constraint jig and vary the coefficient of friction between the constraint jig and the specimen. The results of the measured shear strain distribution from the DIC analysis are also shown on the right and outside of Table 5. Under all conditions, it can be seen that the shear strain is concentrated near the center of the specimen sandwiched between the two notches. However, it can be inferred that the deformation of the specimen is different because the strain distribution is dependent on the stress conditions in the region slightly away from the center and on the edge side of the two notches. When the jig is not installed, it can be seen that there is a high strain on the same order as that in the center of the specimen extending from the notch to the edge. This may be due to out-of-plane buckling deformation of the specimen. The results also indicate that the shear stress in the center of the specimen is greater than the external pressure, indicating that accurate out-of-plane shear deformation cannot be achieved. Under the condition where the fixed jig is placed, the area of high shear strain on the end side from the notch is small, so it can be seen that the buckling deformation is suppressed. It was confirmed that the degree of suppression became more pronounced as the friction coefficient between the GFRP plain woven material and the jig increased. However, as the coefficient of friction increased to 0.4, the stress in the center of the specimen became smaller than the external pressure. It is considered that this is caused by the energy of the external pressure being lost due to the frictional resistance force to a degree that cannot be ignored. In an actual test, the friction coefficient cannot be controlled, so it is necessary to apply an appropriate pressing load so that the deformation in the in-plane direction is not too suppressed while suppressing the out-of-plane buckling of the specimen.In the test described in Section 2-2, the friction coefficient between the materials was confirmed to be about 0.3. Under these conditions, the shear stress in the center of the specimen is equal to the external pressure, indicating that ideal shear conditions are achieved.
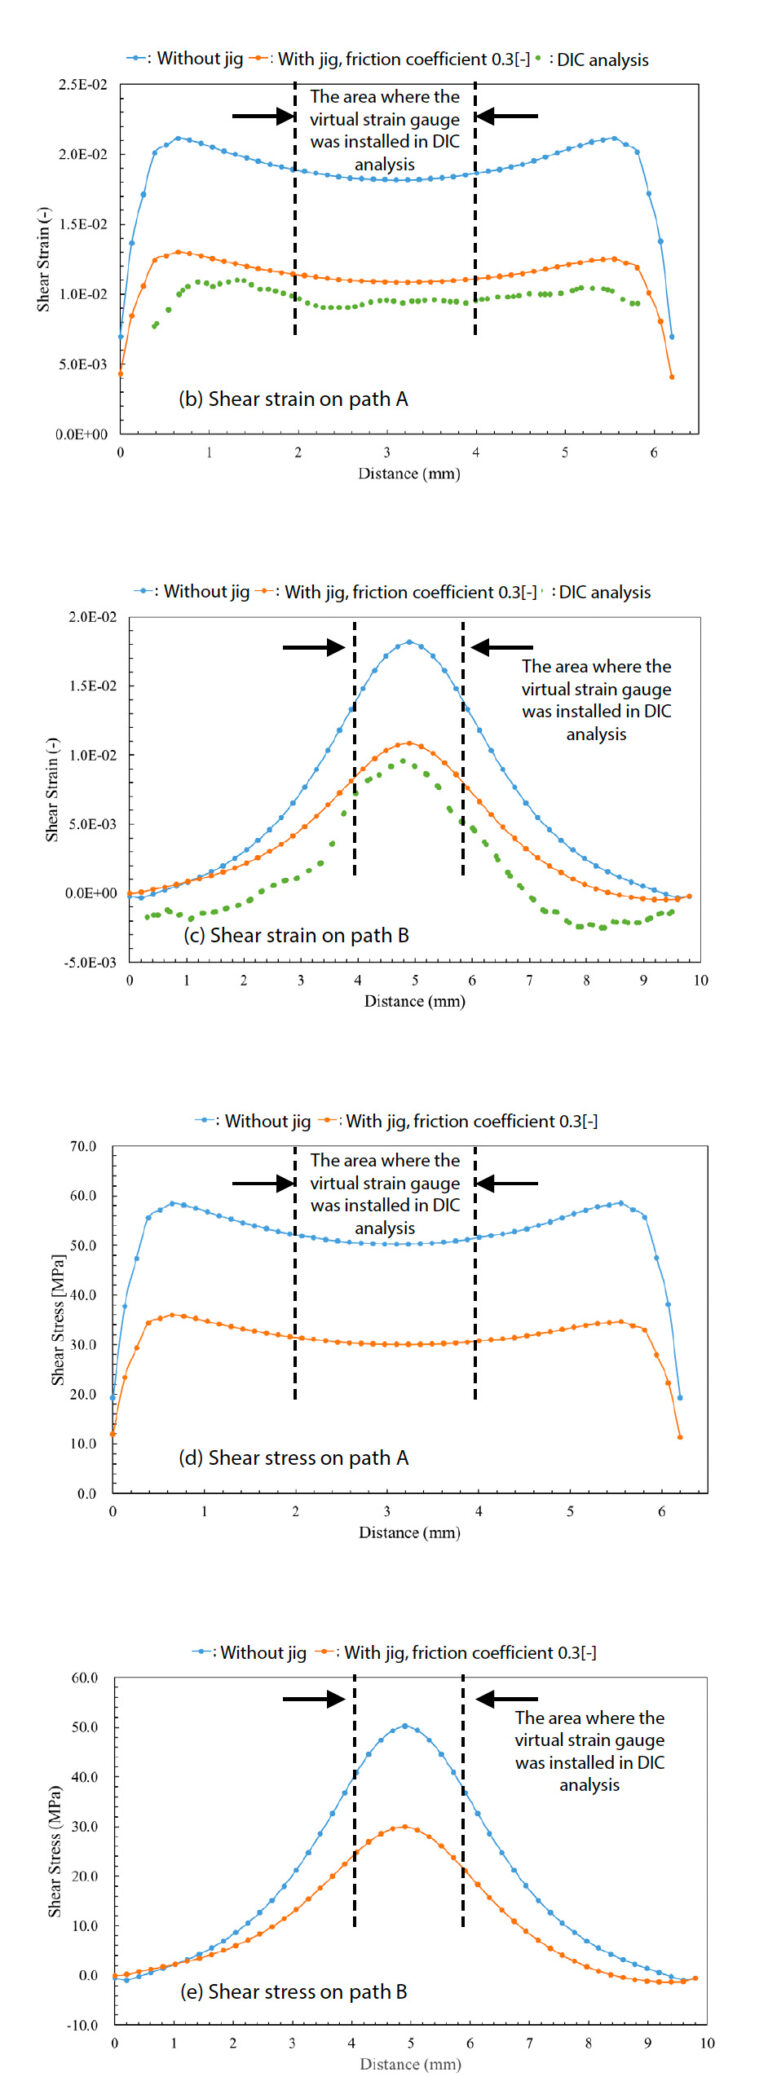
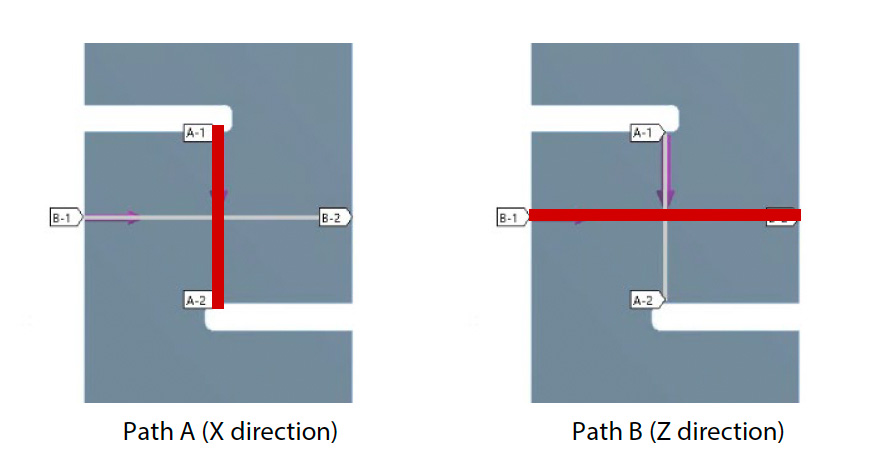
Finally, to see the shear strain distribution near the notches in more detail, the shear strain and shear stress results were plotted over the 2 paths shown in Fig. 17 (a). The results are shown in Fig. (b) to (e). The center of the specimen corresponds to a distance of 3.2 mm in Path A and 5.0 mm in Path B. In the DIC analysis, the area where the virtual strain gauge was installed is located near the center. For an accurate interlaminar shear test, it is expected that the central part of the specimen is in an ideal shear mode, but it is also desirable that similar conditions exist over a wide range in the vicinity. In particular, when measuring local strain values with a strain gauge, it is desirable to maintain a constant value within a measurement area of approximately 2 mm x 2 mm.
In the condition where the constraint jig is placed, as shown in Fig. 17 (b) and (c), this is almost achieved, and it is expected that the interlaminar shear characteristics of the specimen can be measured with some accuracy. On the other hand, in the case where the jig is not placed, due to out-of-plane buckling, the median shear strain is abnormally large compared with the measurement, and the result on path A is observed to be remarkably convex downwardas shown in Fig. 17 (b).
The distribution of shear stress was also checked, and it was found that under the condition where the constraining jig was placed, the shear stress shown in Fig. 17 (d) was broadly distributed to a certain extent on path A similar to the shear strain. In addition, it was confirmed that the virtual strain gauge used in the DIC analysis was distributed in a broad shape in the region where the virtual strain gauge was installed on path B, which was near the center between the notched grooves corresponding to a distance 2 to 4 mm on path B. In the test, there is no method to evaluate the stress other than calculating the nominal shear stress by dividing the test force measured in the load cell of the testing machine by the cross- sectional area of the specimen, as shown in equation (2) in Section 2-1. In the results shown in Fig. 17(d), there is no stress concentration near the notch in the specimen, and the uniform stress distribution over the notch interval of 6.4 mm can be verified only by CAE analysis. The results of the CAE analysis showed no significant local stress concentration, providing evidence that the test methods and test geometries applied in the test are useful for evaluating nominal shear stress as well as linear and nonlinear strain.
These results indicate that the interlaminar shear test can be reproduced by placing the jig in the out-of-plane direction of the specimen and supporting it with a moderate load that does not interfere with the tangential slippage of the tool-specimen material interface but suppresses normal buckling.
Summary
In this paper, we introduced a case in which the interlaminar shear characteristics of GFRP plain woven materials were evaluated by the interlaminar shear test method using the modified notch compression method from both the experimental DIC analysis and CAE analysis.
The CAE analysis model was constructed by setting the boundary conditions between the specimen and the constraint jig taking into account the coefficient of friction. The results of the DIC analysis and the CAE analysis were found to be almost identical in the following three points obtained between the notched grooves of the specimen.
1. Contour diagram of shear strain distribution
2. Shear strain distribution shape in X direction
3. Shear strain distribution shape in Z direction
In addition, the stress distribution between the notch grooves calculated by the CAE analysis was wide and uniform, and no local stress concentration was observed.
The interlaminar shear test method with the modified notch compression applied in the actual test proved to be useful not only for obtaining the linear and nonlinear strain but also for evaluating the nominal shear stress.
References
1) Pettersson KB, Neumeister JM. A tensile setup for the IDNS composite shear test. Compos Part A Appl Sci Manuf 2006; 37 (2) : 229–42.2) Melin LN, Neumeister JM. Measuring constitutive shear behavior of orthotropic composites and evaluation of the modified Iosipescu test. Compos Struct 2006; 76 (1–2) : 106–15.
3) Julio F. Davalos a, Pizhong Qiao b, Vinod Ramayanam a, Luyang Shan b, Justin Robinso. Torsion of honeycomb FRP sandwich beams with a sinusoidal core configuration. Compos Struct 2009; 88: 97–111
4) T.Murakami, T.Matsuo, T.Sumiyama, Experimental method and evaluation for interlaminar shear properties of randomly oriented strand thermoplastic composites based on modified double-notch specimen and two dimensional digital image correlation. J. Compos. Mater., in press, https://doi.org/10.1177/0021998320967719 (2020).
5) JIS K 7092. Test method for interlaminar shear strength of carbon fibre reinforced plastic by double-notch specimen. In: JIS handbook. Tokyo: Japanese Standard Association; 2010.
6) Bouette B, Cazeneuve C and Oytana C. Effect of strain rate on interlaminar shear properties of carbon/epoxy composites. Compos Sci Technol 1992; 45: 313–321.
7) Ministry of Economy, Trade and Industry website: https://www.meti.go.jp/policy/digital_transformation/index.html
8) J.D.Eshelby, The determination of the elastic field of an ellipsoidal inclusion and related problems., Proc. Roy. Soc. Lond, Vol.A241, pp.376- 396 (1957).
9) T. Mori, K. Tanaka, verage stress in matrix and average elastic energy of materials with misfitting inclusions, Acta Metallurgica, Vol.21, No.5, pp.571- 574 (1973).
10) Terada, K., Kato, J., Hirayama, N., Inugai, T. and Yamamoto, K., A method of two-scale analysis with micromacro decoupling scheme: application to hyperelastic composite materials, Computational Mechanics, Vol.52, pp.1199-1219 (2013).
11) Koji Yamamoto, Takashi Murakami, Satoshi Iguchi, Zen Miyazaki Application Note No.58 Verification and Validation (V&V) of Uniaxial Tensile Test Simulation Results of Composite Materials: Fusion of Actual Measurement and Homogenization Analysis https://www.shimadzu.com/an/sites/shimadzu.com.an/files/pim/pim_d ocument_file/applications/application_note/11055/jpi320003.pdf
12) https://www.cybernet.co.jp/ansys/product/lineup/multiscale/multiscale/
13) https://www.cybernet.co.jp/ansys/product/
Download
- Application: Validation of Applicability of Modified Notch Compression Interlaminar Shear Test Method
